
I’m going to try to put together here a description of the best string-loop you could possibly have on your bow. The 'Catfish Loop' is NOT a typical string-loop. I don’t like metal loops because they are heavy and they tend to eat up the jaws of your release. The problem with standard string-loops is that they can come undone, which can be rough at times, and they are bulkier and heavier than my loop. The Catfish Loop is light, compact, strong, and cannot come undone. It will fit any bowstring, and can be used with any mechanical release. The 'Catfish Loop' isn't for sale because there is really nothing to sell. It has to be made and put on by the person with the bow.
To visualize the loop, think of it this way: Hold your first two fingers out in front of you, straight up and together. Then wrap a string around them four times. Tie a knot with the two ends of the string. Then slip the four loops together off your finger. This circle, with four loops in it, is the basis of the string loop. Lay all four loops, as a single ring-like circle, on your bowstring. Then, from the other side of the bowstring, grab the top and bottom of the circle and pull them together. You should be able to hold the eight strands of this loop together while lifting the bow by the loop around the bowstring.
To make the loop, first take a small board, and put two small finishing nails in it about one and five-eights to one and three-quarters of an inch apart (it’s good to do this, so that if the loop you make is too small or large, you can adjust exactly - it also makes making the loop easier). The best size for the loop is determined somewhat by the type of release you use, as well as the depth of the throat of your nock. I use .026 diameter braided fast-flight to make the loop. To begin, wrap four loops of braided ff around the nails, and tie the ends together in a non-slip knot. Take this four-layered-loop off the nails, and lap it around your bowstring where you think the loop should go. Now serve over the eight strands, just like you would a center serving, the business end of the loop (I use the same braided fast-flight for this). Keep it tight against the bowstring, so it will hold its position well. Wax generously. I use nocking points made out of four laps of half-hitched braided fast-flight, mainly because they are much lighter than brass nocking points, but suit yourself. I like for the loop to be able to turn on the bowstring, but, if necessary (say, for peep alignment), you can lock it in place with a bit of floss. One of the real advantages to this loop is that you can easily tune with it on. The loop itself can slide up and down, so all you have to do to tune your arrow for vertical is to screw the nocking points up or down and the loop simply goes with them. The other advantages, if they aren’t obvious, is that the loop cannot accidentally come off, since there are no knots to come undone (as in a standard string-loop), and it is much lighter. It also looks better (much more compact) on the bowstring. The finished loop is fairly stiff. It holds its’ shape well as a loop, and is very easy to hook your release onto.
Here’s a couple of updates since the above was originally written: 1) if it’s not clear, it’s good to use two nocking points, one above the arrow nock, and the other below, both INSIDE the string loop. These prevent the possibility of the loop pressing on the arrow nock. 2) Someone suggested that when you tie the initial four laps together that you can leave about 12 inches of string on one side of that knot to use for serving the loop. This saves an unnecessary serving underlayment on one side. If you go to the trouble of trying this, you’ll be surprised how easy it is to make and how well it works.
Another advantage that I’ve recently discovered: when you need to change your center serving (I recently switched to BCY #62 braid for center serving because I like the way it resists separating) you can remove the string (or brass) nocking points and slide the Catfish Loop out of the way. Then re-center-serve the string. After the new center-serving is in place, slide the Catfish Loop back in place and tie in new nocking points. I have three of these loops on three different bows and have shot thousands of times without even the suggestion of wear. Believe me, if you try this you will never go back to any other loop. Besides, it costs almost nothing.
If you are not familiar with how to serve a string, let me continue with the finishing of the loop. You should have four loops of braided fast-flight tied off in a knot. At the knot, leave about one inch of string hanging on one end of the knot, but leave about 12 inches of string on the other side of the knot. This is the string that you will serve the loop with.
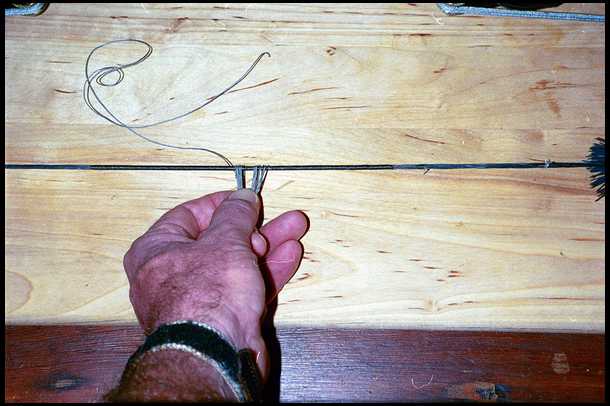
Lay the four overlapping ring-circles on one side of your bowstring and pull the top and bottom toward you from the other side as mentioned above. At this time, you should be holding eight stands in your fingers. As an image, you should be able to lift your bow by the bowstring by the loop in your fingers. The knot should be placed close against the bowstring (probably easiest on the bottom) on the shooters side. The knot should have two strings hanging down, one about an inch long, and the other 12 inches long. Lay the one inch piece along the loop - you are simply going to serve over it to keep the knot from ever slipping. Now take the 12-inch strand and start wrapping it tightly around the eight strands (actually nine, with the one-inch strand) that will comprise the loop. Start wrapping above the knot (between the bowstring and the knot), which should make your first couple of wraps tight against the bowstring. Do NOT wrap this strand around the bowstring, however, - it should only go around the loop. Carefully and tightly continue to wrap this 12-inch strand over the knot and around what will become the loop until you are about ten wraps from finishing.
Now, here’s the part that’s hard to explain to someone who has never served a string. (you could look at internet pictures of center serving to get the idea). Take a piece of dentil floss about 20 inches long and double it. Lay the loop of the floss on the rest of the unserved string-loop, with about an inch of the loop of the floss running on past the bowstring. Now continue to wrap the 12-inch string around the rest of the loop and the floss. Don’t wrap this part too tightly. When you wrap all the rest of the way to the bowstring at the other end of the loop, there should be an inch or so of looped floss still sticking out. Run the end of the remaining 12-inch piece (which is pretty short by now) through the floss loop (like you're threading a needle). Leave a little slack in the 12-inch piece. Now, by grabbing the other end of the floss (the two ends together), you should be able to pull the end of the 12-inch piece underneath itself and back out where the floss began to be wrapped over. This piece you pull through should NOT go around the bowstring. Whew!
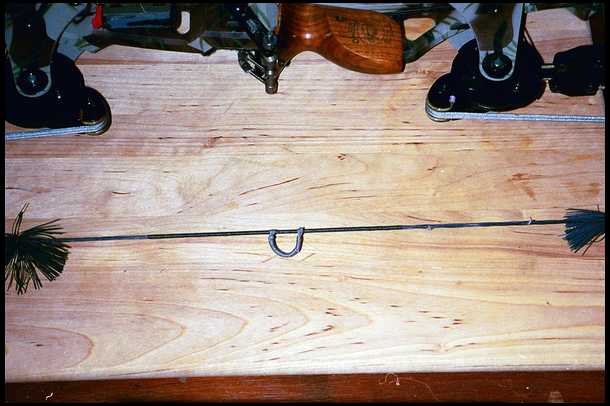
O.K., if you’re still with me....once the end of the 12-inch strand comes through, grab it (you should pull the loop of the 12-inch piece out until there is a single strand) and pull hard. This will tighten the end of the wrapping around the string-loop. You can now cut off the tag end of this 12-inch string as close to the string-loop (where it comes out about ten wraps from the bowstring) as you can and you’re finished!
I'll try and post the pictures that illustrate how to tie it below.


TJS
How ya been? You've been lurking too long. :)
I remember when you posted this a couple years ago and I promised myself that I was going to learn to tie a Catfish Loop. Well I didn't. But I did just have a string loop break on me last week.
So, perfect timing. I'll work on it this week and see how badly I mess it up. Thanks for posting this again.
~Troy
Put a CatLoop on my son's bow last night. Quick question, is there a trick or secret to getting the loop tight on the bowstring? I served it in tight and it was still loose. I was thinking about instead of just folding the loop around the string (180 degree bend) to wrap it around the bowstring (360 degree wrap) and then serve it in. Thoughts?
~Troy
Hey, Troy. I think your idea would work, but you would need to make the starting coil larger to accommodate the double wrap. You could also probably tie the loop in place with dental floss. I personally like the fact that the loop can rotate on the string, but then I use a peep with a stretch tube on it to keep the alignment straight. It's never a problem to turn the loop towards yourself to attach the release.
By the way, I use #62 braid for my loops now and have had one on for about five years with absolutely no wear on it at all.

