


First my boat setup.


Now for the lights. The lights were purchased from Econolight for around $34 each. They are High Pressure Sodium fixtures, which IMO are the best for bowfishing in muddy waters. They emit a more orange glow of light rather than bright white...but don't let it fool you. A 150 watt HPS light emits the same or more lumens than a 500 watt Halogen, without the glare associated with Halogen light output. No more squinting. And with fewer watts, less gas consumption on the generator. My 6 HPS lights equal less watts than 2 500 Halogens, but have 3x the light distribution for the same amount of power.
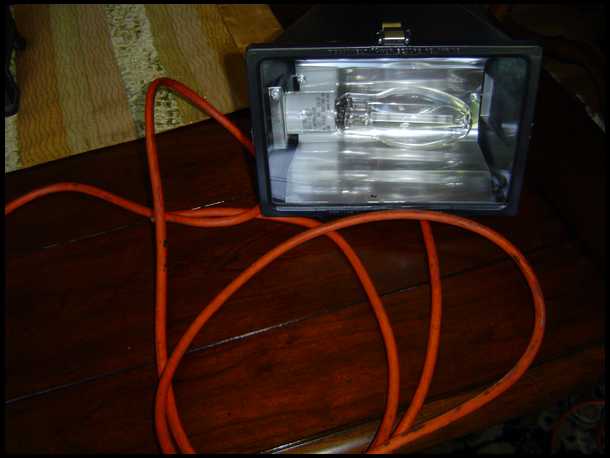
The lights are HEAVY though, each fixture weighs just under 10 lbs. They must be reinforced to match this when mounted. To offset this, I gutted the lights, removing the ballast and ignitor from inside, cutting the weight well in half. The only thing remaining is the Bulb and reflector plate in the housing. I cut up some old 2 wire 16 ga extension cords into 12 foot sections, and wired them to the bulbs, giving each housing a 12 ft insulated and secure cord. The finished light housings look like this.
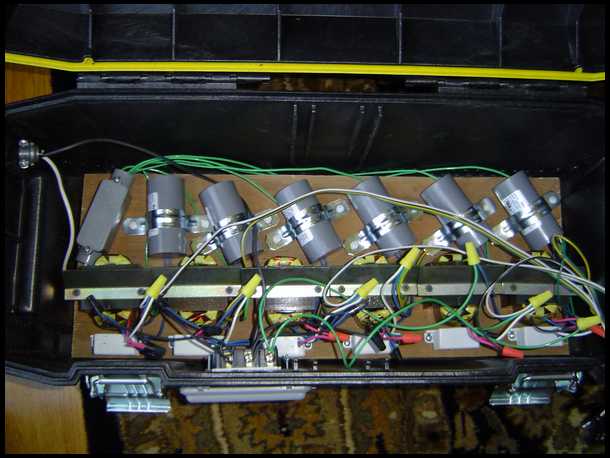

Anyway, Now I have to find a home for 6 ignitors, 6 ballasts, and 6 capacitors. I chose a Stanley Fatmax toolbox, modified to become the ultimate bowfishing power source. I cut a board to fit in the bottom, and began screwing everything into place in neat rows. While wiring the circuits back together correctly, I clipped all excess wires to make it tidier. I added in 3 power switches between the box and the generator power source. I did this for good reason. firing up all 6 at once would seriously strain the genny for amps...overload it. They require alot of amps at start up but once warmed up, the bulbs draw hardly any amps. 1.2 or 1.8 I believe. I stripped old extension cords when wire was needed, to save on costs.
The box has a regular extension cord male end from the power source...it could be plugged into the wall. From there, I separated the wires for the positive and negative side. the negative goes to a grounding block where it is connected to all 6 negatives straight to the bulb. The positive powers the 3 light switch. Each switch controls two light fixtures. One switch for the side, front, and other side of the boat. From the power switch, it gets complicated. Anyone seriously interested in wiring one of these, Ill try and dig up a wiring diagram to show you, but it isn't pretty. Not complicated once the first one is done, but overwhelming at first. Once it runs through the three components of each light, the fixtures are connected through three trailer light connections to the fixtures. Both the positive and negative are ran through these plugs.
So for power, I plug the box into the genny. Plug the three plugs from fixtures into box. fire up the genny. flip the three switches in sequence...and we are done. 5 minutes later the whole lake is practically lit up. Plug and play.
The pros of using a box, are great for smaller boats. the weight of the fixtures can be trasnferred from the front of the boat by moving the box. It helps. Weight isnt an issue for my tank, so I leave it under the deck up front.
The finished product is shown above, but it isn't NEARLY as complicated to wire as the picture seems. Caps are in the back row, ballasts in the middle, and little ignitors up front...trailer leads to light fixtures on front right, light switchs front center, and power plug leaving out the left side.


Im sure I forgot something, if anyone is interested this whole setup runs about 300-400 dollars if you do the work yourself, and is a SAWEET light setup once installed. The toolbox can be unplugged and removed to deter theft inbetween shoots as well.


Hero Pic, 4 men onboard total. One spotlighter and troller, one filmer, and two shooters at all time...just rotated. Wish we had all of us shooting, the fish would have likely sunk the boat. 50 fish total, guesstimated around 500-650 lbs depending on which of us you asked.
I'm going with 10 -250 watts HPS on my next rig for next season on a 2070 polar craft or xpress boat.

