Brown Bear Mounting - Razza's Taxidermy
General Topic
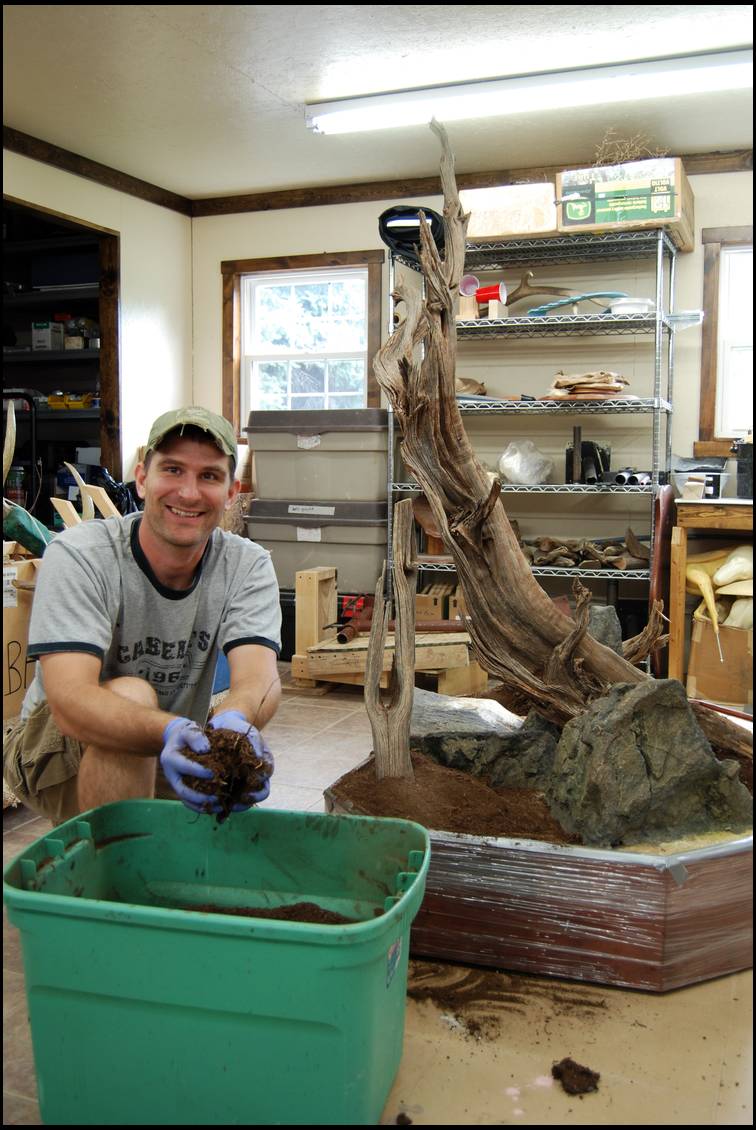
Over the next few days I'm going to give a step by step on how I did this Kodiak mount. If you have any questions feel free to ask. Thanks Dennis
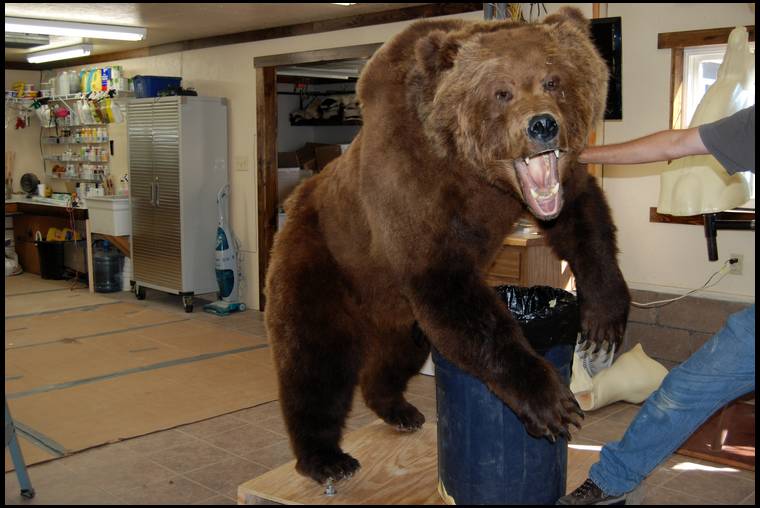
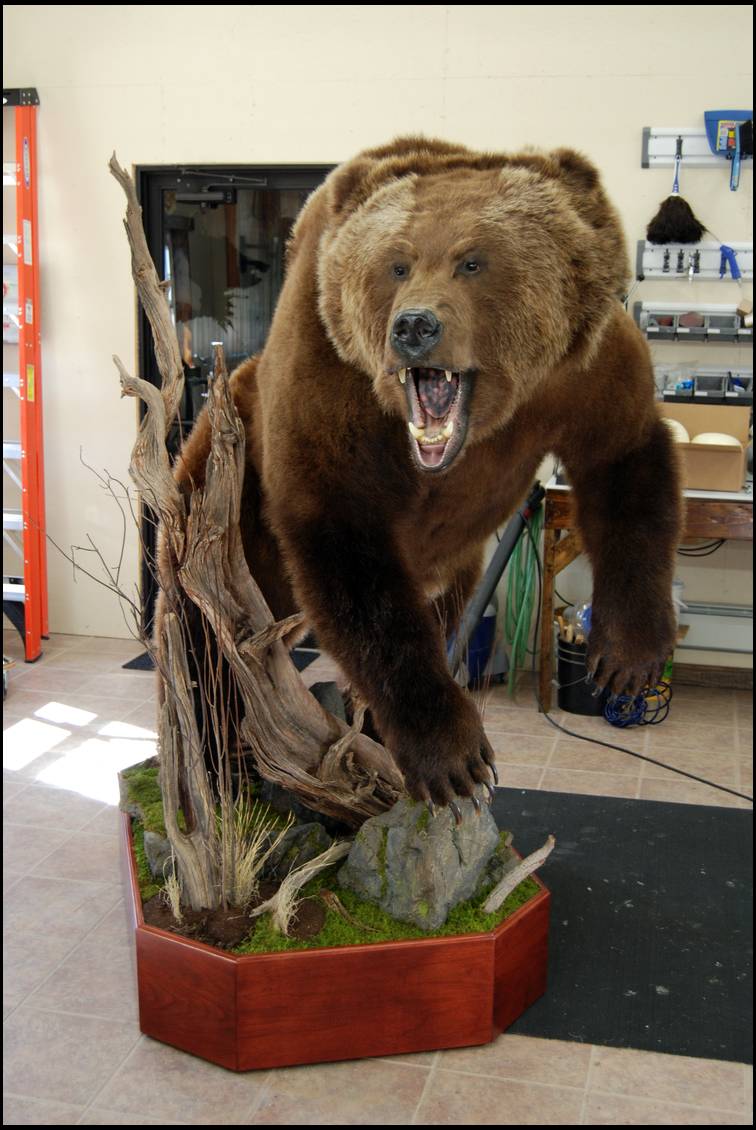
The hair quality was very poor on this bear... Rubbed hard all over and even short haired on center of his head. I thought I would do a thread on this bear because of the form alterations to the pose.
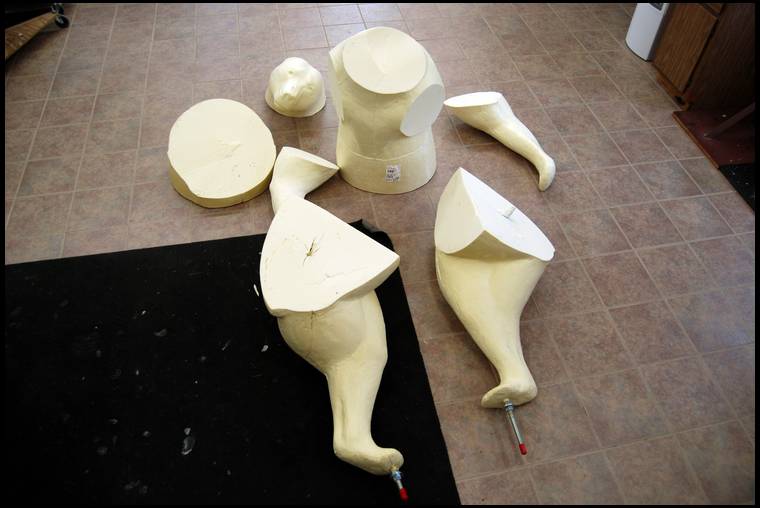
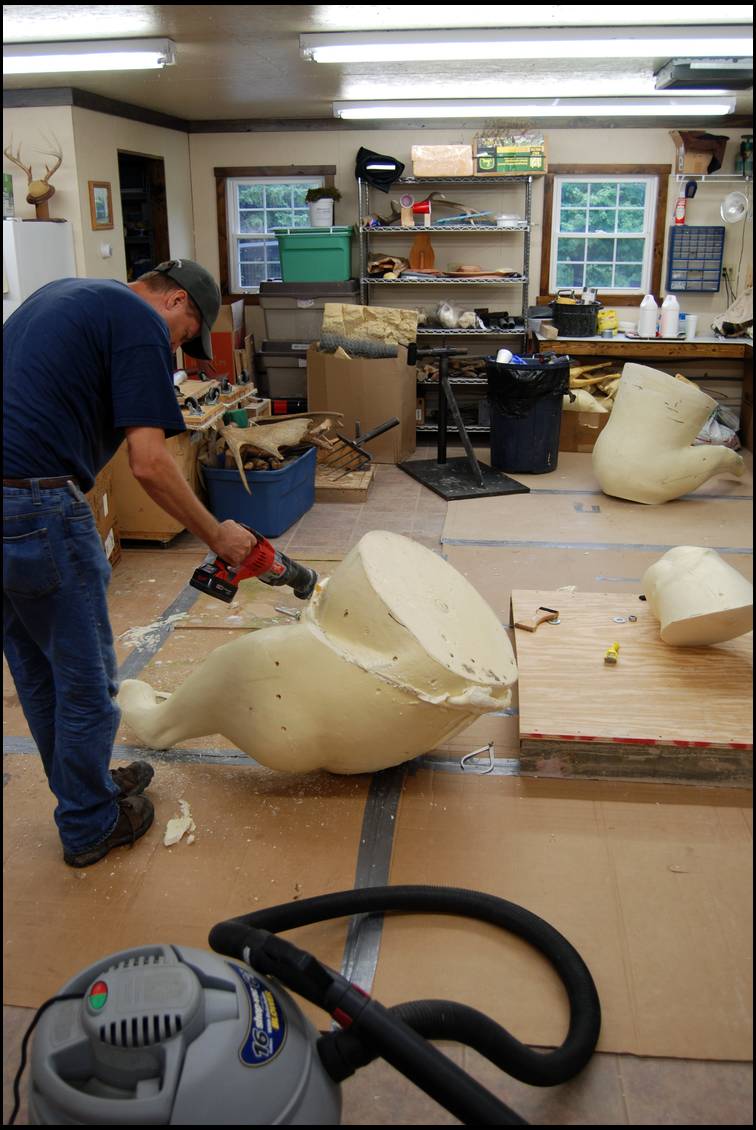
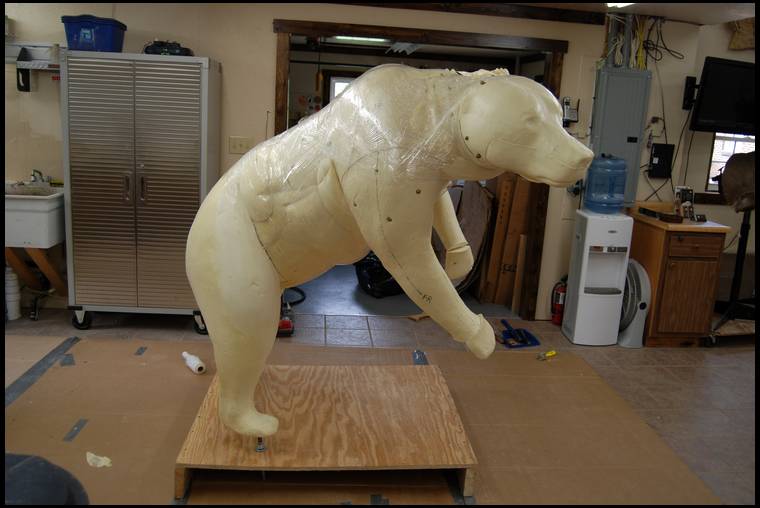
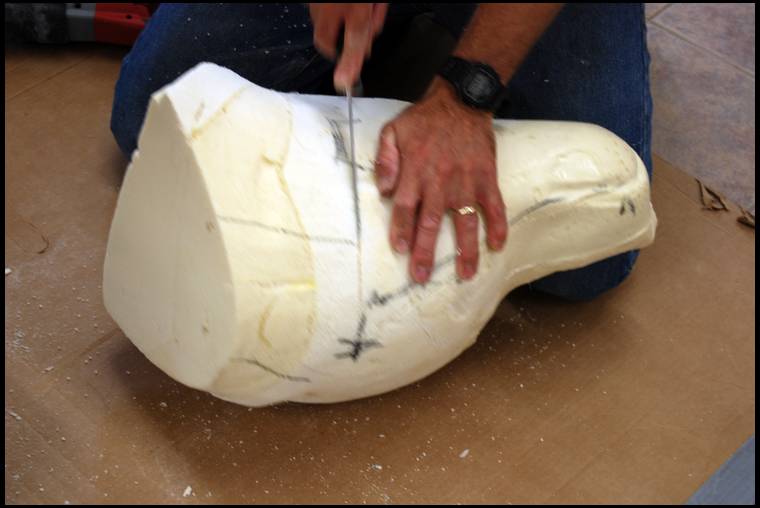
This is what I started with. The form shipped in pieces.
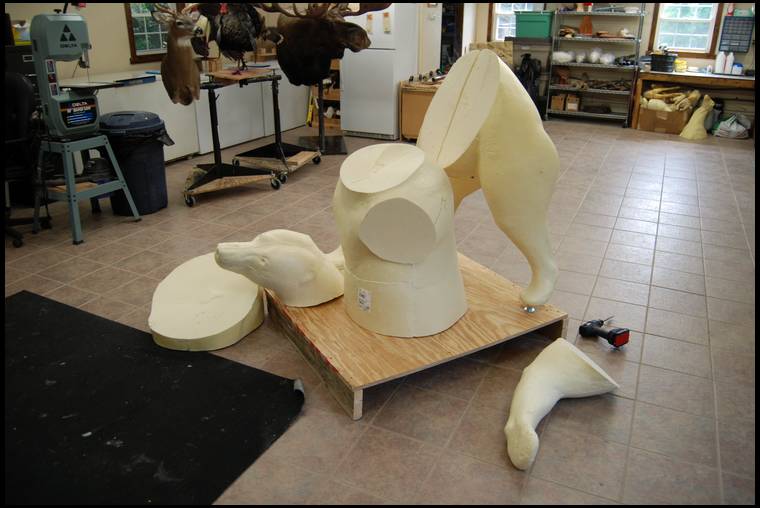
Starting to put the form together.
The form put together before form alterations or test fitting the hide.
Are you sure your a real taxidermist? I've got 3 different taxis I go to and their shops look like pig styes, but your shop looks like they just wheeled the open heart surgery patient out! Hahahaha, anyway, great idea! Mike
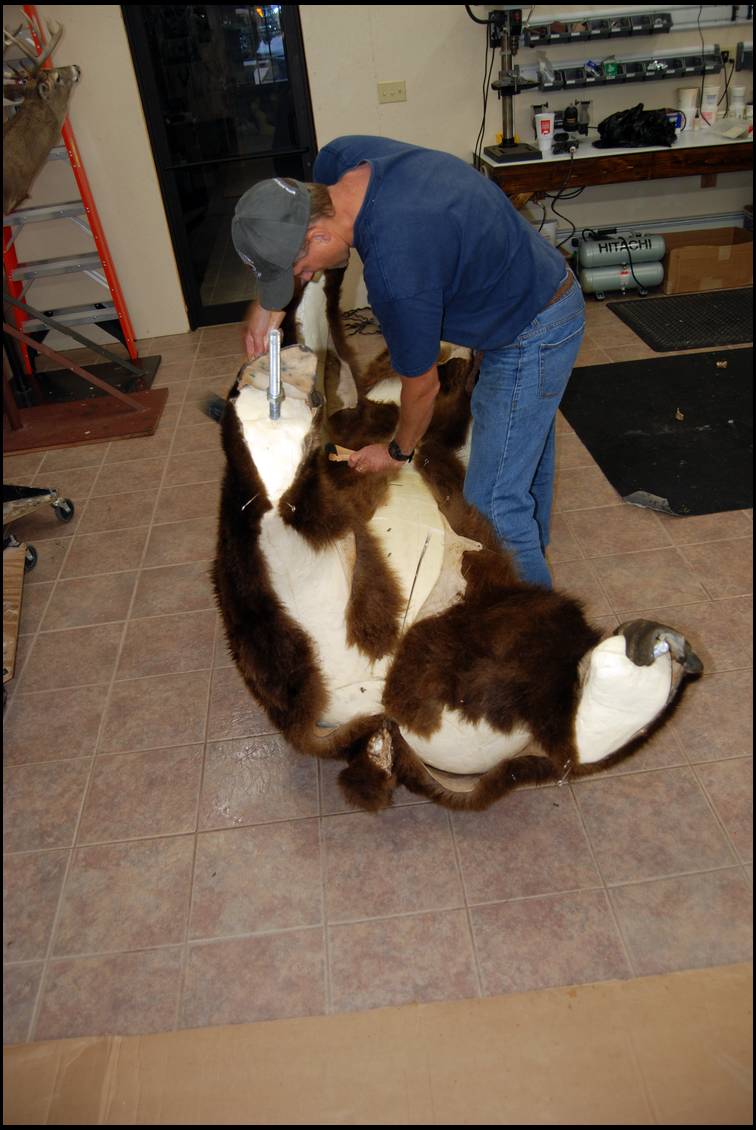
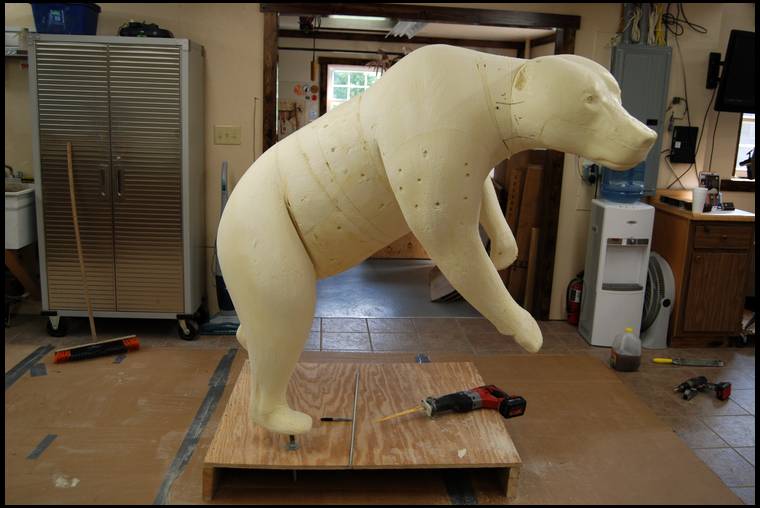
The hide and the form getting ready for the first test fit.
Mike- Thanks, I hope to show some cool stuff.
Test fitting the hide.
Florida Mike- Definitely not a surgeon!LOL. It's nice to find my tools when I need them.
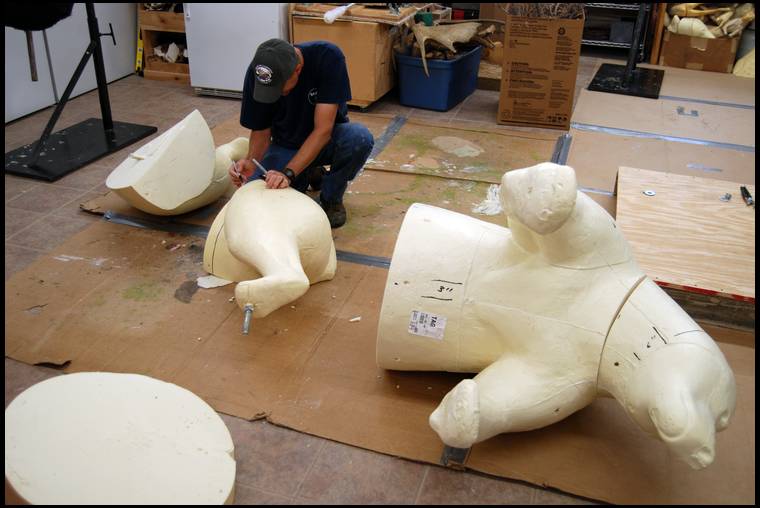
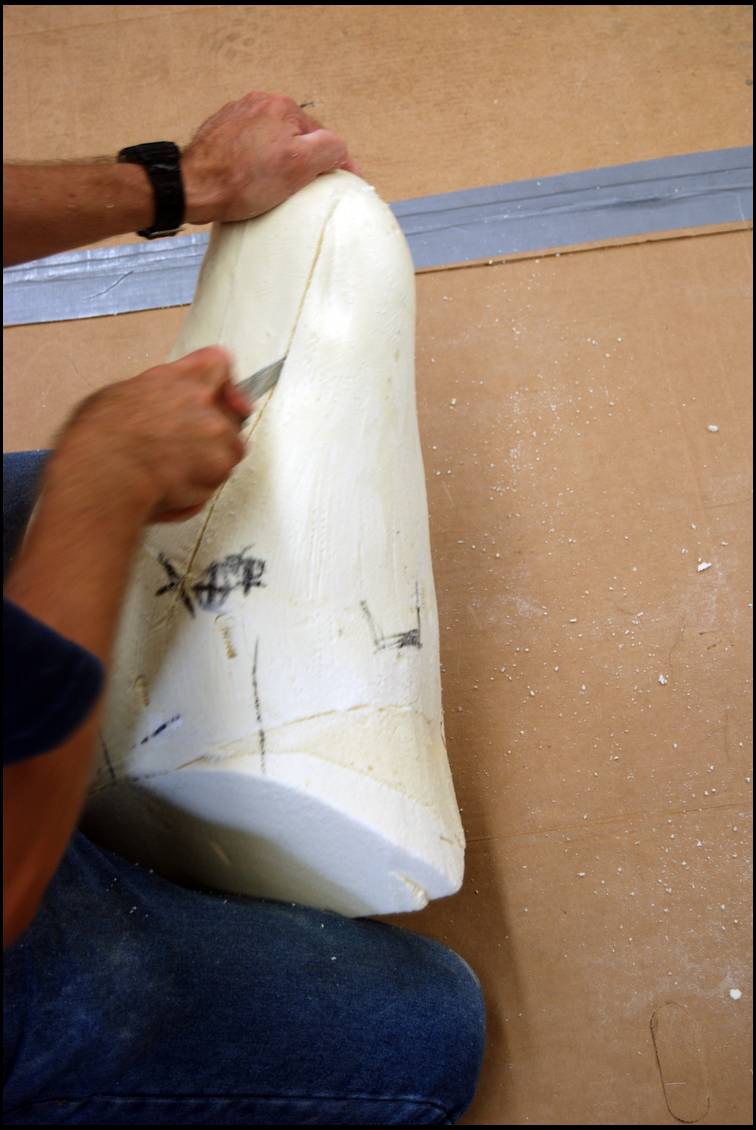
After I test fit the hide I'll take the form apart and alter the form to fit the hide. The next series of pics will show altering the form to size and also position.
Pretty cool, looks like a lot of work! The bear looks amazing.
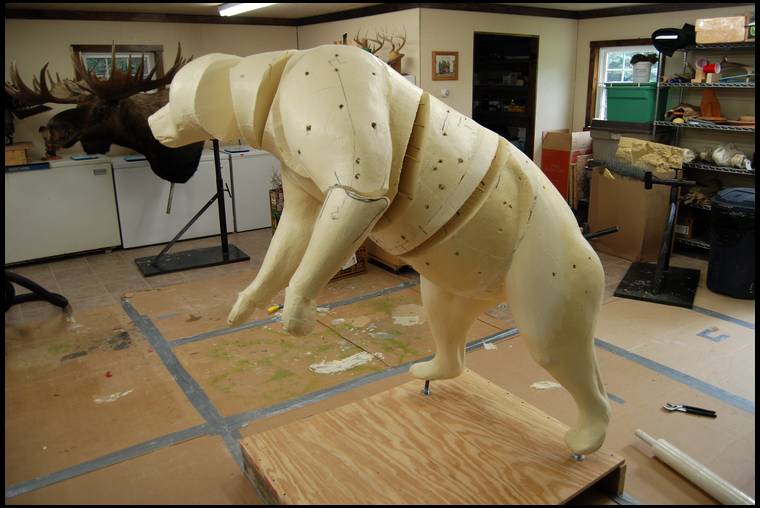
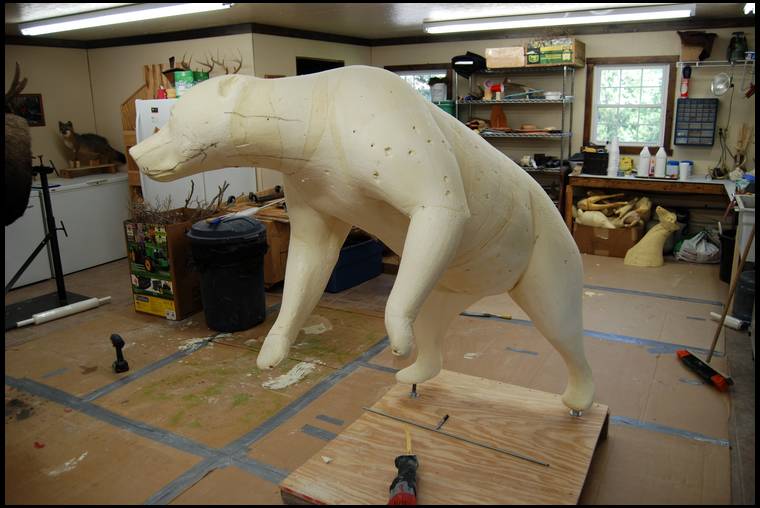
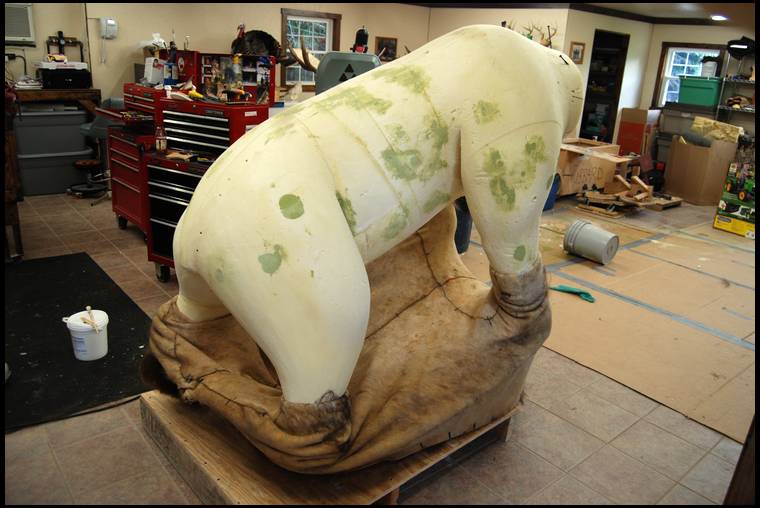
getting the form back together into the new pose.
A pic of the back of the form to show how much we turned the bear. Now we will have to fill the gaps with foam and reshape the body.
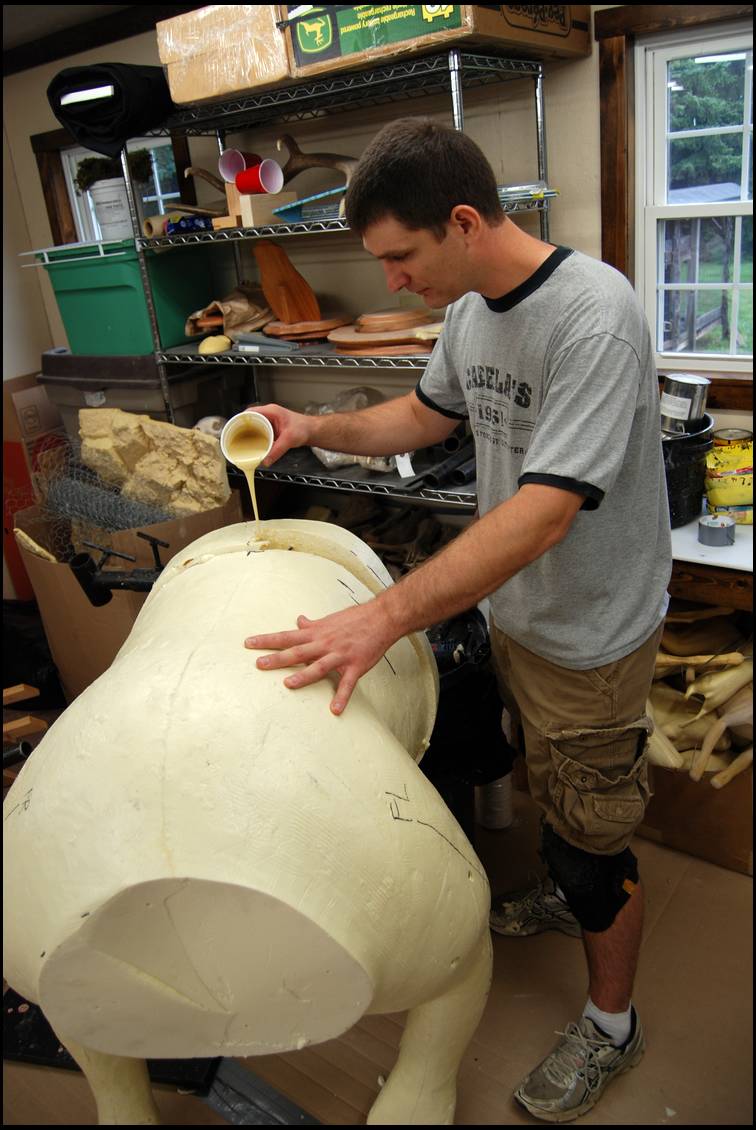
Here's a few pics after we foamed the form.
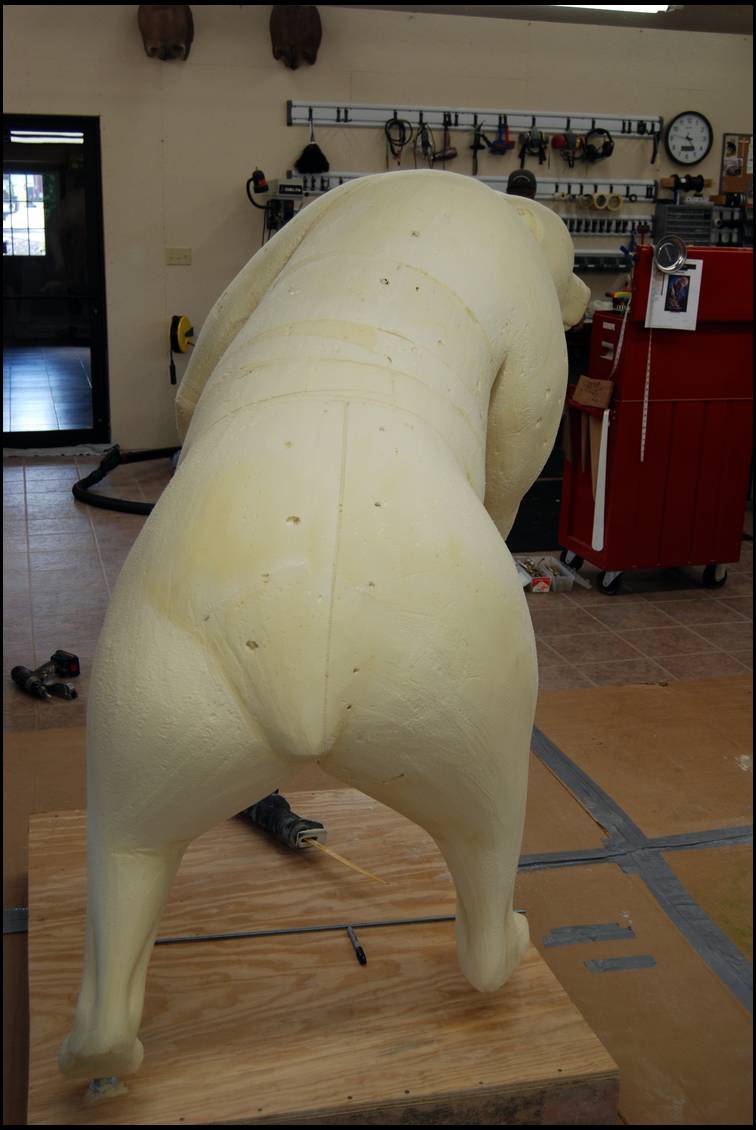
I shaped and sanded the form. Here's pics after shaping.
Now I test fit the hide and make sure it fits.
Tomorrow I will go over how I did the open mouth. Thanks for following, Dennis
Dennis, on the big gaps where you turned the form, do you use other hunks of foam and then fill it in the liquid or do you just use the liquid?
Also, I know there are few lifesize bear forms so you need to customize, but what about deer? Are there enough varieties in size and style that you don't need to customize every form?
Thanks.
What a treat seeing the entire process. A great artist and business man. Great job! C
Simply amazing Dennis, this thread definitely justifys the cost of a bear mount to me. Mike
Thanks guys! Mike N- Sometimes I'll put the extra cut off pieces in the voids to take up room and use less foam. On this bear I used just foam.
They make a lot of deer sizes and poses. I do alterations to about half the deer I mount. These are usually minor... like changing the eye to nose or head width. A deer from Canada doesn't fit a deer sculpted from the south very good! After test fitting, the skin & hair patterns will tell you what needs to be changed to fit properly. Thanks, Dennis
Geezzzz-usssss!!
That first pic scared the heck out of me!!
It looks so lifelike!
Great work for sure.
Good luck, Robb
New appreciation of what it takes Dennis.
Great post and very interesting to follow.
cool stuff, thanks for sharing. you are very talented.
great looking, AND CLEAN, shop.
It is neat to see this process. Thanks!
This is great! Thanks for sharing this with us!
Very cool. I hope to get a brown bear some day. I always figured I'd have a rug made, but that sort of pose would be really cool to have in the house, especially seeing people's reaction when they came around the corner and saw it...
Great thread Dennis....thaks for sharing all the intricate details!
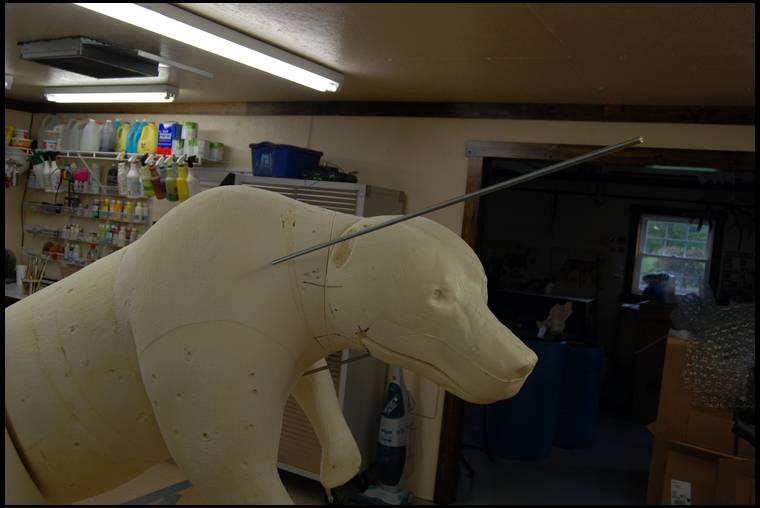
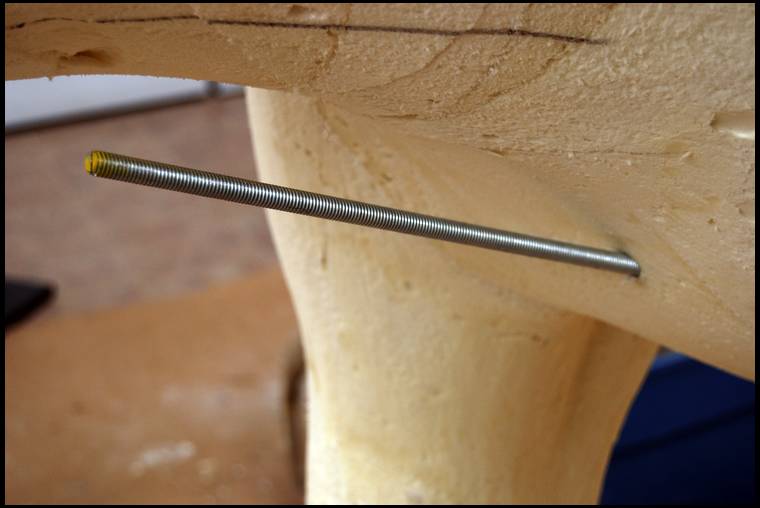
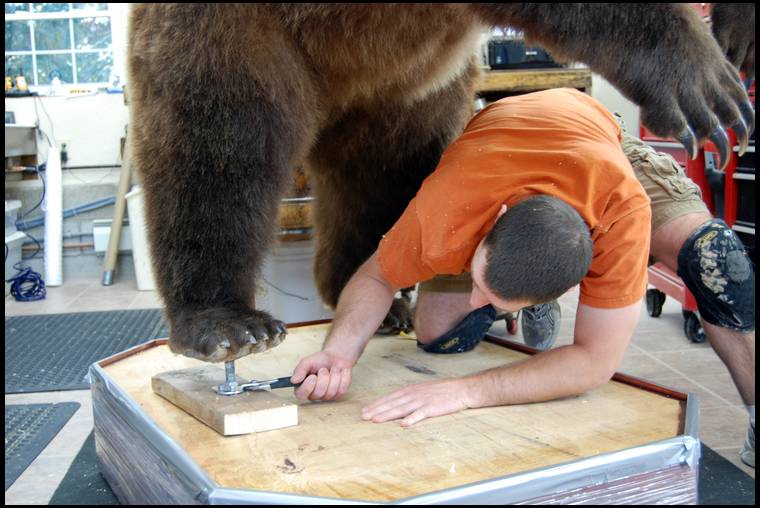
Thanks for following everyone! Before I start with the open mouth alterations here's a few pics of how I reinforce and support the form where I made all the cuts.
I take 5/8 all thread and run through the body everywhere I cut the form in half. I run them the whole length of the body and up each leg.
I run the rods in with a drill. I put a slot on one end and use a screw driver tip in my drill to counter sink.
This bear had 12 rods total.
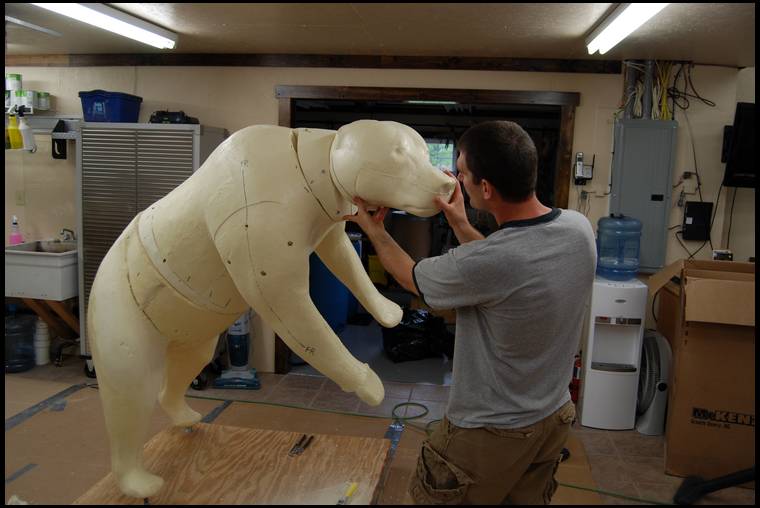
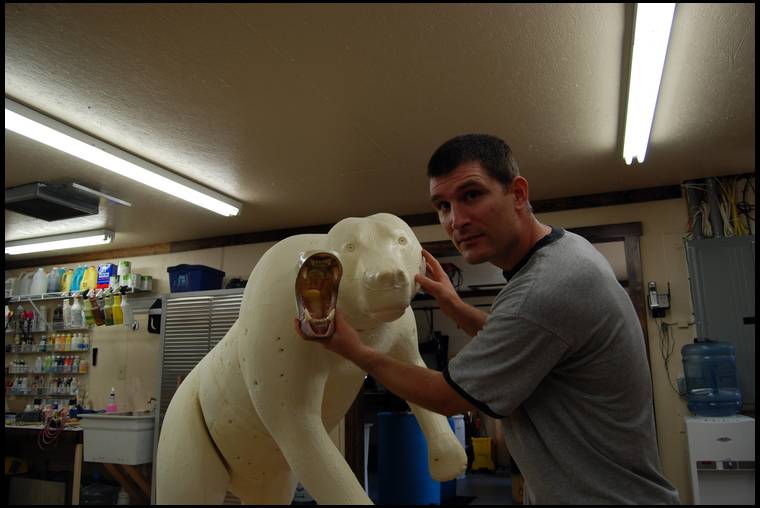
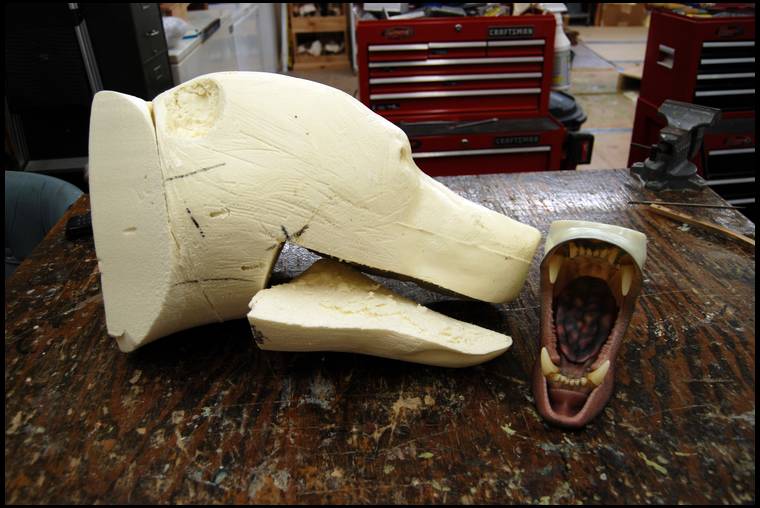
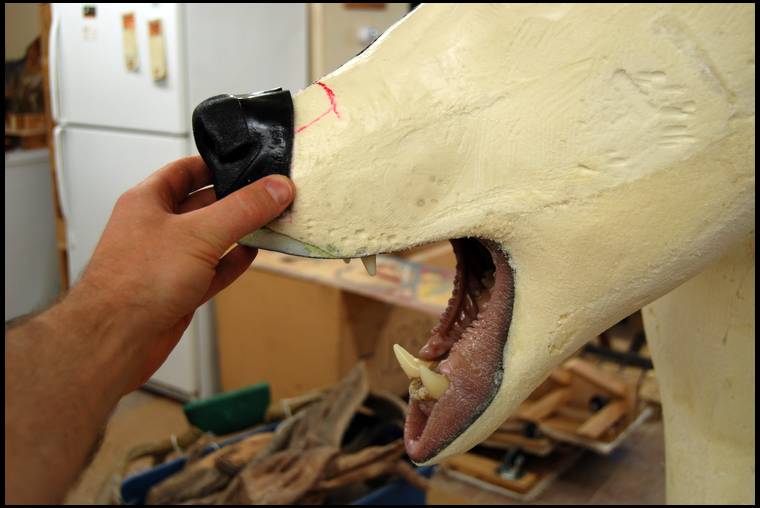
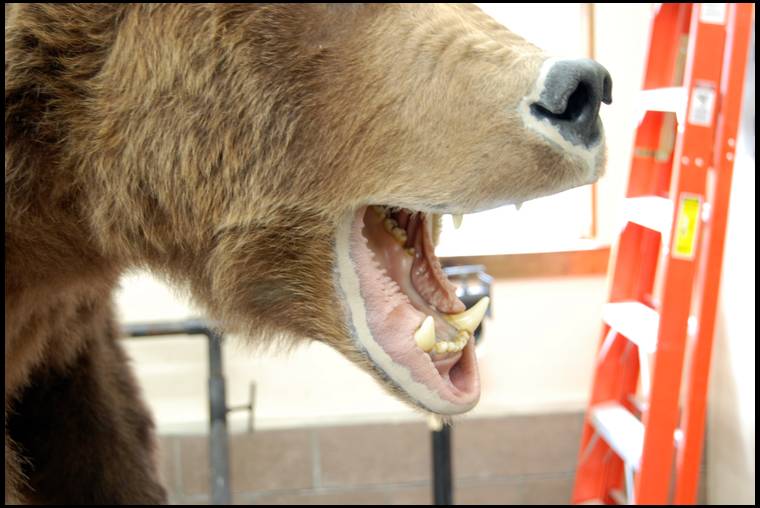
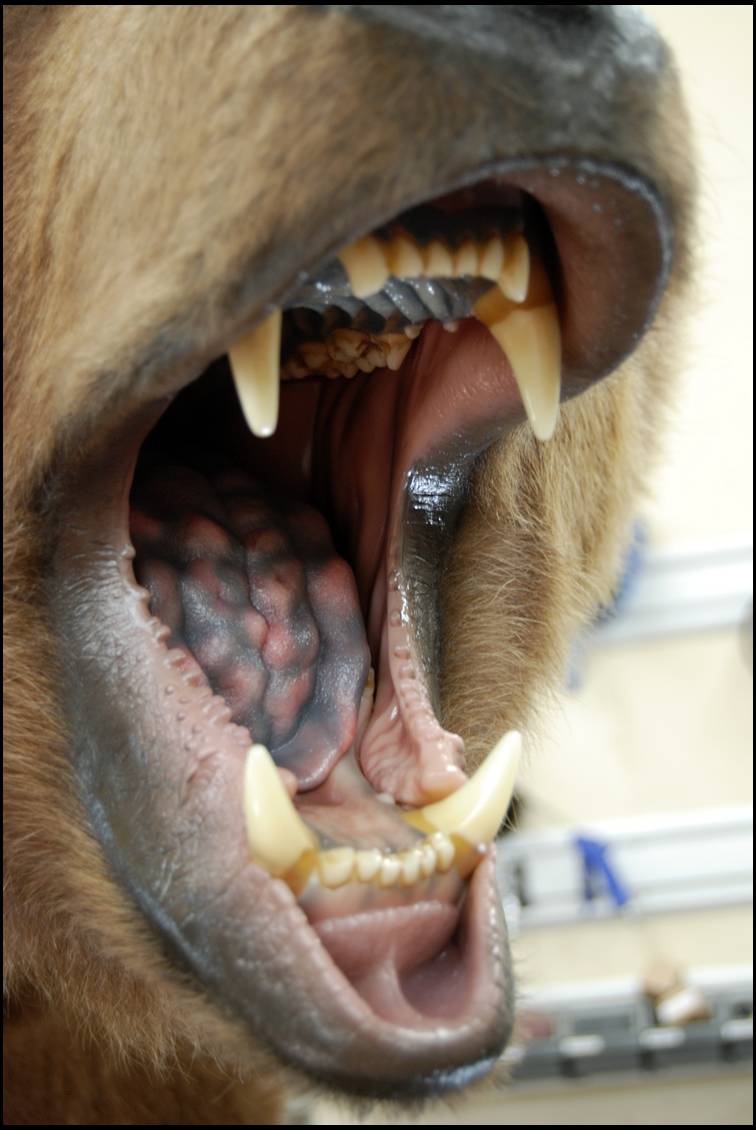
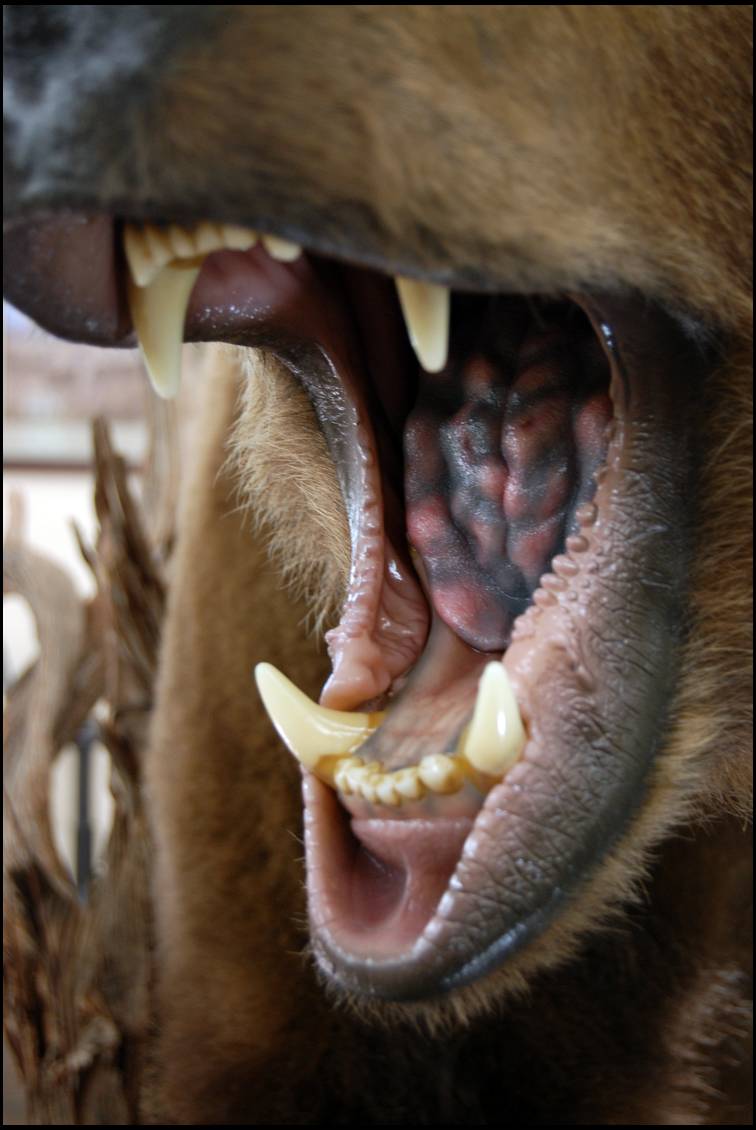
Now for the open mount. After I have the head cut off so I can work on it easy. I make a cut where the jaw would hinge.
I carve out the foam inside of the mouth to make room for the mouth insert.
After I have it carved out, I bondo It in place and put it back on the form to make sure it's in the right place.
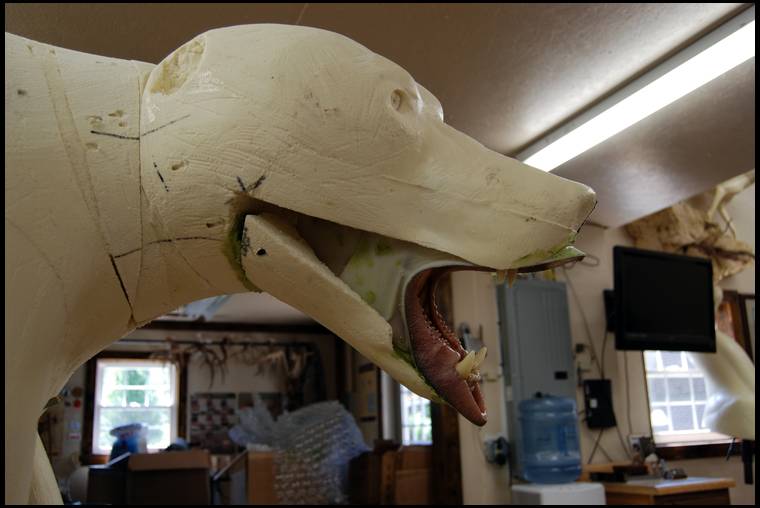
I fill the checks with foam and rough shape to lips. I can cut the nose off now that I have the jaw set inplace. I will be using a cast nose in place of the original foam nose.
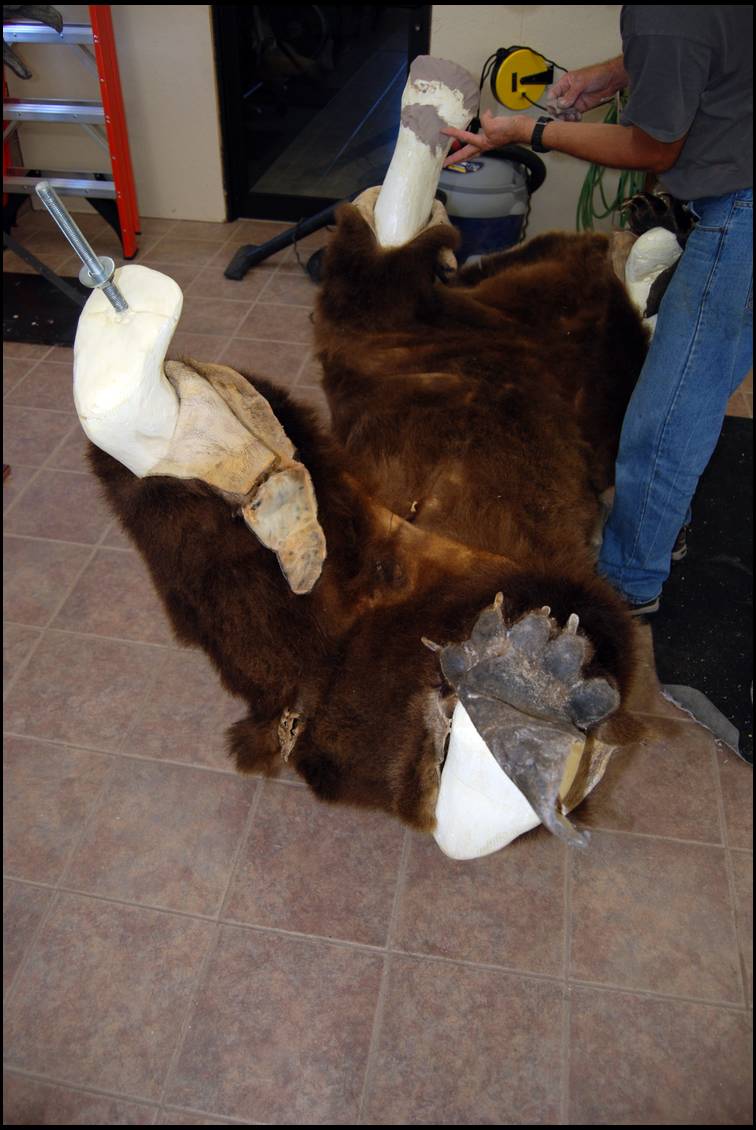
Ok...so I got a little lazy with my pics on the next few steps. I forgot to take pics of how I prep the hide. Basically after I get the nose on and head preped I move on to thinking the hide and sewing the belly and legs up. I also cut the bear down the back. The reason I do this is it makes a much cleaner seam in the finished mount
Tomorrow I will go over mounting the bear.
You can see in this pic the stitches from sewing up the belly and legs during hide prep. Notice the black lines along the back seam... I put these on for reference point before I cut the bear down the back so when I sew I keep everything in line.
Wow, awesome thread, very impressive
Very cool, thanks for sharing! Definitely an eye opener to how much work it takes for a great mount!
Is it better to have a dorsal cut for full body bears??
Yeah Ned brings up a great point. How should we skin some of these critters? Cut the belly or cut the back? Also what is the prefered method of preping the hide to ship to you? Mike
loesshillsarcher- IMO Yes, I recommend dorsal cut on bears unless you have issues in the field were you need to get the hide off faster due to weather,heat,ect... A dorsal cut on a bear makes for cleaner seams and a better finished product. I like to dorsal cut most all life size but there are exception like cougars and short haired animals (african,early season whitetail,ect.)
Mike- You have two options. Turned and salted or frozen. Both are safe and easy. If you ship frozen put in a cheap styrofoam cooler and duct tape the seams. Ship on a Monday or Tuesday and contact the studio when you ship so I can track the package. Also put all info inside and out like name, address, phone, tag or seal #, ect... Usually you can ship a whitetail size animal to the studio for around $20-$25.
If you ship turned and salted you can either have it prepped by an expediter, outfitter/guide, or local taxidermist and they will ship directly to the studio. I supply preprinted shipping labels for this. Contact me a few weeks before the hunt for labels.
I'm going to try to put a few short video clips together on skinning, caping, packing, and shipping and will post. Thanks, Dennis
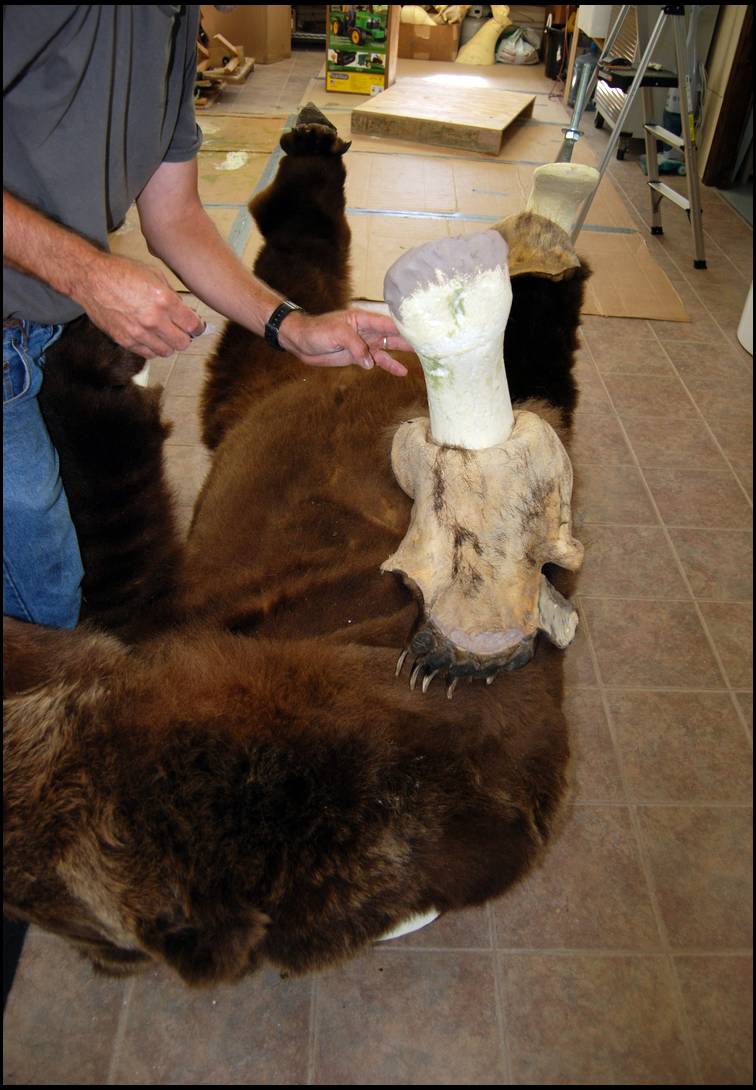
I start the mount by slipping the hide on his legs and doing the feet work first. I'll clay and shape his toes and sew up the feet.
forgot to mention that I mount the head while I have it cut off. It's easier for me to do this on a table with the head in front of me than on a ladder with the head attached to the form.
After I have the feet all done I bolt the bear down and roll the hide down to his feet. Now I can apply hide paste.
After I get it pasted I pull the hide up and attach the head permanently. Then start sewing.
After I have it sewed up and adjusted I blow him off with a shop vac on reverse. This will help clean and set the hair.
I'll watch him close over the next couple weeks while he dries and make any adjustments necessary.
After he's dry I will remodel and paint. I will fix all the areas around the mouth and nose where the skin meets the casting materials.
Tomorrow I will start the base work. My favorite part! Thanks for following, Dennis
Nice work Dennis!
Since you cut the hide down the back, is that the way you would prefer to have the hunter skin them in the field? Or do you prefer to sew up the bottom side, then cut the back side and do it the way you showed here? Just curious is all.... Thanks!
Well thanks for showing us the detail that goes in to the art of taxidermy. Really interesting and for those of us that have taxidermy mounts (or will in the future), you've given us a great insight to what great taxidermists do.
Even though I don't have any mounts by Dennis I find this a fascinating thread. I'd like to see him to a shoulder mount on a deer next.
Thanks.
Nick- I recommend a dorsal on bear whenever possible. Sometimes it's not an option when in the field going against time and the elements. Also nice not to have a seam on a standing bear down the front.
Mike N- I can do a deer! I'm all done with my deer from last season but they are already starting to come in. As soon as I Start one I'll do a thread. I should be able to give a more detailed thread with a deer. A life size thread on a bear would be way to many pics to give all the details. I try to do my best to give a good overall idea of the the process.
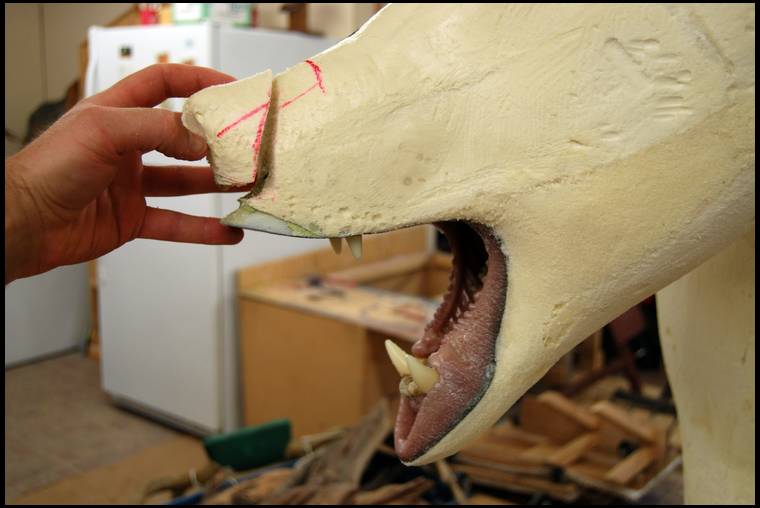
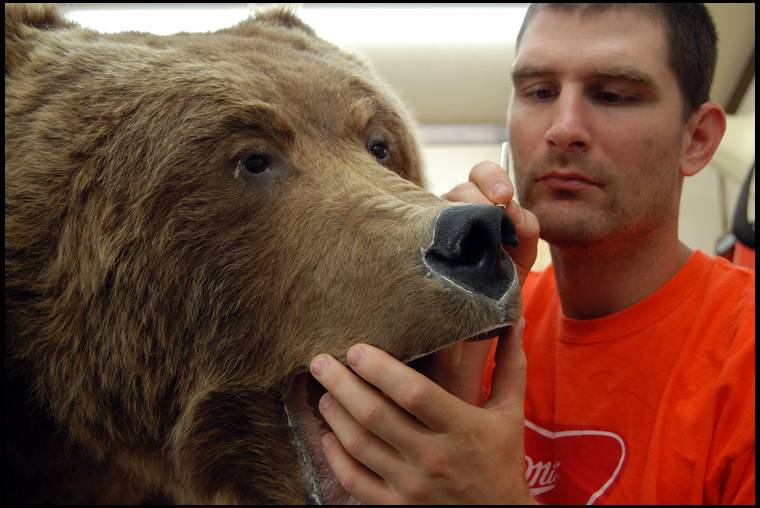
Here's a pic of the lips after I sculpted them.
another view of mouth and nose.
I'm starting to get an understanding of why guys don't seem to want bear work in their shops around here. Looks like a ton of work for guys who are 90% whitetail taxidermists.
Owl- Yeah, It's hard to find forms that fit good. You need to be good at altering to size and this takes a lot of time. Deer you can usually find someting that fits.
another view of epoxy work to nose/mouth.
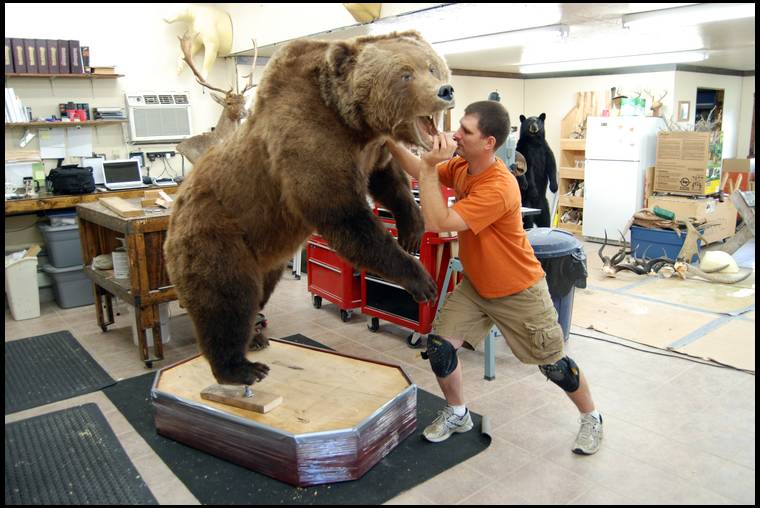
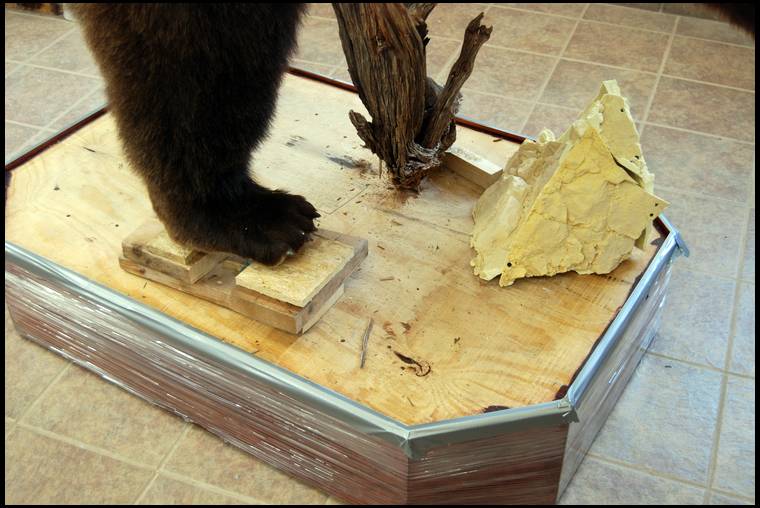
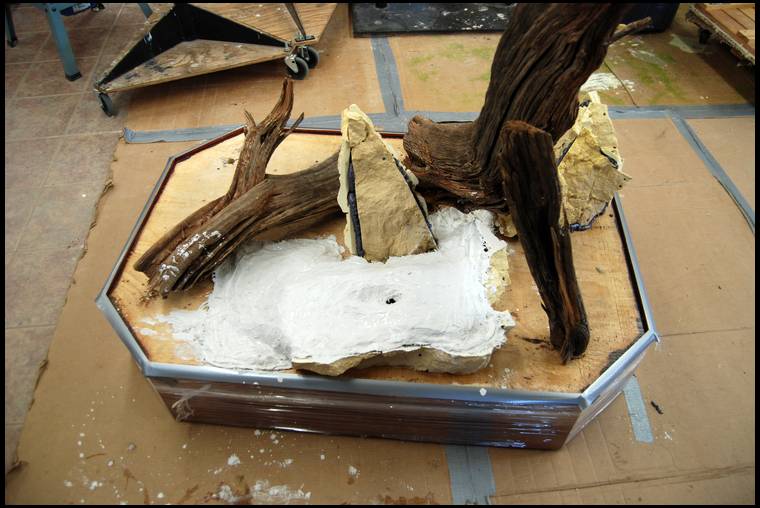
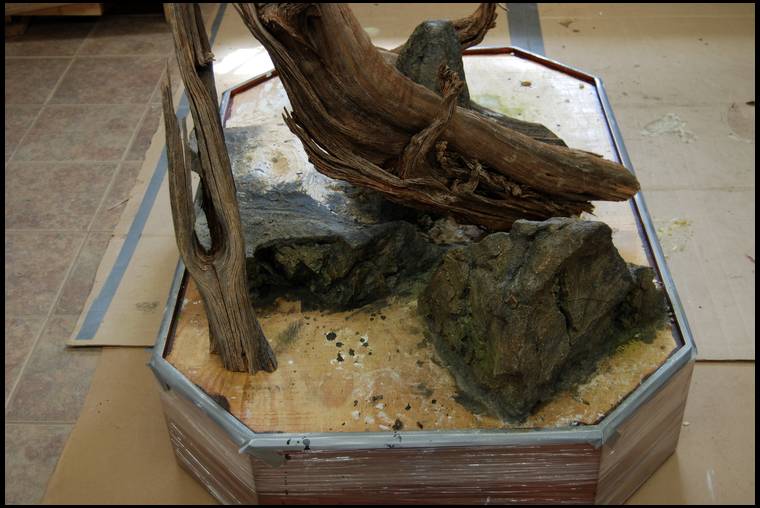
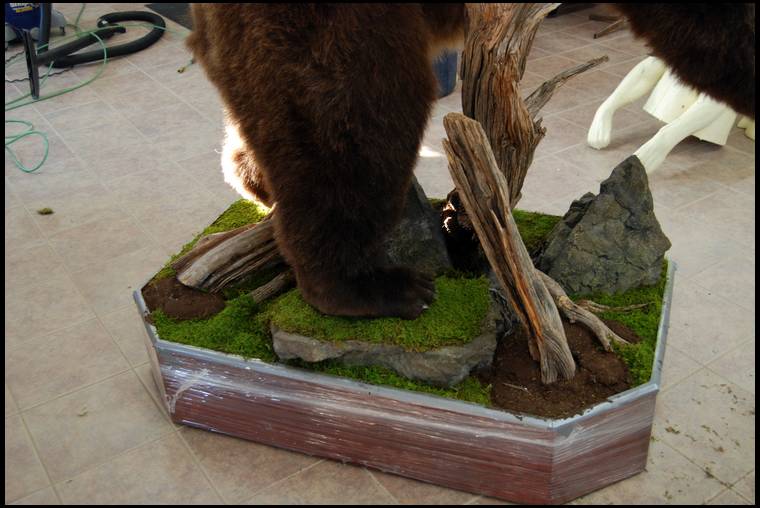
Now for my favorite part! the base and habitat. I move the bear to the finished base and bolt him down.
I will level the bear by adjusting his leg rod bolts. I should mention that I wrap the base in a plastic to protect it from paint, plaster, and scratches while I do all base work.
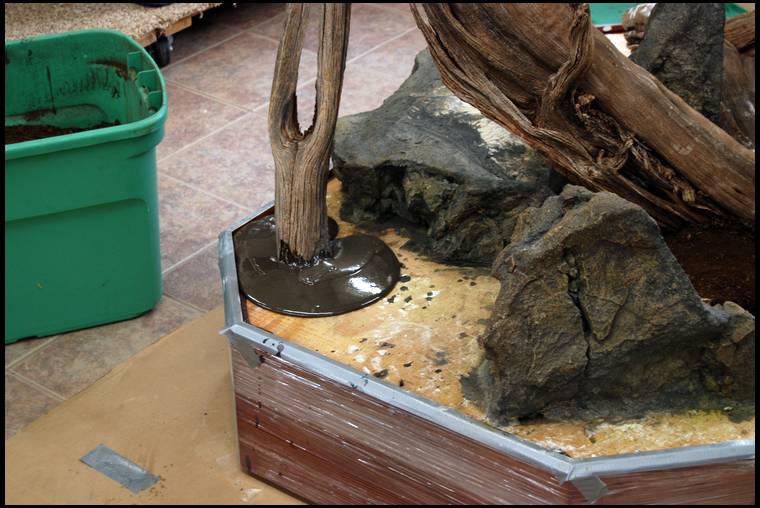
Now that I have him bolted in the pose I want, I can stand back and take a good look an get a mental vision of the habitat. I will start with a few big drift snags to balance out and help compliment the action of the pose.
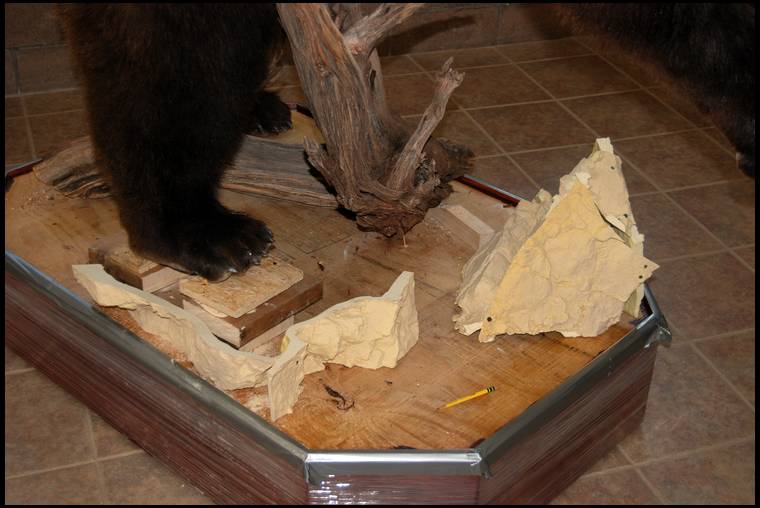
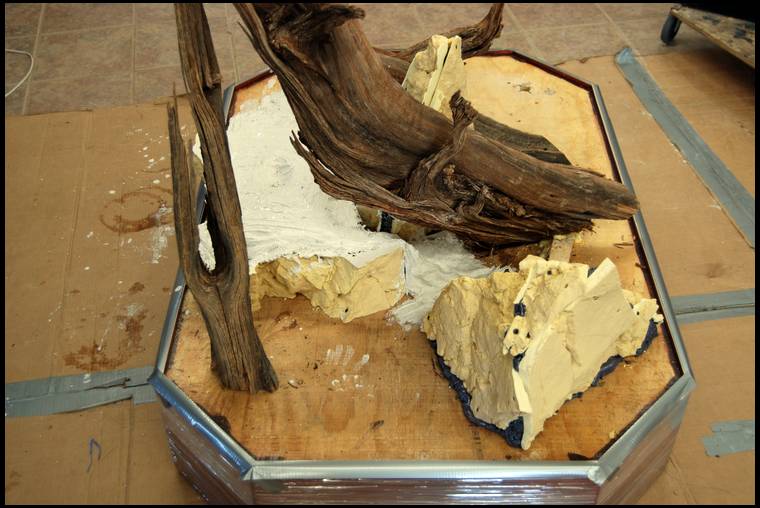
Now I start building my rocks. I cut and shape to size.
Sorry for the blurry pic... I use chicken wire to shape areas where I want some ground contour. I will later use burlap dipped in plaster and cover this wire.
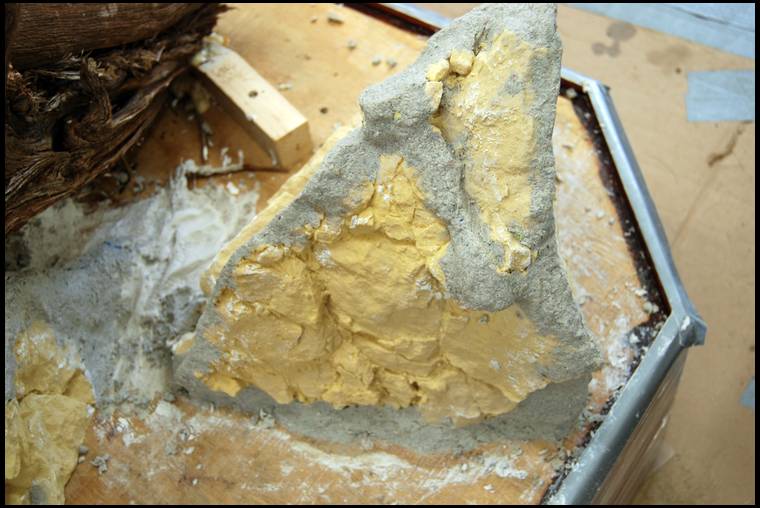
I take the bear off for the next few steps as it tends to get very dirty. I put a sealer in the joints of the rocks I made. This helps glue them together and holds the seaming compound.
Do you have to do anything special to the form to create the wrinkles in the nose?
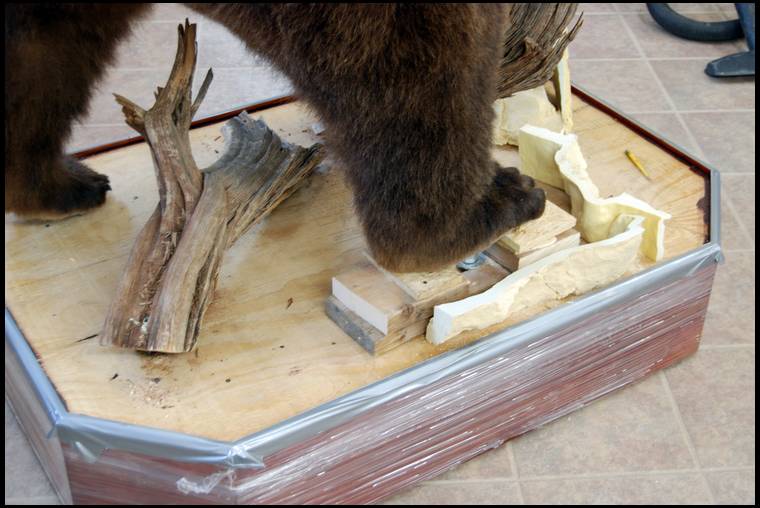
I apply the burlap to the wire.
I fill and shape the seams on the rock with a special mix I make to blend in the edges.
Another angle... will continue later.
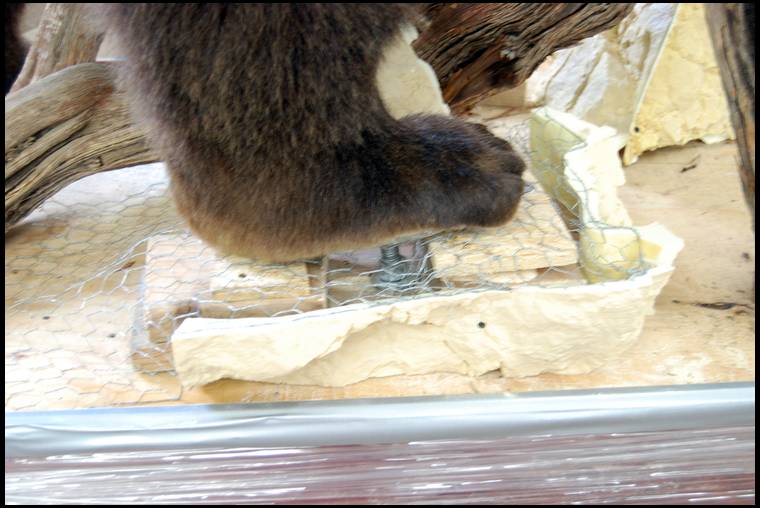
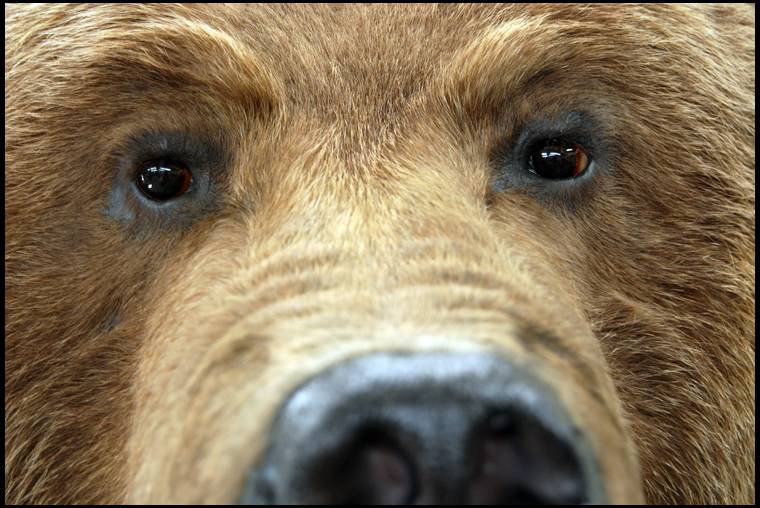
Robhood23- I sand the wrinkles in the form and use clay to soften them. I use good reference and anatomy photos while doing.
Very cool, any chance you can post some close ups of the face (finished). Defiantly first class work. thanks for sharing.
So about how many hours do yu have into this at the point you have shown? This is really cool - and I must say, you make it look really easy (in you nice HUGE clean work area).
Awesome stuff!!
Huntnbiggame- on the way... I might have to take a few tomorrow.
Bogey- Some go together faster/better than others. Just an est on this bear of actual hands on would be about 40-50HRs my time and 15-20 Hr my helper. This doesn't include the time uncrating, boxing, and shipping hides to tannery and going over pose with customer. It may take me longer to finish this thread than it did to mount the bear!LOL
After I seam the rocks I paint them.
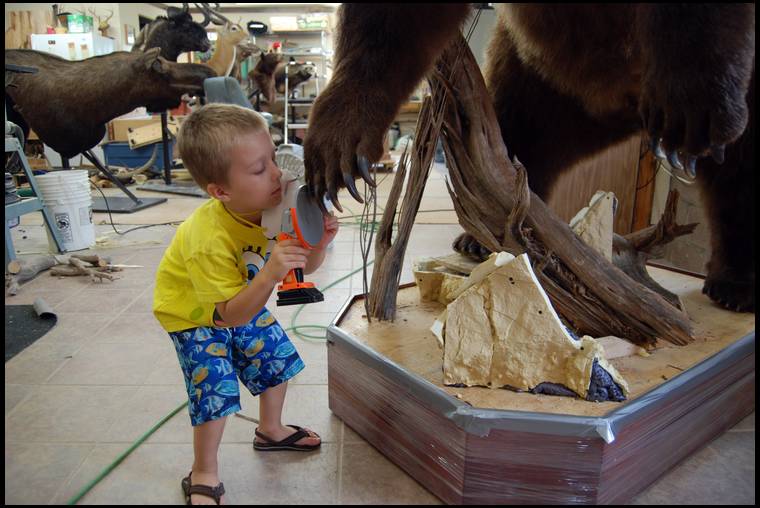
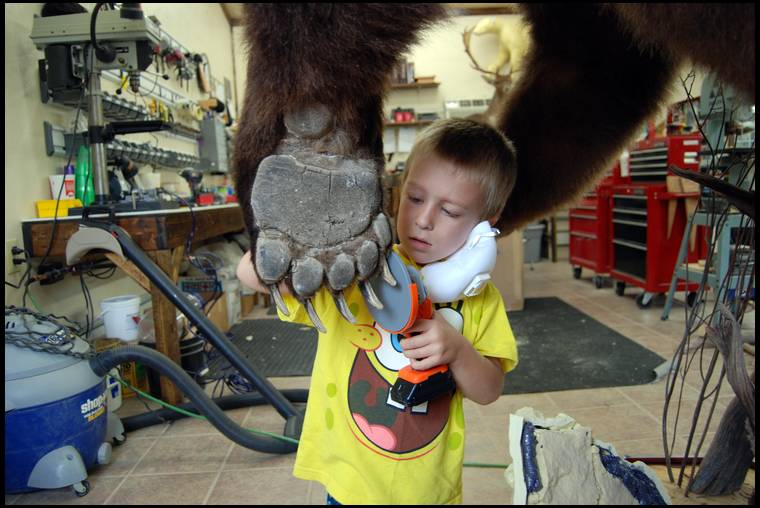
As always this is about the time I bring in the major help! A few pics...
He's really gettin into it now!!LOL
Look at the intensity on Reeds face...Cracks me up! This pic shows just how big the paws are!!
Ok, Back to the project. The rocks are painted, now I mix up a foam mixture with dye and poor on the base. I use this as a glue and it gives a good base for attaching different habitats.
poring foam on base. This will help hold the drift snag in place and act as a glue for my ground cover.
I use a mixture I make for ground cover base.
I pour it on the foam while it is still rising and push it in. I can move the foam around with my hands and give it some contour.
Talented Individual !!!!!!!
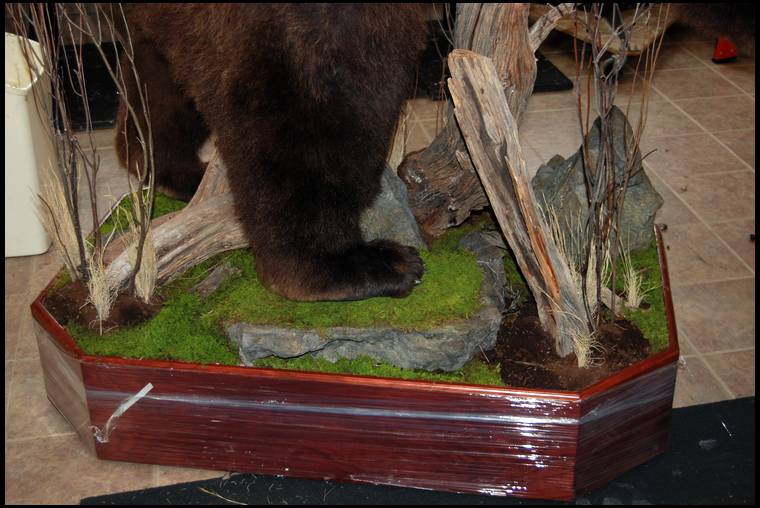
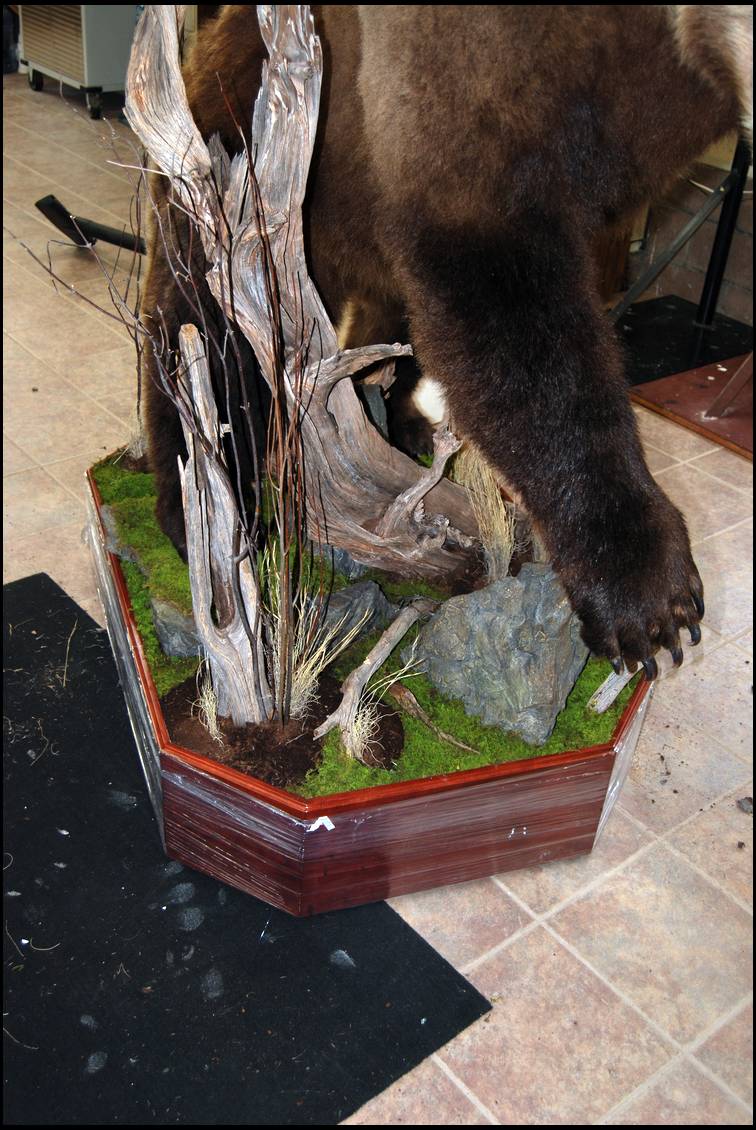
Now that I have the ground cover down I'll start putting my moss down.
I have moss where his feet go; now I'll put the bear on for the last time. I like to have the bear on when I finish the habitat. It helps me balance the piece.
Fantastic being able to watch step by step. Totally captivated!
All the habitat will get sealed down. I will take the plastic off the base and clean with milsek. The mount is now ready for the customer!
I'll post some finished pics. Hope you enjoyed!! Thanks for following, Dennis
Bowsite sponsor
I did a slight eye rotation.
That's all I got! Thanks again for following. Any questions feel free to ask. Dennis
Very nice Dennis. Thanks for sharing with us! You're definitely putting out a quality product.
Dennis, how long did this take from start to finish? I'd be interested in say a breakdown of time such as how long it took you to prep the hide, mount the bear from the time you started working the form and how long you worked on the base.
Can you talk about care of the mount once the owner gets it home?
This was one of the most educational threads I've read on Bowsite and the most in-depth on taxidermy.
Thanks.
Great job. I really enjoyed seeing what went into the habitat. Quality that will bring memories of the hunt back for years to come for your customer.
Jim in PA
Unbelievable!
Good luck, Robb
Very nice! Definitely one of the coolest threads ever on taxidermy.
I do not have what it takes to be a taxidermist.
Ned me neither, but we can send them some business! LOL
I am also captivated by this thread, great work!
Josh
Really cool thread! Thanks for sharing it with us.
He is an artist that does taxidermy!
WOW!!!!!
Thanks.....very enjoyable thread...
I don't think you needed to check 'debate free' on this thread....awesome work!
Bill
Really cool thread!! Thanks for taking the time to do it.
No debate...
completely awesome work
That's just make's my wife get even more mad at me. Now I want a Grizz even more now. I think getting a bear to look that good is like seeing a Taxi that does good mountain loins, Very few look life like. You have a great talent, and that is beautiful work. Do you have any plans to enter it for a tax. competition.
Mike N- Here's an est of the hrs spent... Hide prep 8-10 hrs, form altering 15-20 includes head & mouth , mounting 10-15, basework 8-10. I also had a helper for about 10-15 hrs extra. Miscellaneous hrs like uncrateing, making shipping label, packing for tannery, code punching, talking pose with customer,invoicing ect... is about 5 hrs.
For cleaning I use compressed air and blow the dust off outside every few yrs. Not much you need to do with them. for daily cleaning I would use a feather duster.
Huntnbiggame- No competition for this one... I will be delivering it to Tennessee on Friday!
Thanks,Dennis
Just noticed you are a fellow PA resident. We will have to talk when I return from Mexico this winter
PAstringking- Yep, about 40 east of Pittsburgh. What are you hunting?
Completely amazing work! Truly a work of art. Thanks for taking us along while you built this magnificent mount. I don't even want to know how much this cost, but it is worth every cent!
Dennis, absolutely fantastic of you to share this on Bowsite, all the time it took to work, photo and write this up, thanks again. This only solidifies my choice to bring you some work.... Hopefully this whitetail season! Have you done any Mt. Lions?
Thanks Rich, Probably took me a long to do the thread as mount the bear! LOL. Yes... I love doing cats!!! Maybe I can do a Cougar thread!
Dennis, I will be hunting the lovely desert of Sonora. I live in Harrisburg...about 2 miles towards the mountain from the Farm Show complex.
I am out your way for regional meetings every so often....maybe I will stop by sometime. Great looking work you have posted so far
Dennis, Great, quality work! Maybe I can send you some work soon! Mike
Very nice Dennis. I have a 2 taxidermist that I am happy with. I didn't know I needed a third but apparently I do. Now I just need to kill something other than time... Mike
These are my two bucks from last fall that I recently picked up from Dennis and a short video I took while there of customers mounts awaiting pick-up. Quite an impressive taxi-shop!
I'm not far from New Florence or Johnstown. Maybe 25-30 min. My studio is located in New Derry on Rt 982. If you travel Rt 22 to go to Johnstown I'm 5 miles off 22.