Antler Repair Tips
General Topic
I have read some taxidermy related threads on this site and I noted some interest so here's some information on my experience with antler repair. First off, I do have some background in taxidermy although I now have and have had a different profession for many years.
I really don't mount anything for myself nowadays and part of that goes back to some of my older hunting buddies having no idea what to do with all the bulky mounts as they face their mortality.
Also, I'm much more fascinated with antler than taxidermy so I've gravitated that direction and I moved into purchasing cut-off antlers from high fence preserve deer and attaching them to full skulls and reselling from and on Ebay etc....
In the past, I've done lots of crude antler repairs over the years as a taxidermist (quick cheap fixes) but I came across a shed from a famous buck years ago and had it repaired by Tom Sexton out of Iowa. I realized his repair was next level work and he DID NOT train me or tell me his secrets but he did give some tips and some things I've picked up on my own. It really involves, attaching, sculpting and painting techniques so here goes:
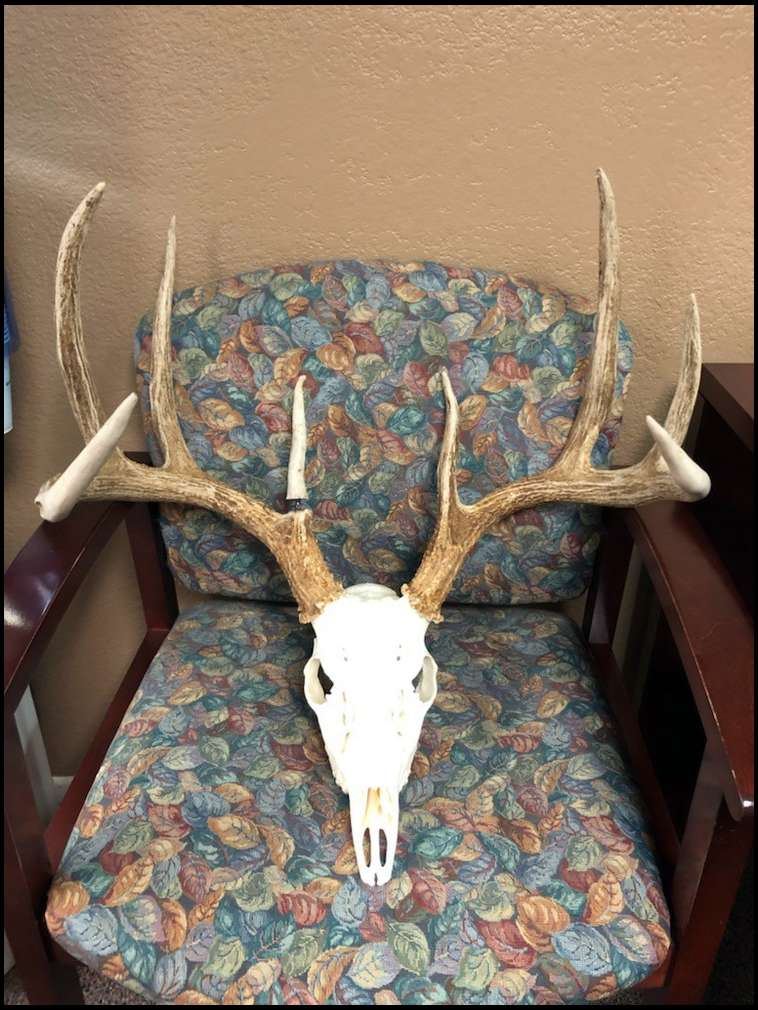
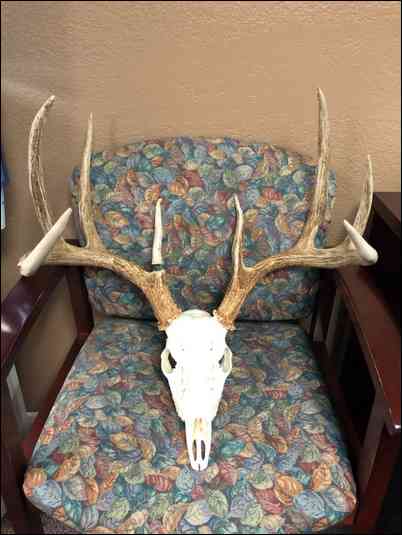
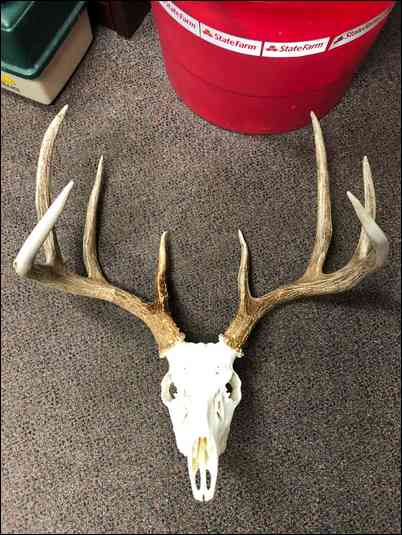
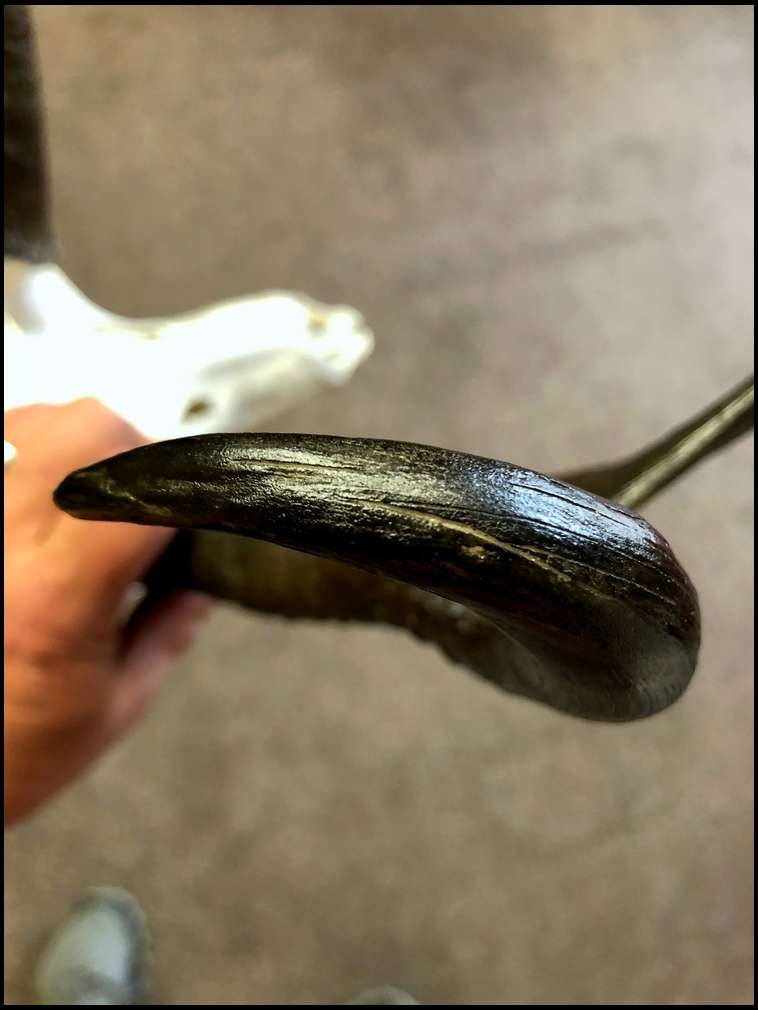
This is a Kansas 4x4 that had a broken brow tine. 4x4 bucks really only have 3 tines on each side to measure, so it's a shame in my mind to leave it broken. Also, some brow tines may be only an inch or two but in this case it's just over 6 inches.
It's much easier for a laymen or anyone to repair a seam rather than try and sculpt a full length tine. What I'm saying is I prefer to use a "donor" antler to minimize the area I have to sculpt and repair. Fortunately, I come across lots of antler and have a client who is a large antler buyer and lets me dig through his antler piles:)
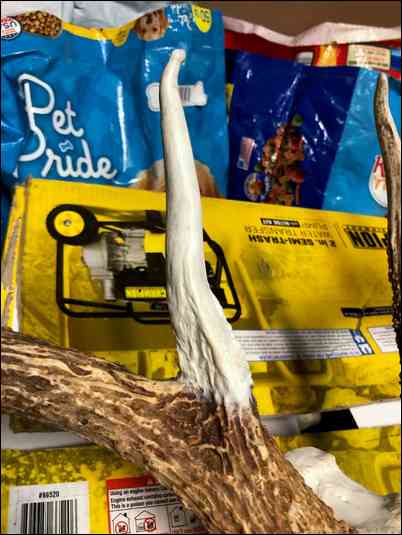
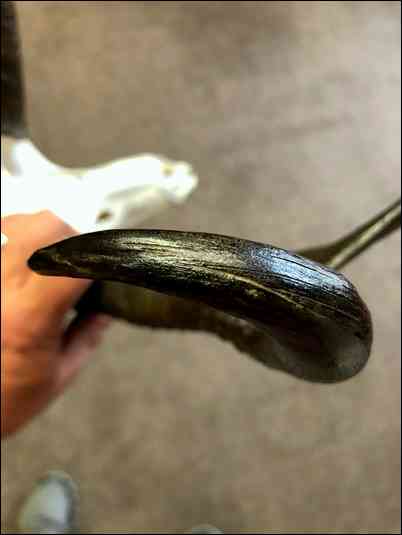
The potential weak spot is the juncture of course. Although not suitable for sculpting, JB Weld epoxy that's available in most auto parts stores is the strongest for attaching. I prefer to use lengths of threaded rod that holds the epoxy and gives the backbone to the attached antler or any sculpted pieces. I simply drill into both ends and run the steel rod two to four inches into each antler or the entire length of sculpted tine.
Next, is the sculpting portion to simulate the texture and veins in actual antler. Any small tools, spatulas or knife blades can be used to trick the eye. Again, much less time consuming to texture a seam rather than the entire length of a "fake" tine.
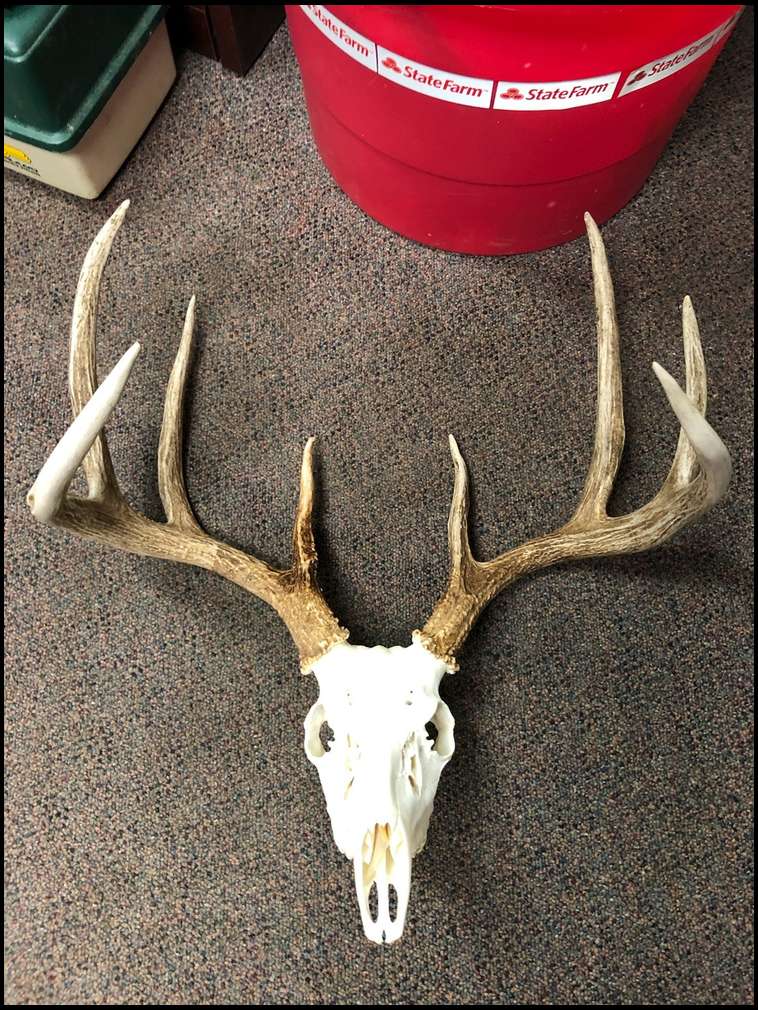
A closer view and note the paint. I prefer to use both water base and oil base paints. You just can't switch until the paint from one medium is completely dry. I use a water base paint to give a consistent antler tone across the donor, repair and original antler.
The other reason I didn't note was that as I use the oil paint and I'm wiping or removing or blending paint, I'm not removing the base tone underneath. The next step is using umber, burnt umber, raw sienna and burnt sienna along with black to achieve most any antler tone.
I prefer to seal the paint and finish with a clear matte finish spray. Good luck and don't be afraid to try. Unfortunately, many of the bucks I see in Kansas have broken antlers while rarely do I see broken antler in Montana. Specific areas seem to have broken antlers for a variety of reasons.
Now, this repair still has wet paint and it's slightly darker. I'll wait several days and watch it and I can tone it down with just a dusting of white paint thinned with laquer thinner when it's nearly dry on the brush.
Very interesting! I've got a euro mascerating now that has a broken tine and I was comtemplating how I might put a "new" point on it. Thanks for the info!
You bet! it's probably obsessive compulsive or something but I can't even look at mine until it's fixed, ha.
Better than the original??? Some say yes and others wouldn't dream of repairing.
Looks amazing to me! I know my taxidermist will fix little things but this rack I have isn't quite worth bothering him with it. Keep us updated on the final product.
Looks good. I think the key is having that pile of donor antlers!
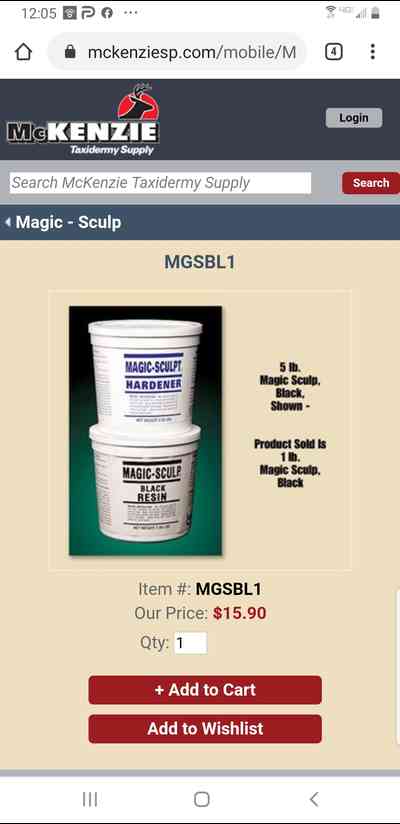
I forgot to mention the sculpting epoxy that you could use. Most on-line taxidermy catalogs sell "epoxy-sculpt' and another brand is "epo-grip" repair and seam epoxy putty. There are others but both of these are high quality.
My question is how do you know what the tine looked like before it was busted? Did you have trail cam pics of the buck when his antlers were intact? If not, then it's just a guess, right? The broken brow in the pic above could have been 2" or 8", or anywhere in-between.
Very nice work, BTW. I do my own taxidermy work, as well. I've never repaired a broken tine, but I have repaired a few broken skull caps.
Matt
Can you add drop tines to racks without them. I think all my deer broke theirs off before we crossed paths.
Grey ghost, No trail cam pics of the buck and I killed him on my first sit on that farm. My buddy who lives there, had several different bucks on trail camera but not this one. Interestingly, my buddy ran into the rancher who leases his property to the east of where we hunt and the lease group of guys from Georgia were apparently hunting a "big 8-point" with a broken brow on one side. My buddy didn't tell him the buck was already dead and they were hunting a ghost:)
So, to answer your other question, YES. It's an educated guess with "artistic license." I'm being positively optimistic by making it symmetrical with the other side.
Beautiful work. Thanks for sharing.
Looks good! Bondo works well also when using a cream colored hardener. Following all the same steps and paint schedule.
Great work and tips! I have done my share of taxidermy over the years for myself and for others as a part time business. Doing quality work like you do is not that easy as it takes a lot of "trial and error" at least for me. Your tips will save some guys that want to do this a ton of time and they will end up with a professional outcome. Thanks for sharing........Badbull
Good job with the repair ROUGHCOUNTRY !
Very nice work, Mike! Dandy 8 pointer, as well. Congrats! What would he score (if he had a matching brow)?
I drilled out the tine that the donor tine fragment would attach to and drilled out the donor tine so a wire was centering and connecting the two tine pieces. Rock solid and the wire allows some flexibility as go to sculpt the putty.
Damn good work right there man.
Good luck, Robb
Very nice work ! Thanks for sharing it with us!
Nice work. I like the idea of using a donor tine.
I'm getting some private messages with some folks already trying out their skills, awesome!
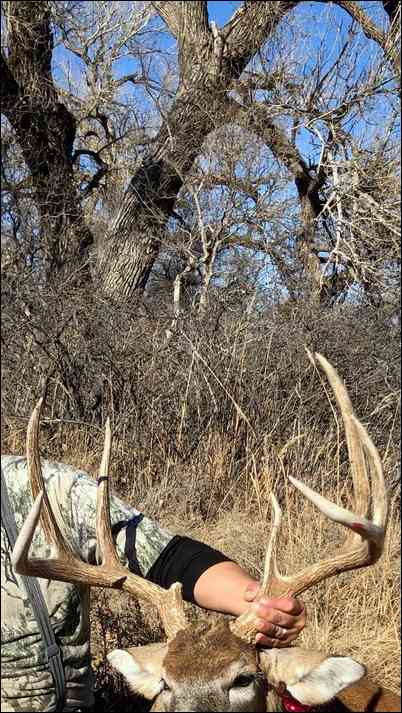
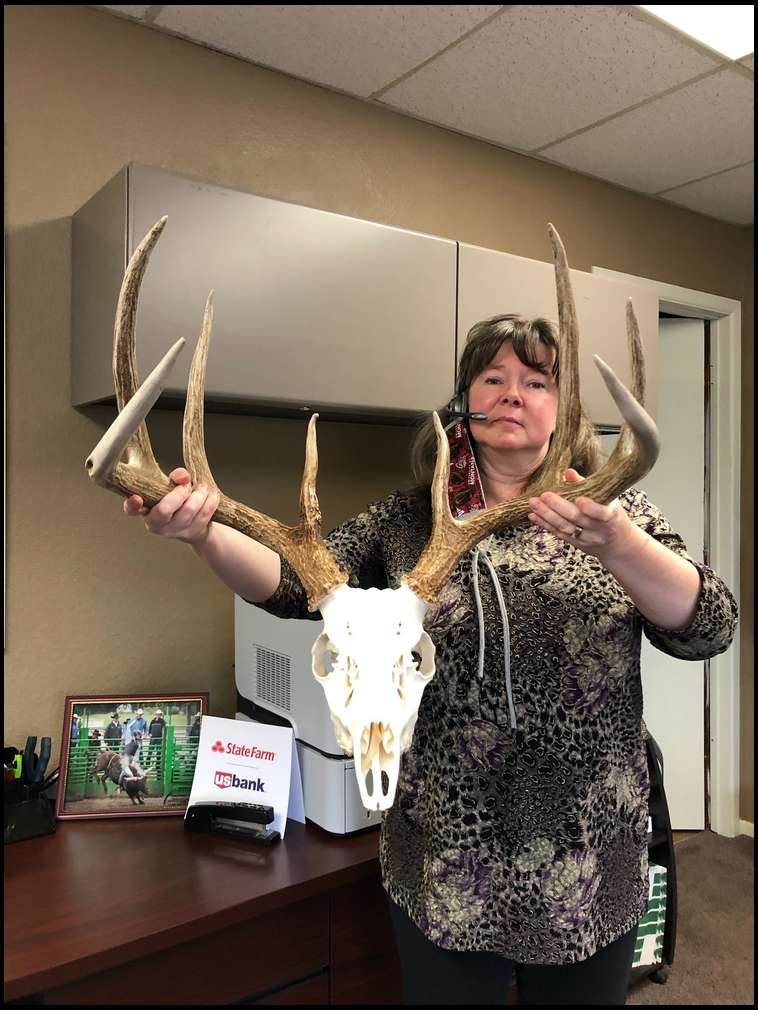
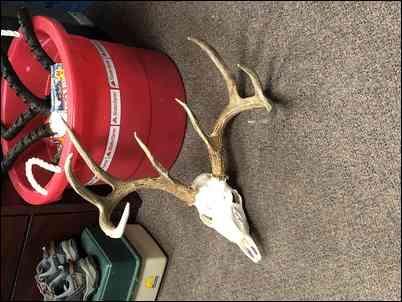
T-Roy: To answer your question about the score, I coaxed my secretary into holding the rack for a picture and reference. I thought the repair was symmetrical but it doesn't quite match the other side, ha. The buck would gross 159 3/8 if my math is correct and net in the mid to lower 150's with asymmetry. He has an inside spread of 20 inches and Rt antler goes 25 4/8, 6 2/8, 11/2/8, 11 5/8, 5, 4, 4, 3 4/8 = 71 1/8 Left antler goes 25, 6 5/8, 13, 7 5/8, 5, 4, 4, 3 4/8 = 68 2/8...……..any 4x4 that grosses nearly 160 is big framed but the shame is he's 4.5 and possibly 3.5 years of age. I'll send in the teeth to verify. His mass isn't great for the area I'm hunting but that comes with age.
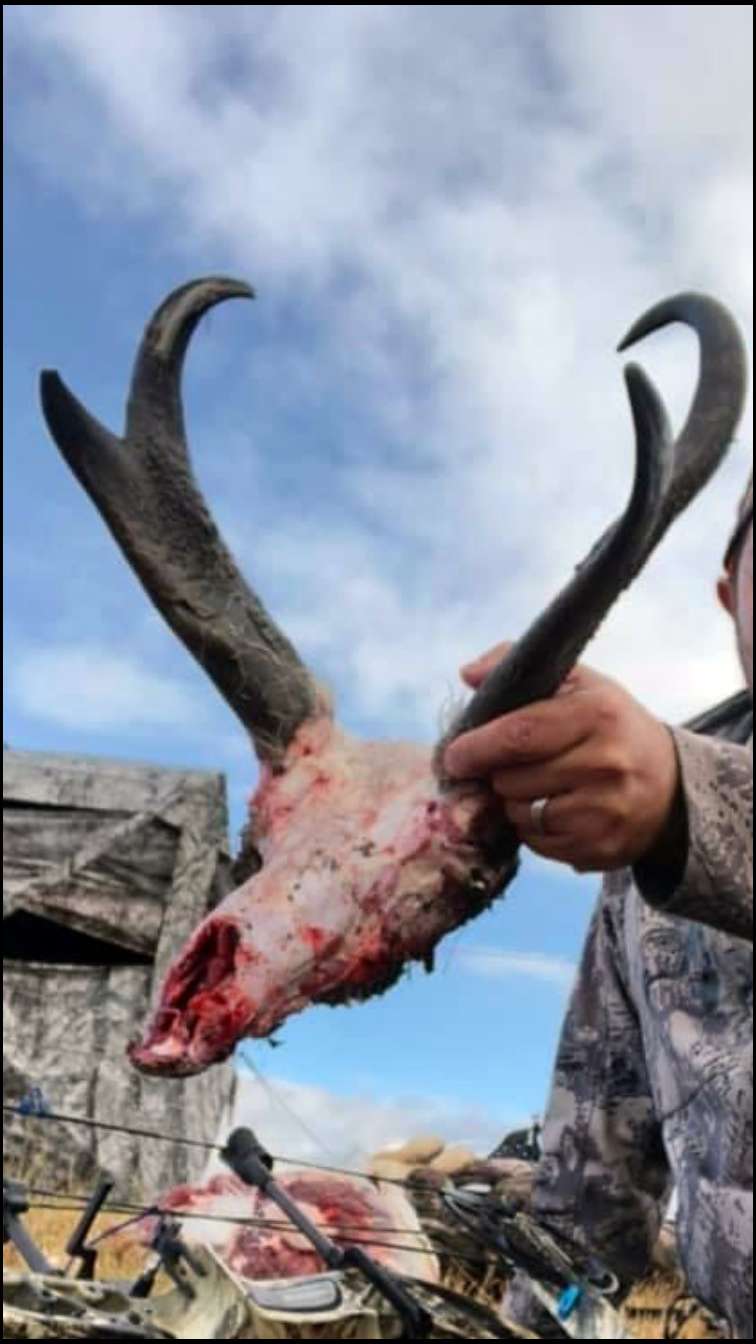
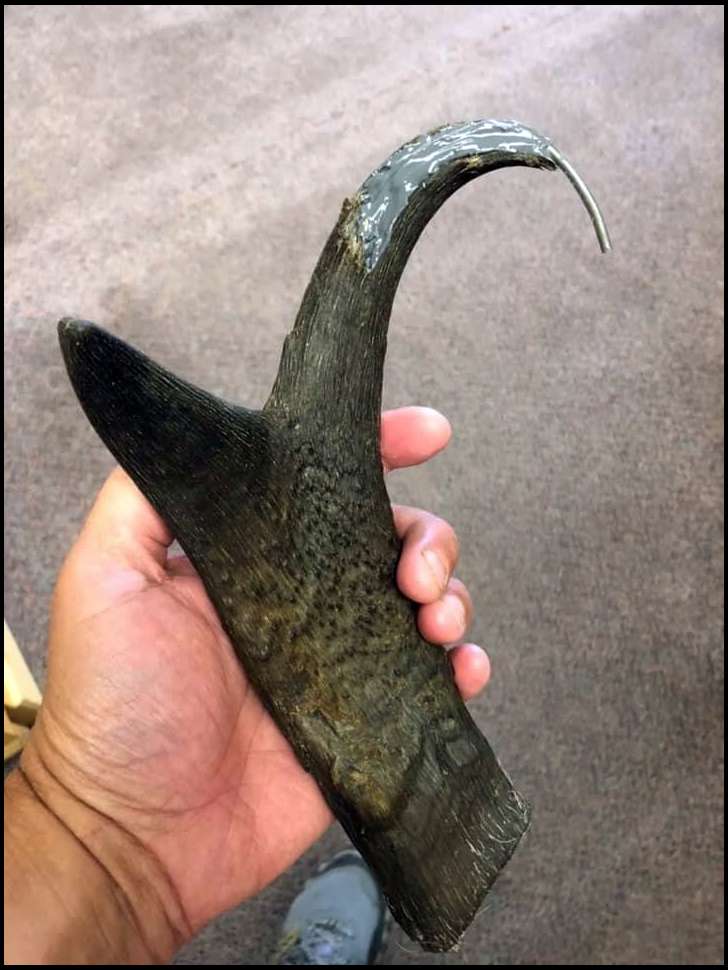
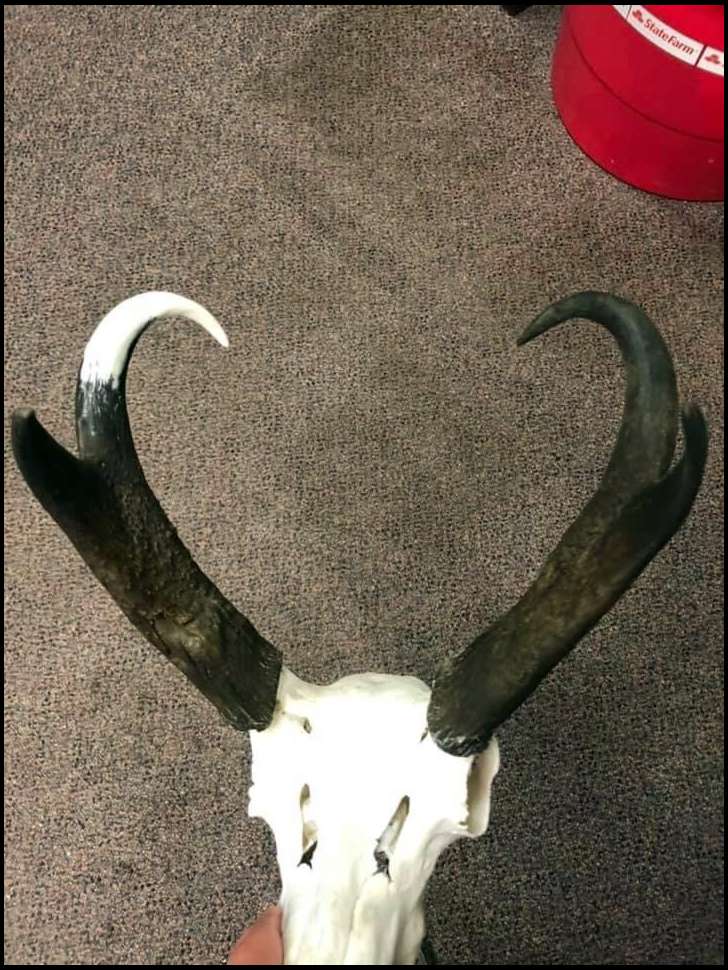
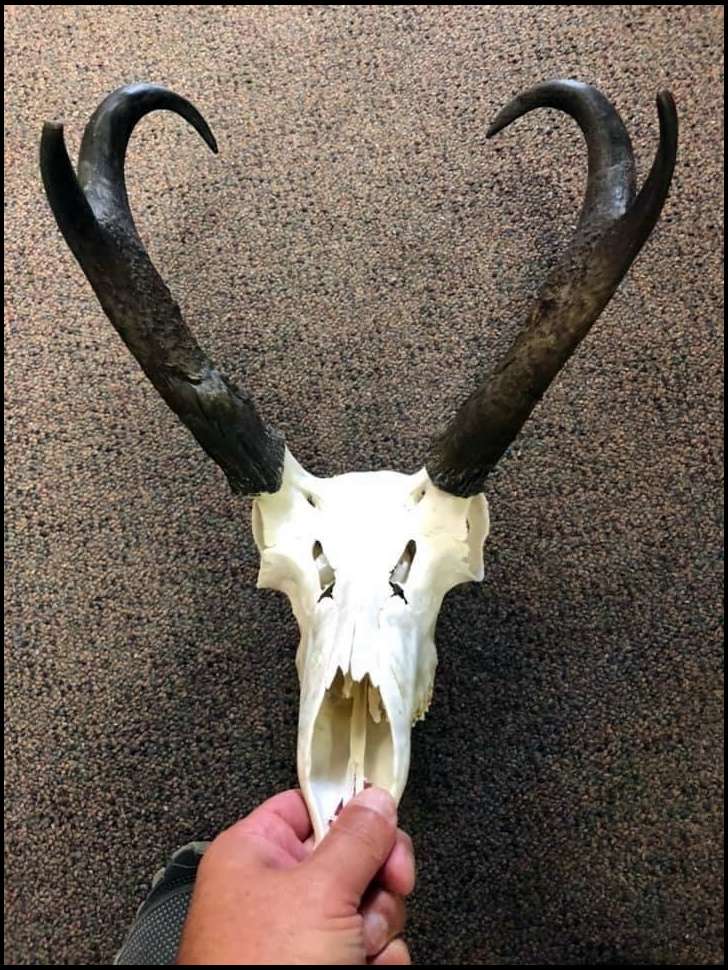
I thought this antelope repair would be of interest as well. The coloring is much easier as you're basically using brown tones and black. My antelope this year happened to have chipped off the end of his right horn and it didn't break off clean but splintered out about half way through the horn material.
I only lost about an inch of scoreable horn but the jagged splinter really bothered me. I had a choice whether to cut it square or use the splinter end. If I was using a "donor" piece of horn, I would probably cut it square but since I was going to sculpt, I chose to leave it and use flexible wire and Dremel a channel for the wire to lay or be embedded in. I also drilled about an inch further into the horn to wire. I actually used JB Weld twice: The first time to set it in the drilled portion and lay it in the channel along the splintered break. The second coat went over the wire and splinter and really secured it so I could bend and manipulate the wire exactly how I wanted it.
Next was sculpting the horn and I used Epo-Grip for this one. It has the consistency of stiff petroleum jelly when mixed up and feathers out with water very easily and doesn't sag or shrink. If you look at the texture of antelope horns, they have fine hair lines that run along the horn. I think I used a pin dipped in water to run the lines. The wire was longer than I needed and trimmed back once I was satisfied with the bend and curve.
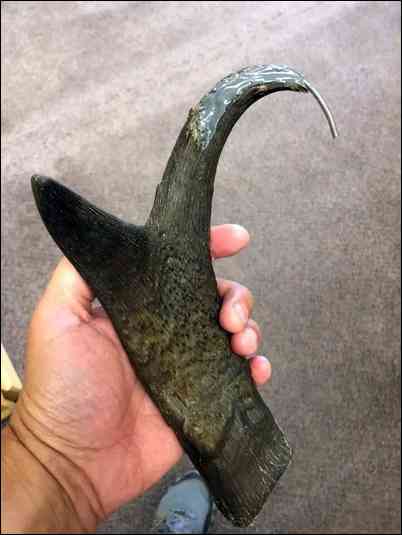
Final stage was painting which again was much easier than matching antler tones. I'll try and post a close-up of the repair but I've had lots of people come into my office and handle it and didn't have a clue.
Here's a closeup of the repair. I prefer the natural matte finish but my boys (3) all shot antelope this year and wanted a shinier finish that they'd seen on a previous skull, so we all went with that:) One point about antelope is they shrink quite a bit. I do some things to mitigate that and maybe do a thread next fall detailing how I boil out, remove the horns, clean and whiten, and re-attach antelope horns.
If the buck was busted up when I shot him, that is how he stays. I had one repaired 35 years ago. Never again, it just don't seem right to me. Shawn
I repainted twice and it’s better but still slightly darker. I’m going to darken the area just slightly on the opposite antler and call it good to finish spray which will also even it out. Don’t be afraid to start over or lighten or darken the opposite antler to trick the eye.
Cool stuff, Mike! Very interesting as well. I, for one, would encourage you to post up your “how to” threads on this type of stuff.
Some speed goats have whitish horn tips. Any tricks or tips on replicating that?
Nicely done and a true talent. my best, Paul
Great question T-Roy.
I’m not sure what would replicate translucent ivory off the top of my head. In that case, I might look for a donor chunk of antelope tip/ivory. In this country, the refuse dumps are full of antelope heads after the season closes. Meat shops throw away a bunch as well here in the west.
Awesome work! You’ve inspired me to try to touch up a few tips. That was a fantastic 8 pt!
Great job with the whitetail and pronghorn! I've been using the same technique for a couple years. I started off by blending the best techniques I found on the taxidermy.net website. The biggest trick is matching colors. I've had my best results by using multiple thin coats with different colors to blend and match the existing antlers.
You've had great results with water and oil based paints. My preference is using several different colored minwax stains plus waterbased colored pencils. Umber, burnt umber, raw sienna and burnt sienna all are great colors. The 3 wood stains I've had best results with are driftwood, golden oak, and provincial. They often start off leaving a glossy look but once they soak in the glossy fades. I lightly sand between coats with steel wool. Once I get the lighter base colors I often add colored pencils to low spots for additional contrast. Then follow with final coats of stains that blend the colored pencil colors.
I started off in fish taxidermy. The one thing I learned in a hurry painting fish is that it is a lot better to start off with super light coats. If over-applied it's nearly impossible to bring out the different colors and overall you come out with a lot darker finished colors. It takes the same patience to show contrast in colors on repaired antlers but less pain/stain is always best!
I actually go through the same process bringing life back to white antlers that are bleached or don't have color. I didn't think it would be possible but thought I would give chalky sheds a try. I was amazed at the results! They take an incredible amount of time but it's possible.
Another trick I've learned is to use steel wool and a sanding block between coats..depending upon the antler. Obviously if just fixing a broken tine there is a lot less work involved.
As you mentioned, epoxie-sculp is amazing stuff! I've repaired small browtines and broken nontypical tines using just epoxie-sculp without a wire or all-thread. It's nearly impossible to paint/stain epoxie-sculp without using a primed base coat. The same thing is true when painting epoxie-sculped areas on fish.
It's good to see someone else using a similar process with great results! I know a lot of guys will be excited when they find out how to bring life back to broken tines and horns! I haven't tried antelope yet. I have a couple whopper bucks I'll have to repair. Thanks or the post!
Try this stuff... comes in different colors and plenty of working time. Ed F
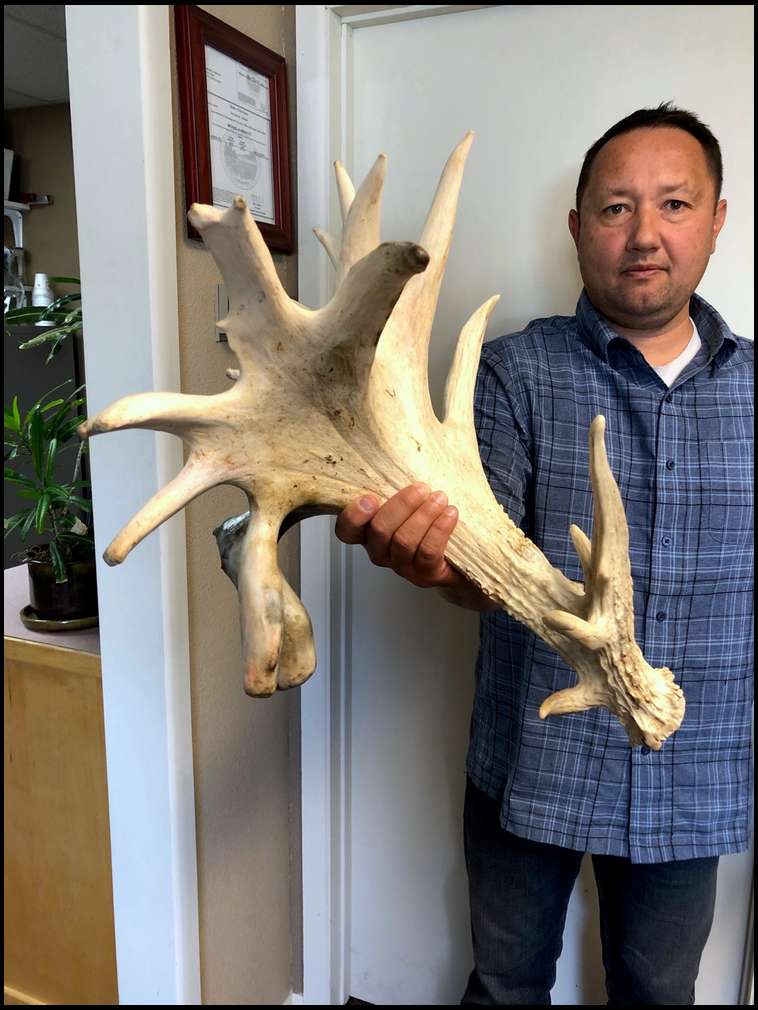
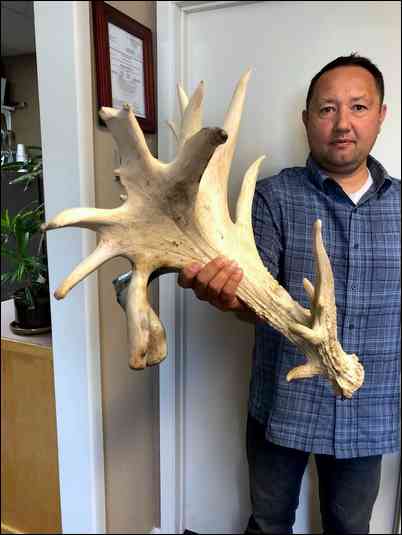
I forgot I had some more pics on my cell phone and thought I'd share. I bought this 170 inch cut-off single from a game farm in Ohio. The cut offs sell cheap because most people aren't aware of how to deal with them. Apparently, game farms with tight pens cut off the antlers of breeder bucks just out of velvet to prevent them from goring each other.
So, this first pic shows the attached donor base piece and brow tine and the white epoxy juncture that's been sculpted in just above the brow tine. I ran a large threaded rod into each side again with heavy JB Weld and I've never had one break.
I think I flipped it to a collector and made a couple hundred bucks on the deal. I know I paid less than 100.00 for the white sawed off antler.
Here's the finished product with same paint schedule I shared earlier. If you do the math, this is probably a buck north of 350 inches.
Also, I've noticed the more I play with these collector antlers of monsterous proportions, the less nervous I get shooting at 150-160 inch bucks:)
It's like practicing long range shooting with a bow and then 30 yard shots become chip shots...….or something like that, ha.
Nice work! That last one looks like a fallow!