RJ hunt’s… let’s make a knife
Equipment
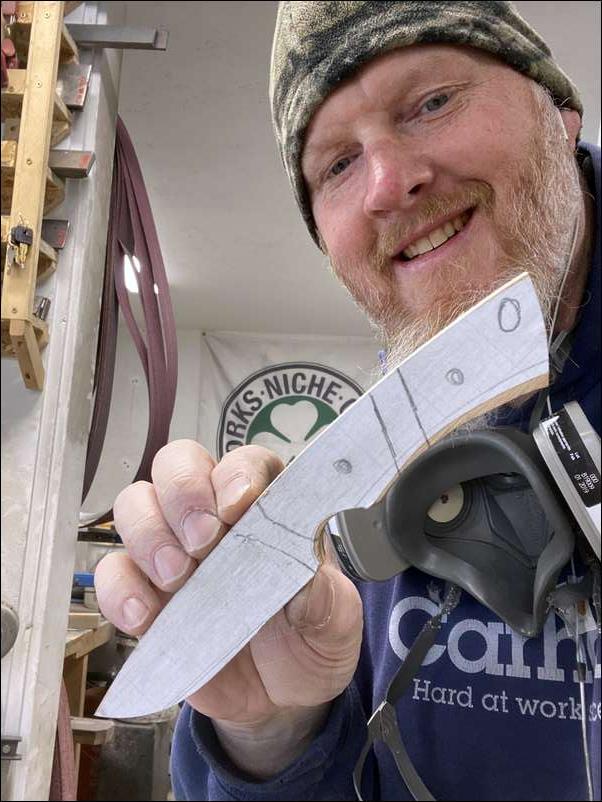
Ok guys. I am going to make this knife on this thread and post up the process in which I do so from design… to blade steel selection…. To finished product. Here is the knife in its “wood” pattern I drew up this am and will make into a blade capable of breaking down and debone an elk sized animal.
Nice! I need to call you about getting on the build/waiting list
Yes!!! Been waiting for this. Y'all need to get an Instagram account and see Rob's work. In-freaking-credible!
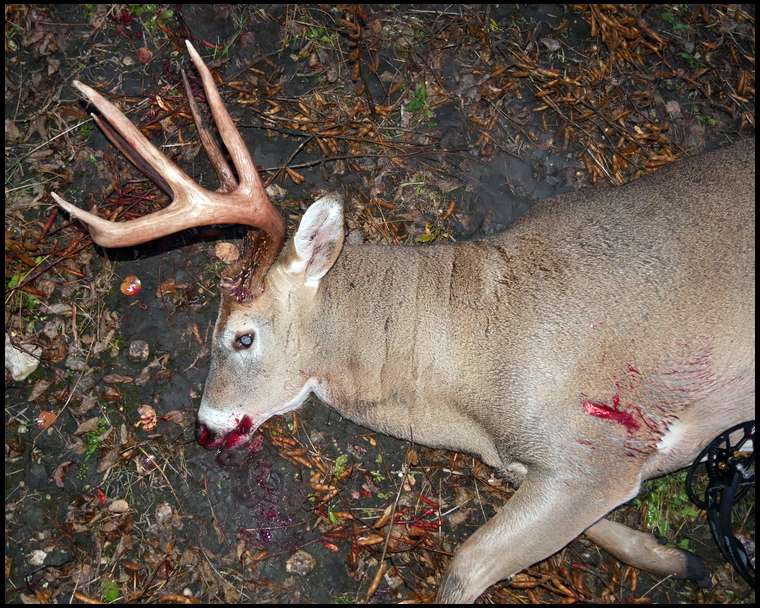
I’ve got a Niche knife that cut up and caped an elk last September And did not need sharpening. So I butchered a whitetail. Still didn’t really need sharpening. But I touched it up any way.
The edge retention was phenomenal
I’ll be following along on this one. Awesome stuff.
What is his instagram name?
This will be a cool thread. Rob is a great guy and his knives are fantastic!
Yep, phenomenal knives made by Rob. I’m very critical of knives and the angle from the handle to the blade, and look. Rob HAS it down in all aspects.
Thanks guys. Appreciate all the support. I will try to make the thread flow though the process and try to update daily as I go.
Bring it on RJ!
Been waiting for this.
Just dont forget about my order while doing this build;)
I already like the design, looking forward to the build. I have to keep a tight rein on myself to keep from having knives I don’t use.
(Who am I kidding ?)
Drycreek, I have one of RJs knives, and 2 on the way.
Its not about “needing” another one ; )
Can’t wait Rob! Best knives I’ve ever owned.
Thanks guys. Appreciate all the support. I will try to make the thread flow though the process and try to update daily as I go.
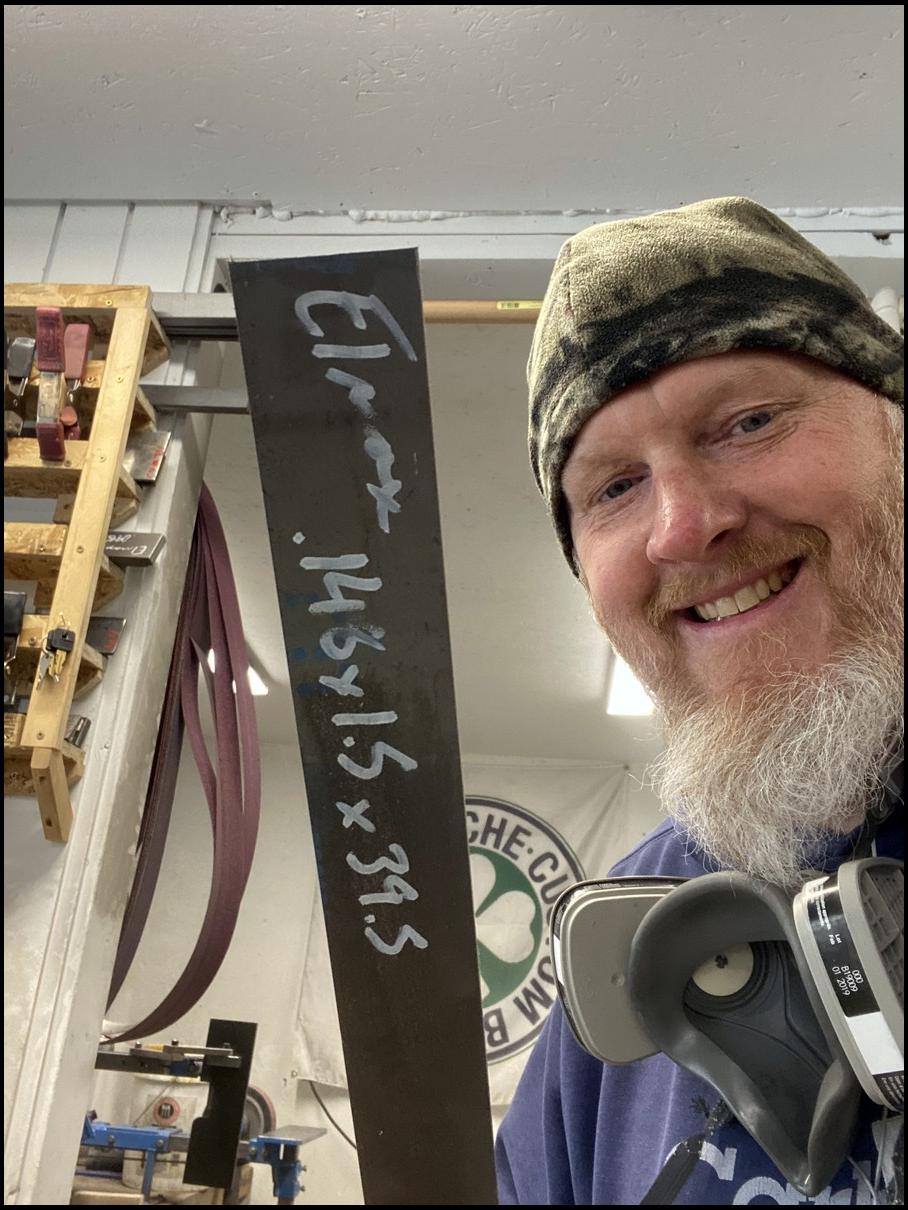
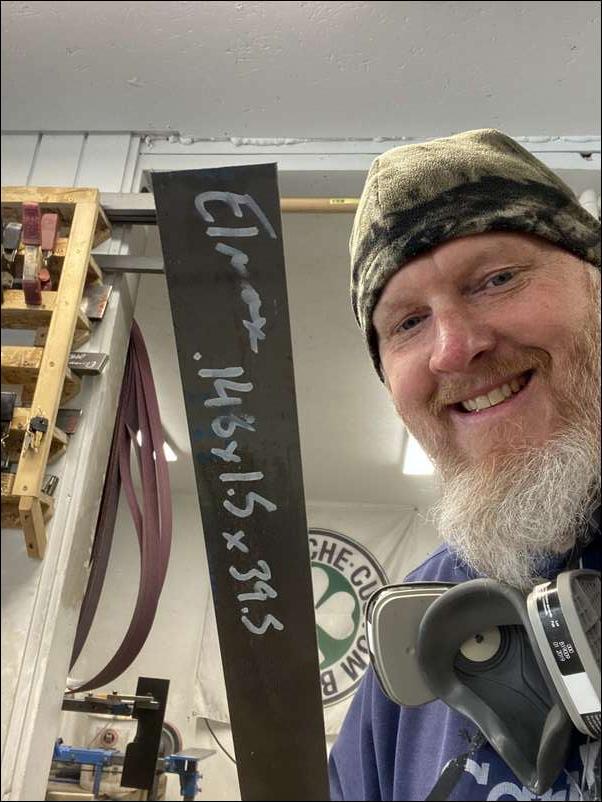
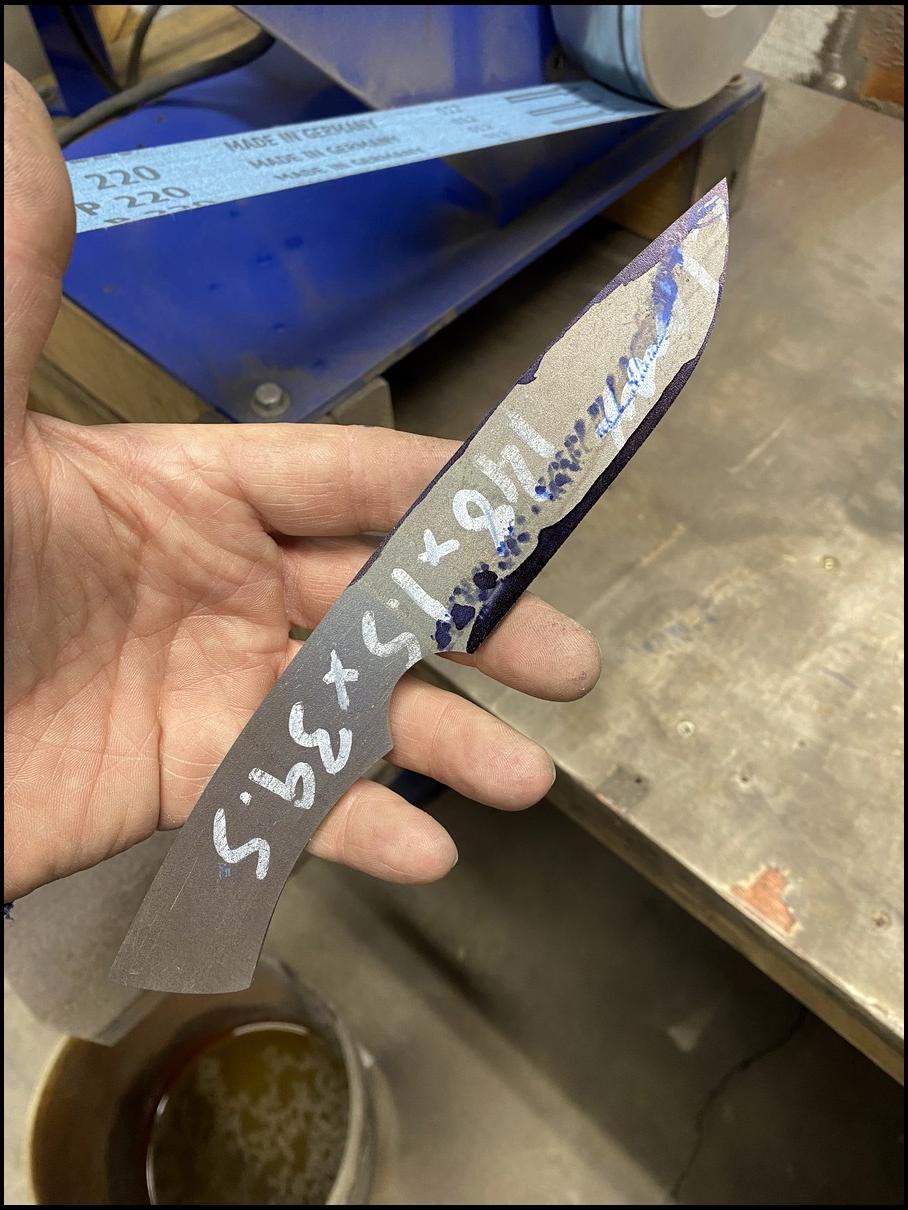
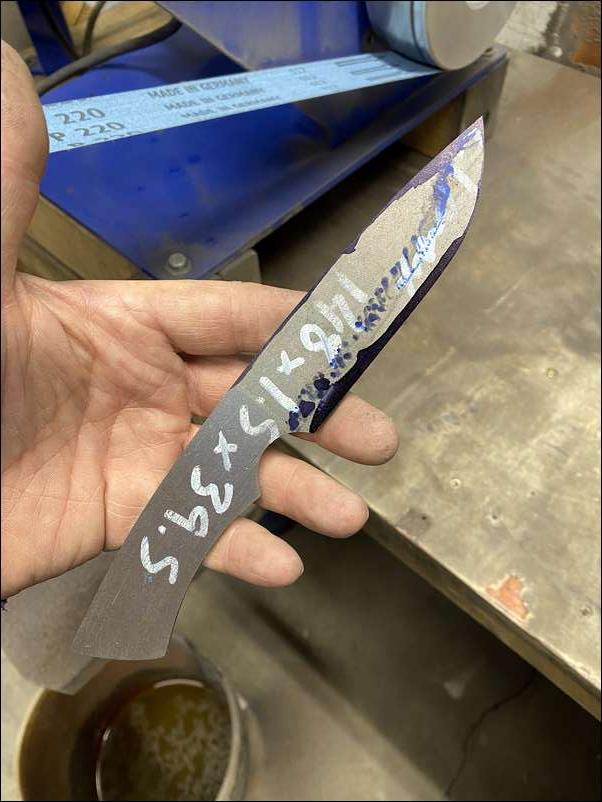
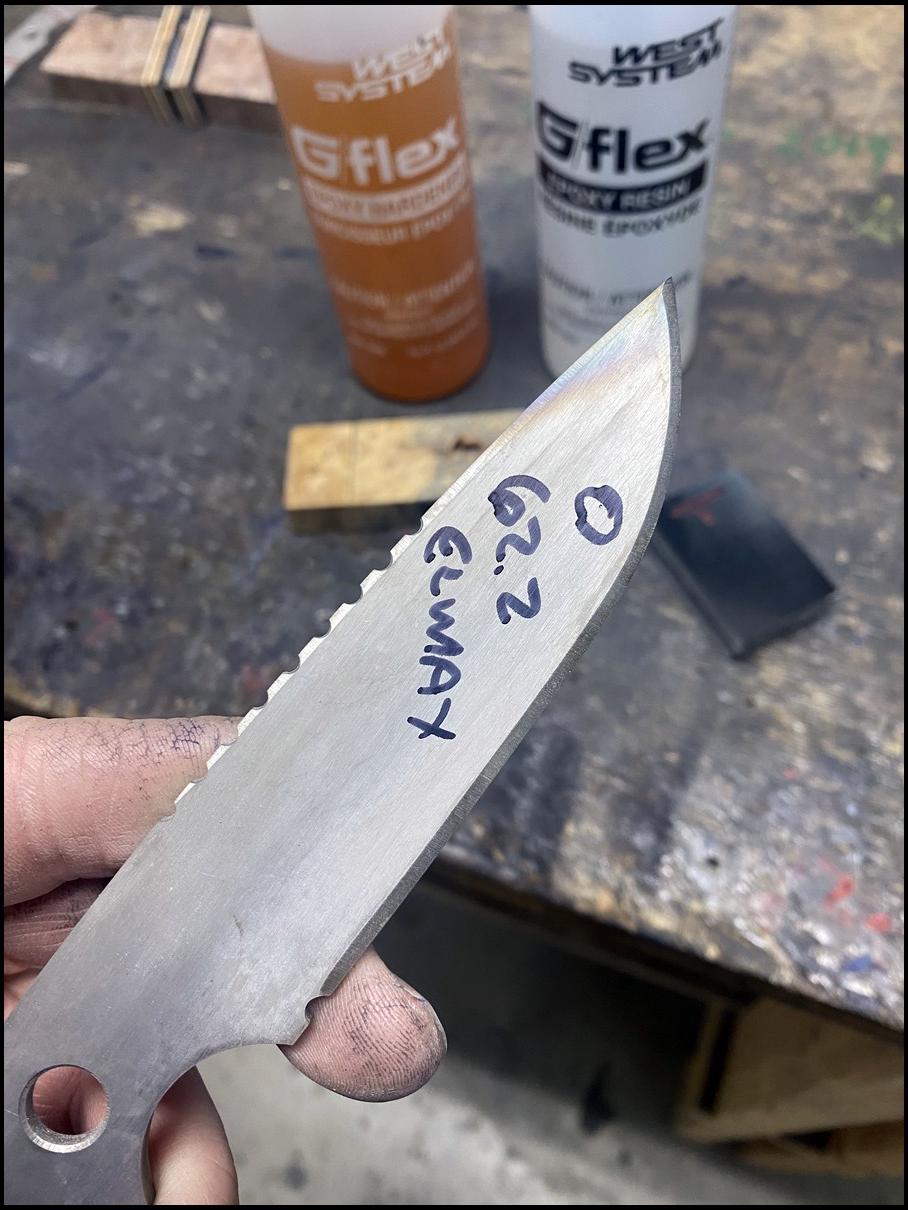
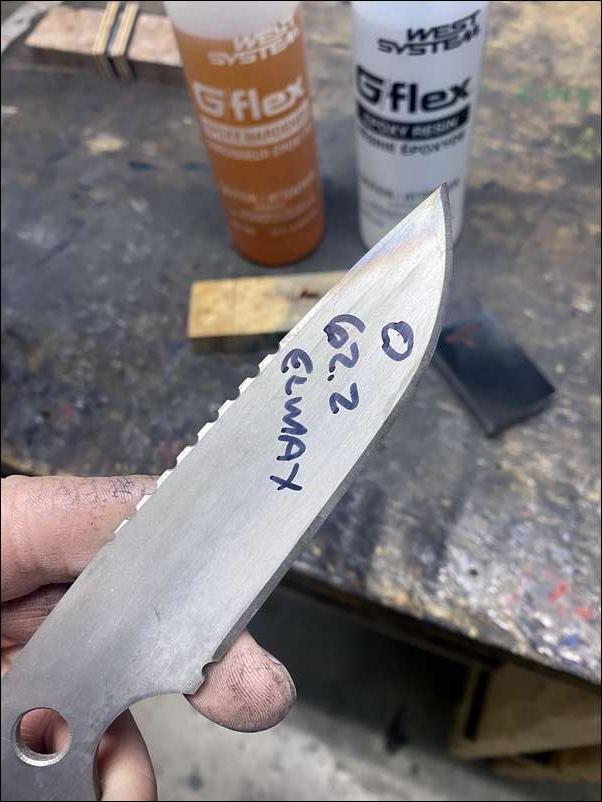
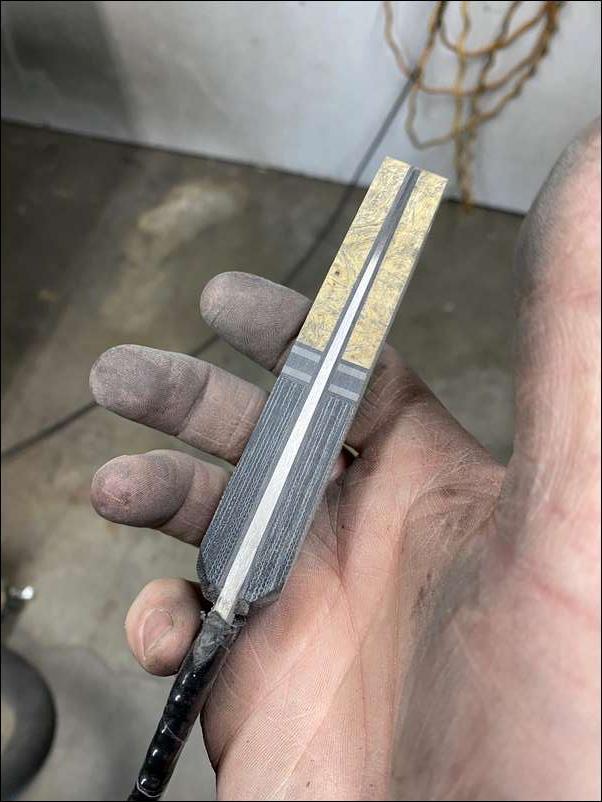
This knife will be a one off and I will need to profile by hand on the grinder and band saw. We will be using Elmax Superclean steel on this as it has superb edge retention and takes a very nice edge. This is a stainless particle steel and though a bit difficult to work it makes for a great knife
Also keep in mind all this work so far Is being done prior to hardening the blade… that will come later on in the process.
I have a feeling this is gonna cost somebody………
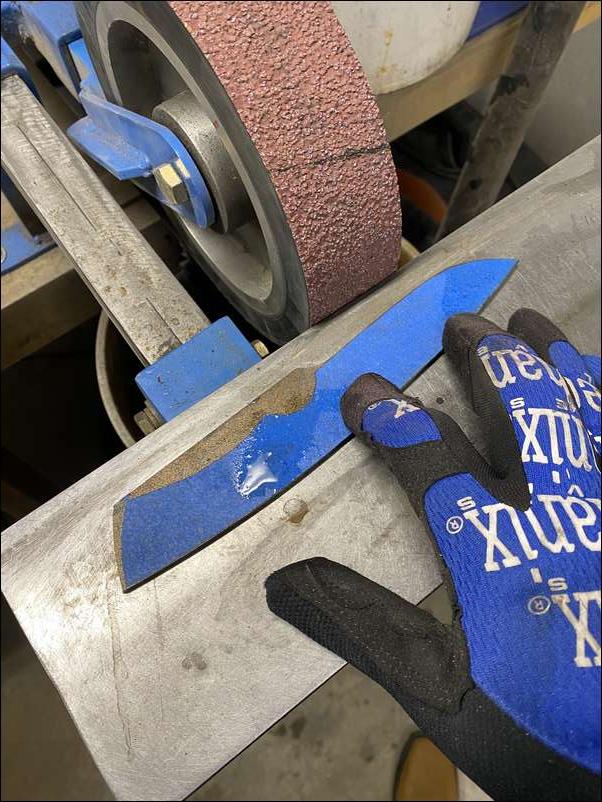
After getting the profile done and cleaned up I have to remove the stainless steel can (a thin dark gray metal on the outside of the steel billet) as it will not harden in the heat treat and is best to get off now. I do this on a surface grinding attachment.
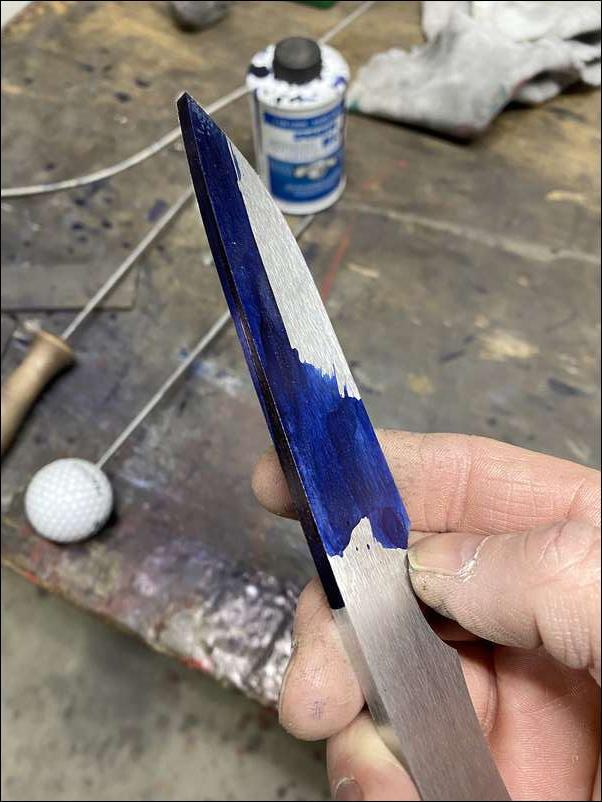
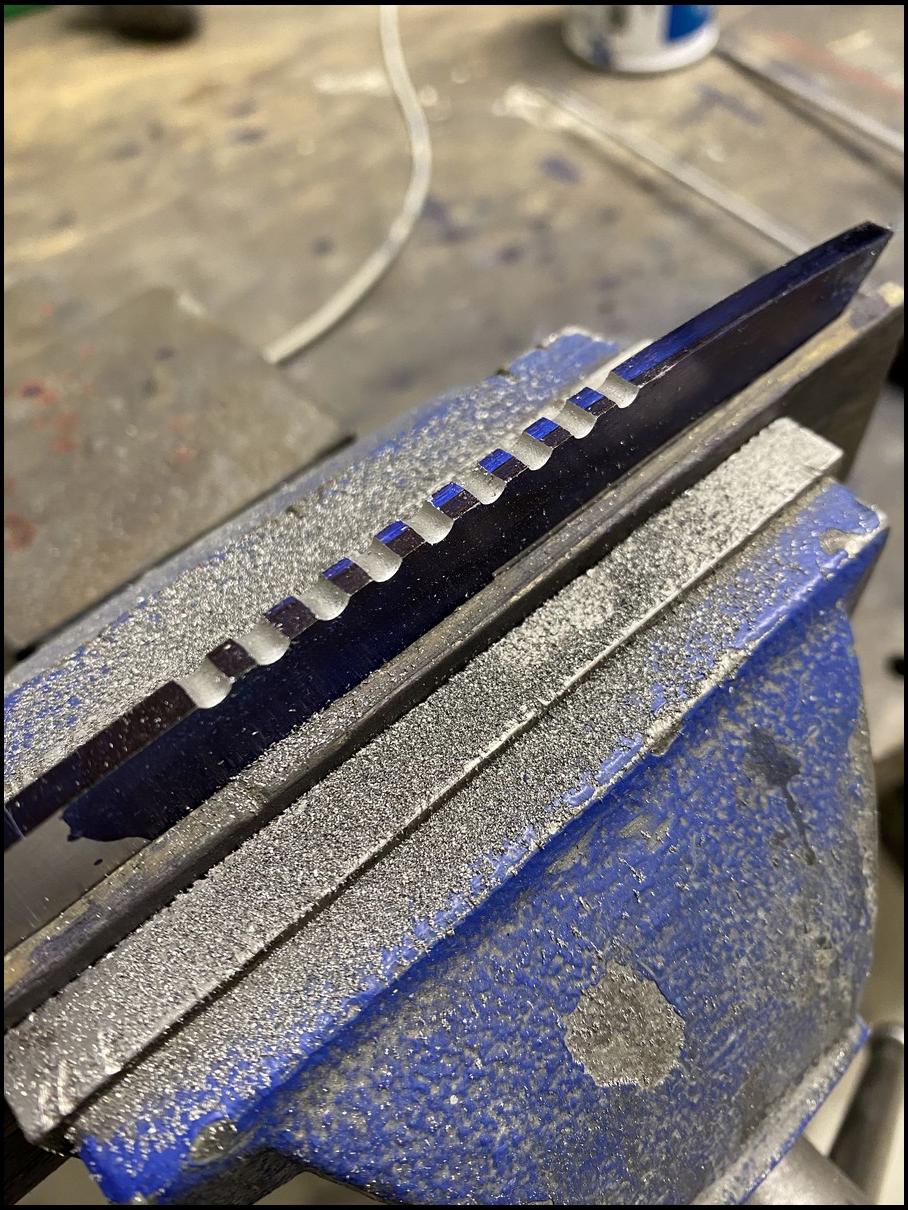
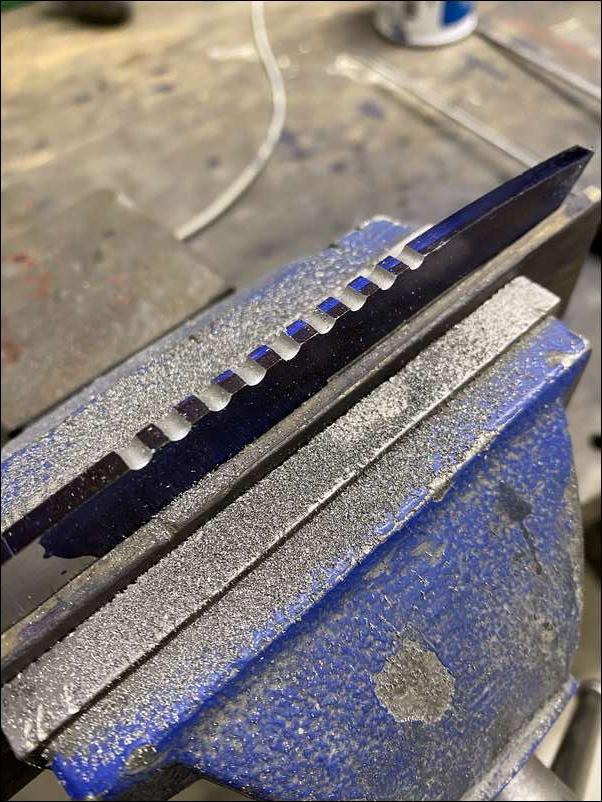
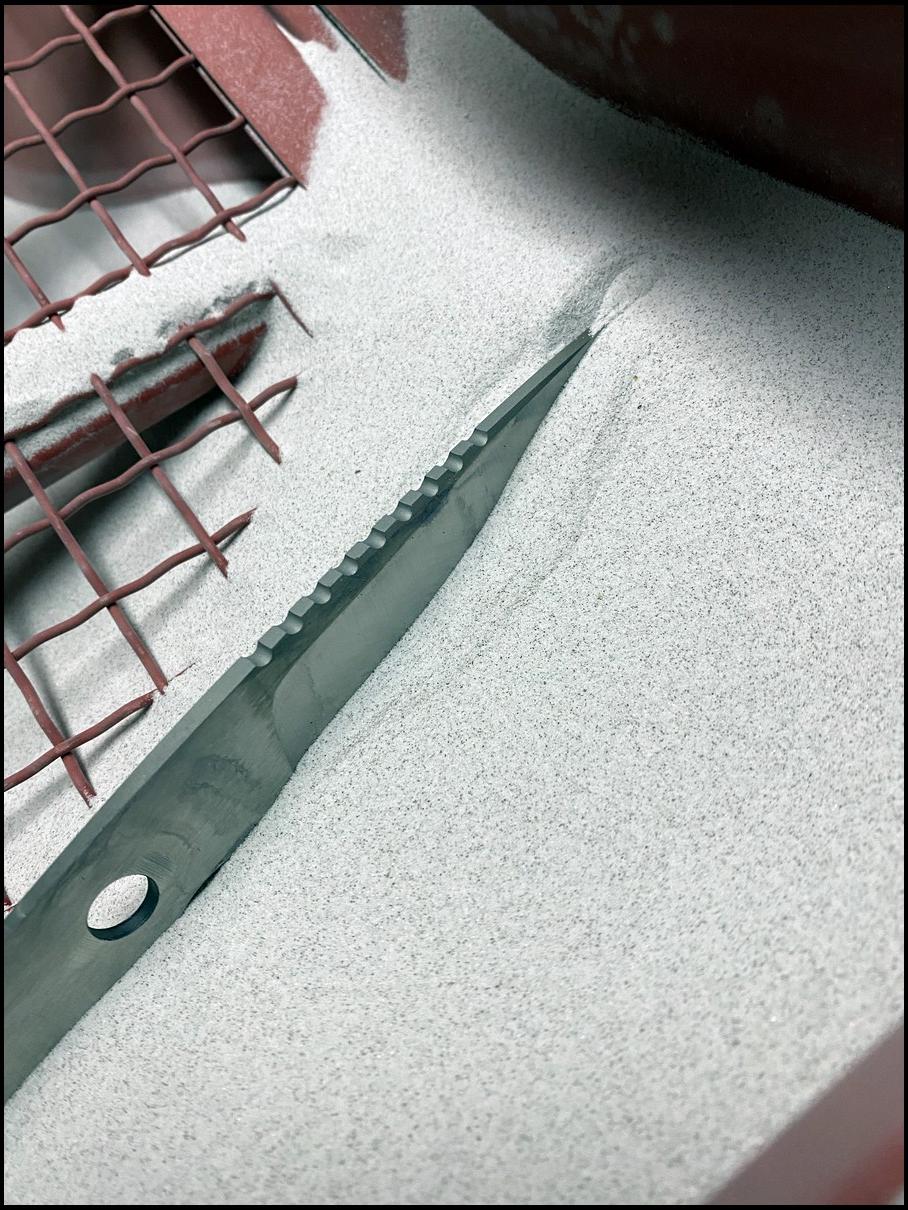
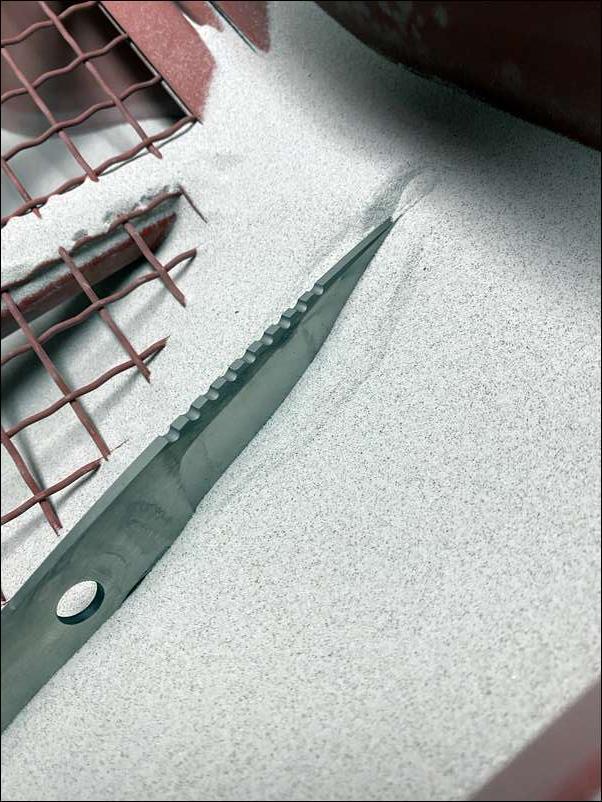
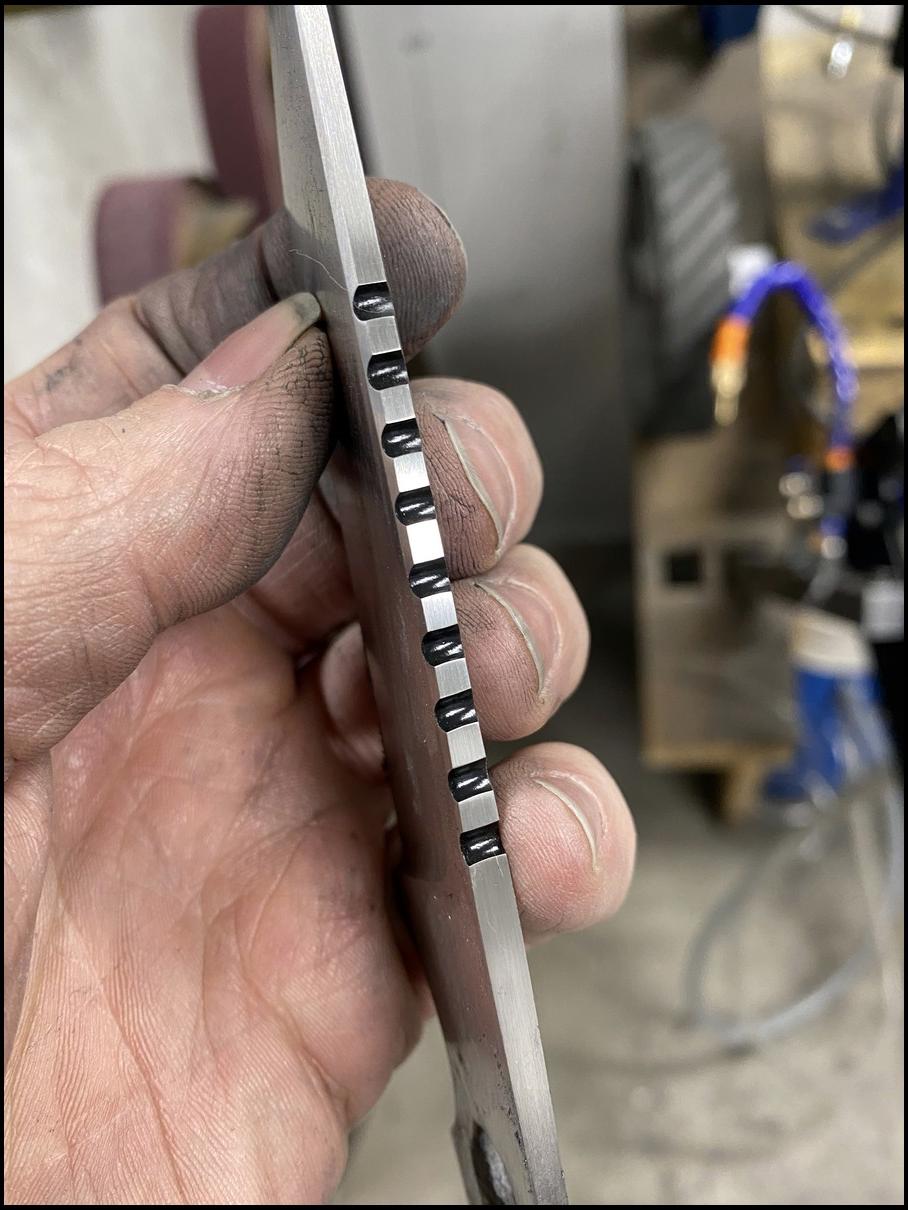
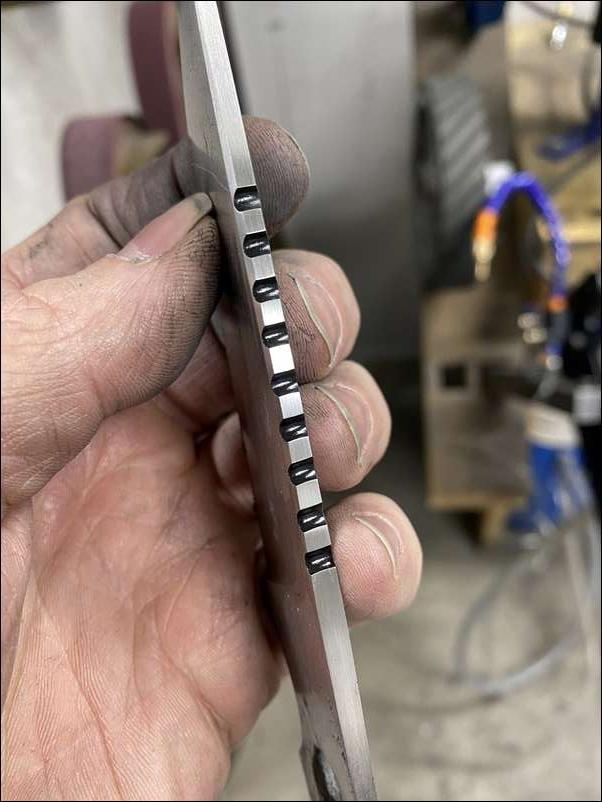
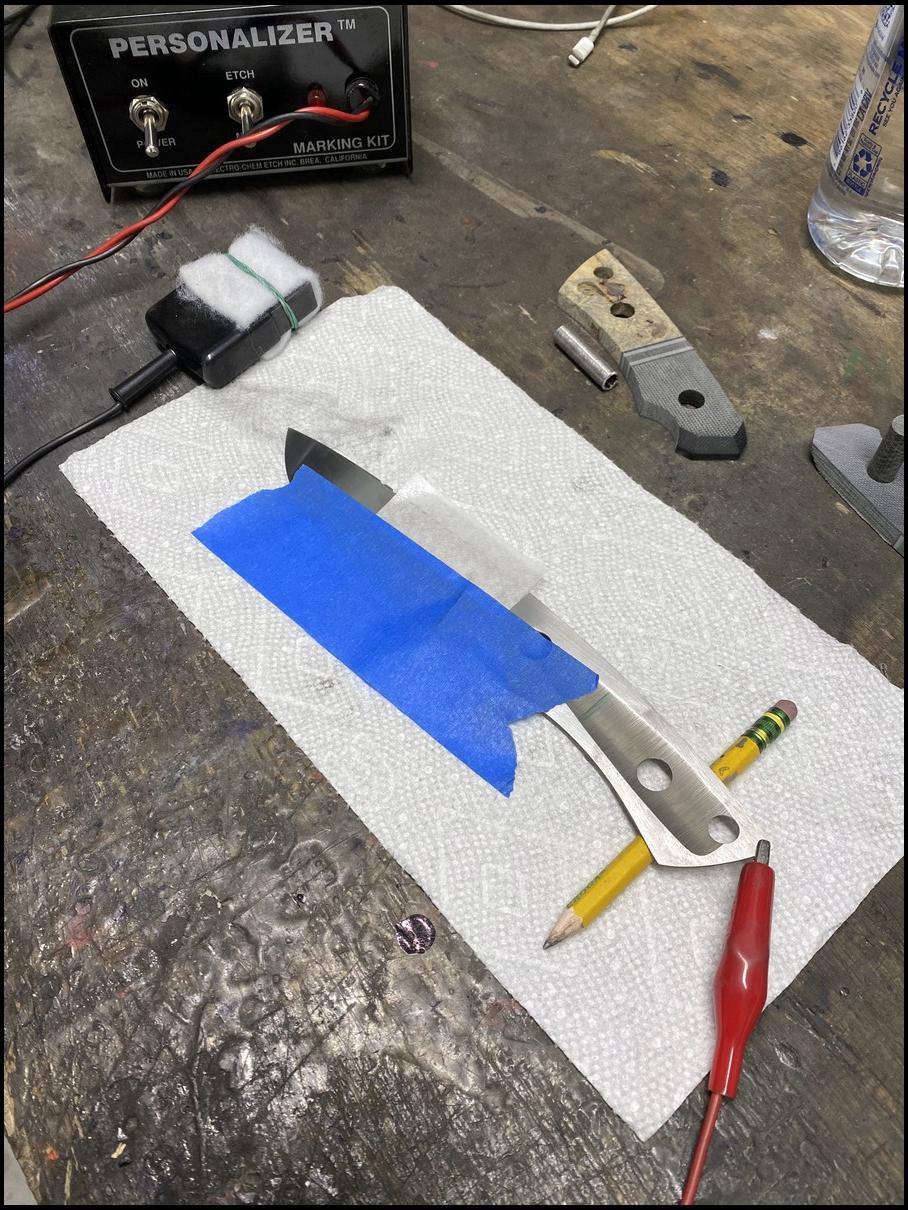
Now that the knife blank is flat on both surfaces and square along the spine I add some jimping (cuts in the spine to add some grip for your index finger) and a sharpening choil (all my hunting knives get one with the exception of my capers). I do all file work with chainsaw files and by eye, over time you get a feel for it. The blue on the base is layout fluid. It allows me to see my marks a bit better. Also later on I will add Cerakote to the file work to add color and character to the blade.
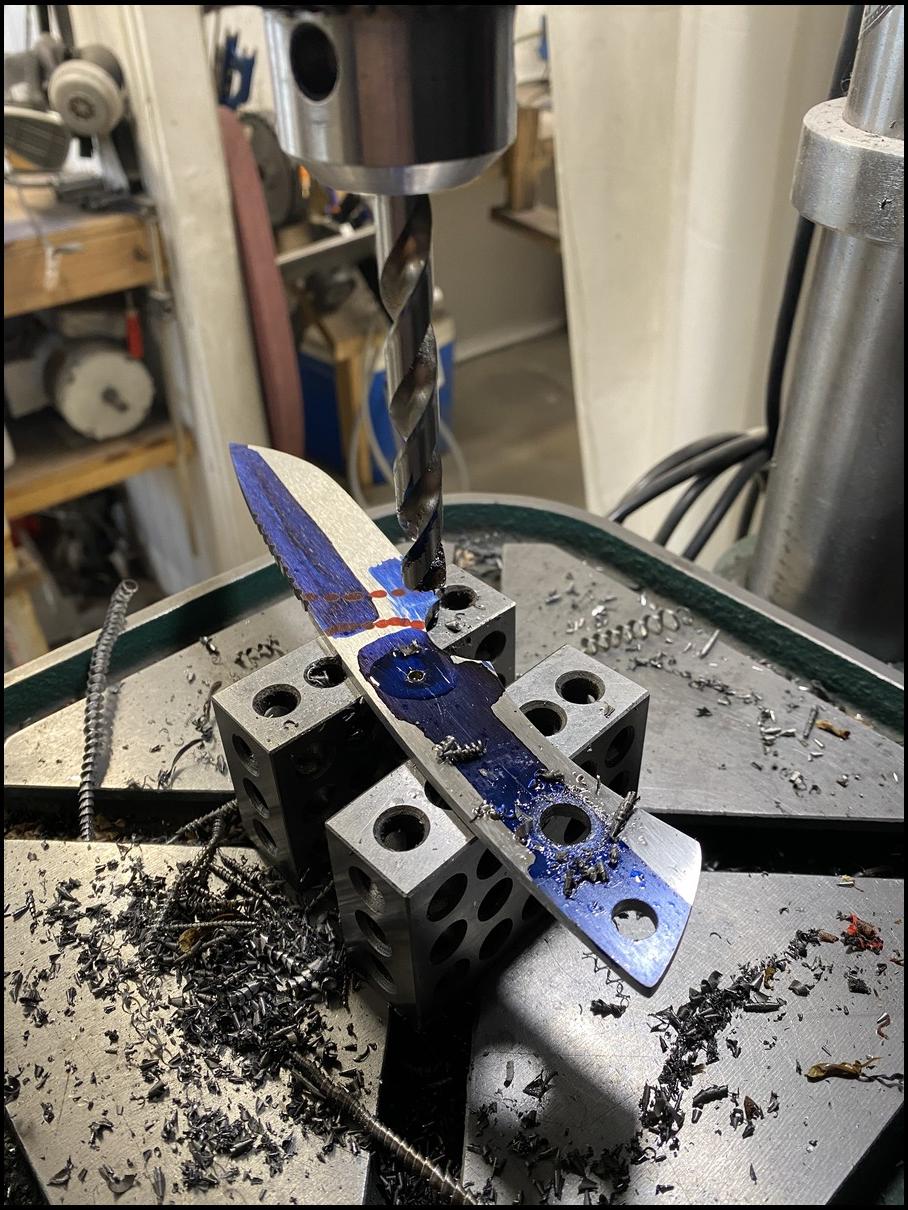
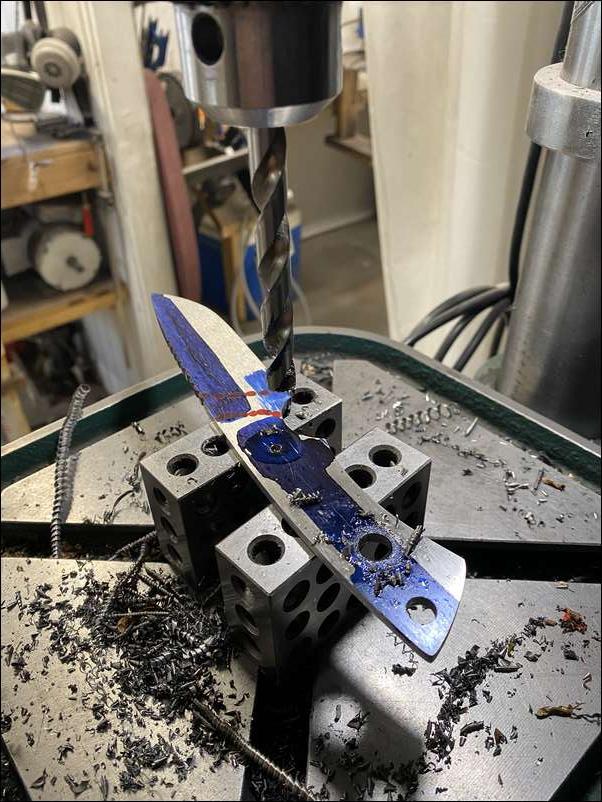
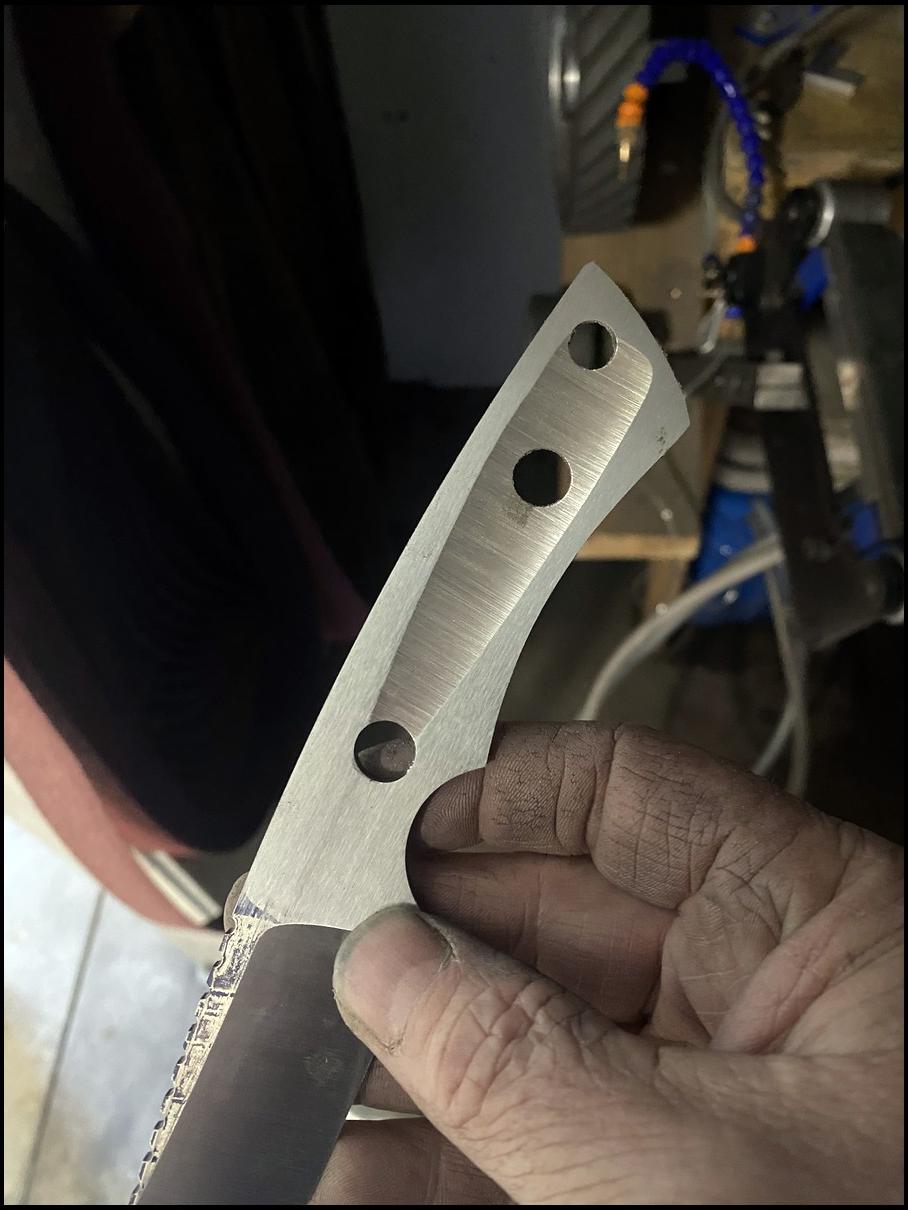
Now to drill pin holes for the handle in the tang of the knife as this needs to be done before heat treat (hardening) as it is easier now as the steel is soft. I don’t drill additional weight reduction holes as we will address weight reduction later after heat treat.
In addition a drill a lanyard tube hole and chamfer all the holes
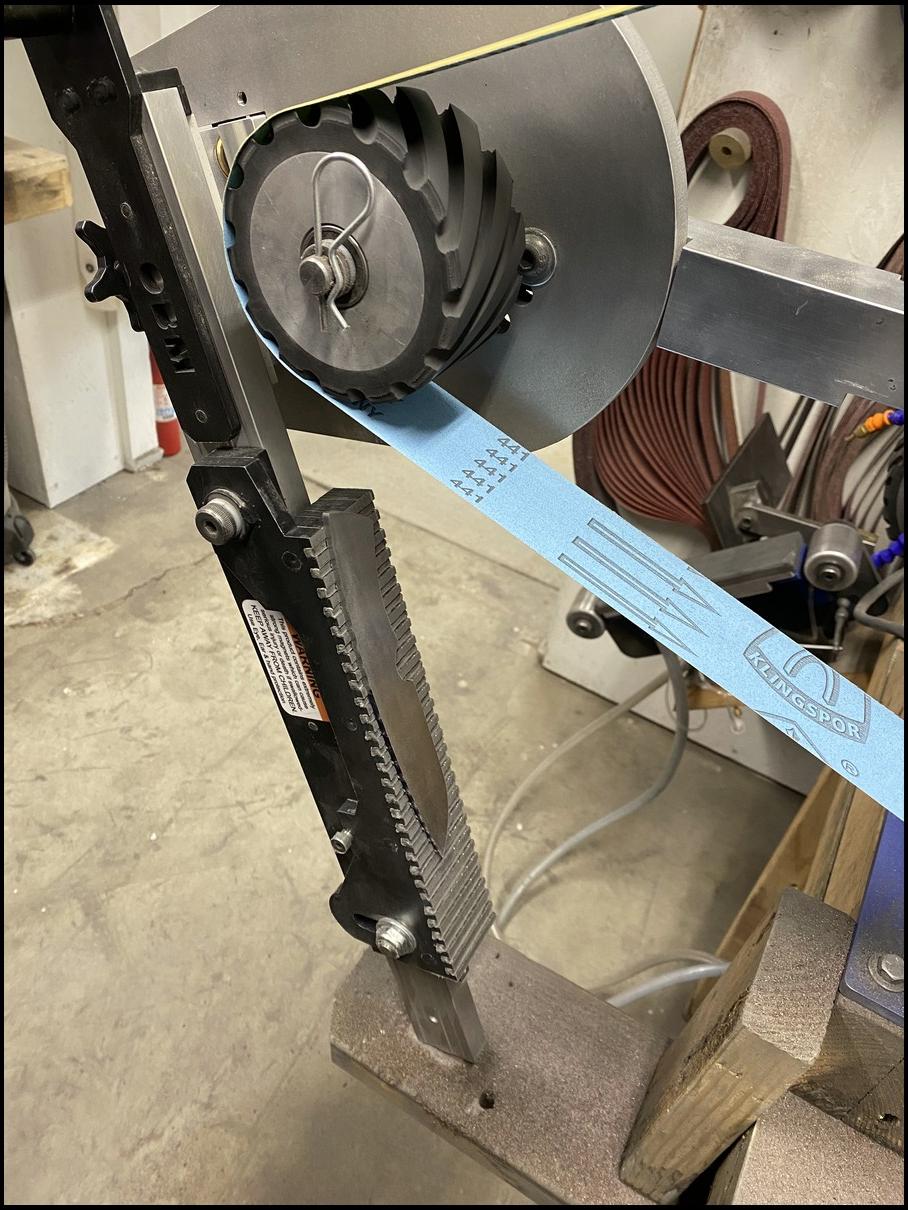
Nice sander setup RJ.
Elmax is good stuff…. i’m looking forward to see how you heat treat it
Guys that try drilling stainless for the first time get an attitude adjustment….Until you figure out that low speed is the key.
This is awesome stuff. Thanks for sharing your expertise, Robert.
And, yeah, that sander is badazz.
Matt
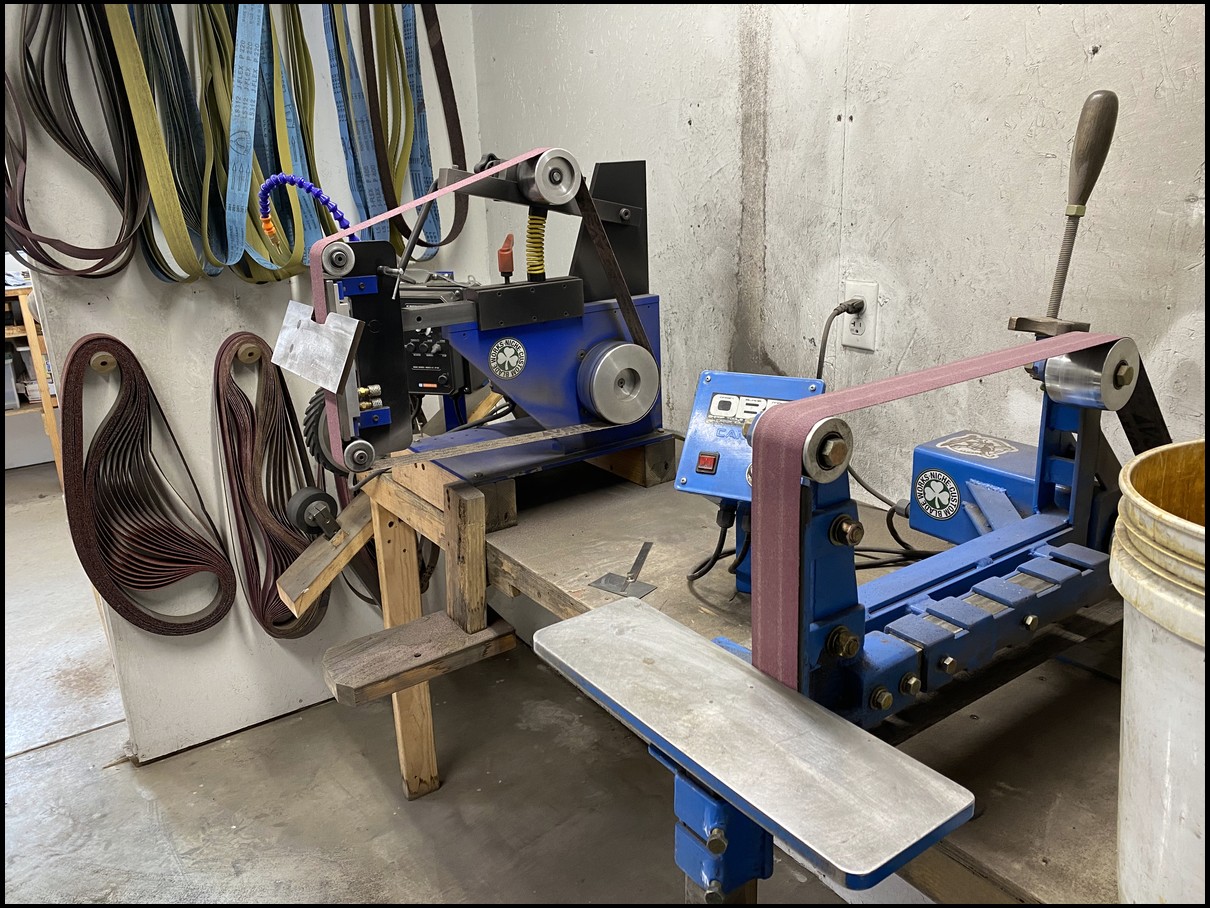
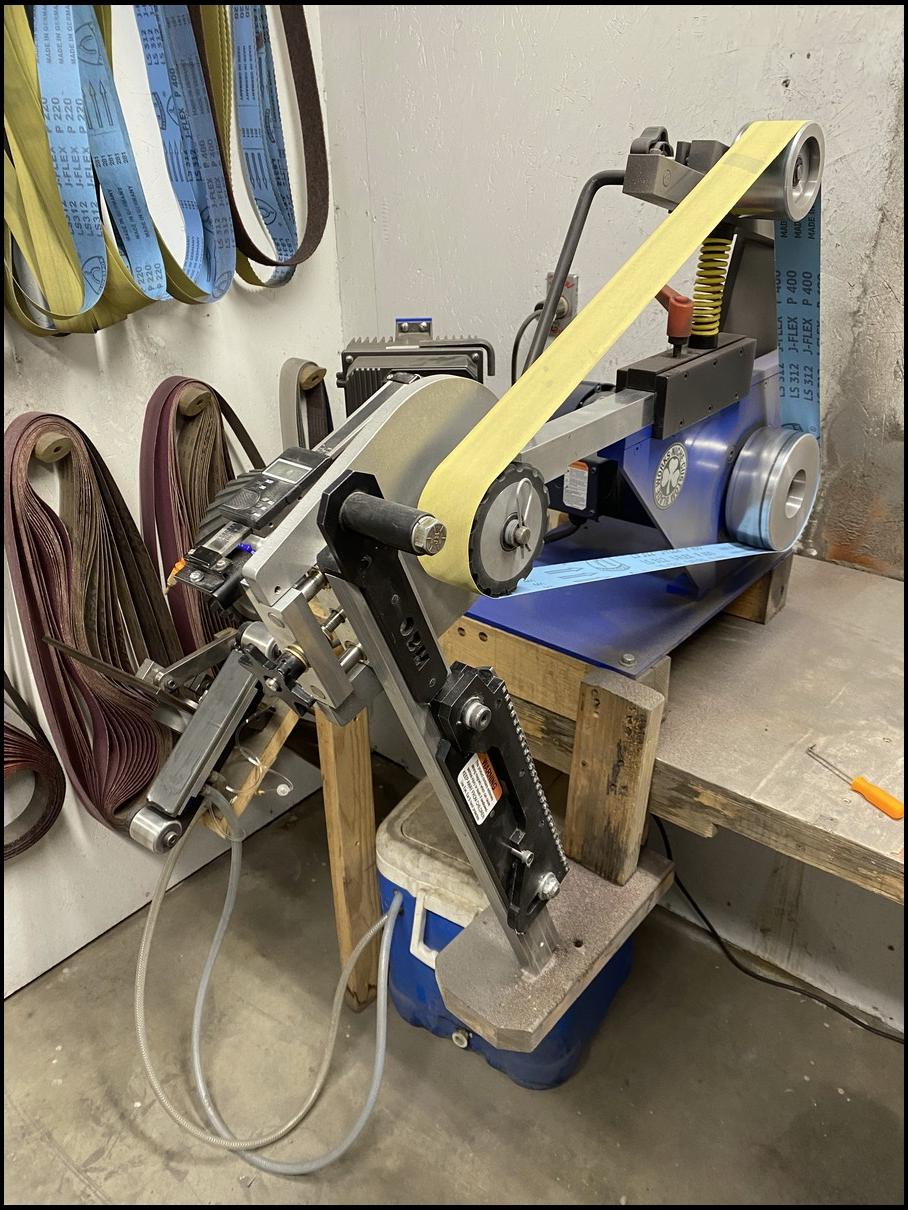
My knife grinders

My knife grinders
Thanks Beendare…. Yeah stainless is an animal to work even before heat treat. Slow speed is key… I run my drill press as slow as will go and apply cutting oil as well. Grey Ghost… thank you. I have two different ones. One is a home made unit and the other I had made for me by a local shop. Both run 2x72 belts and are controlled by VFD drives.

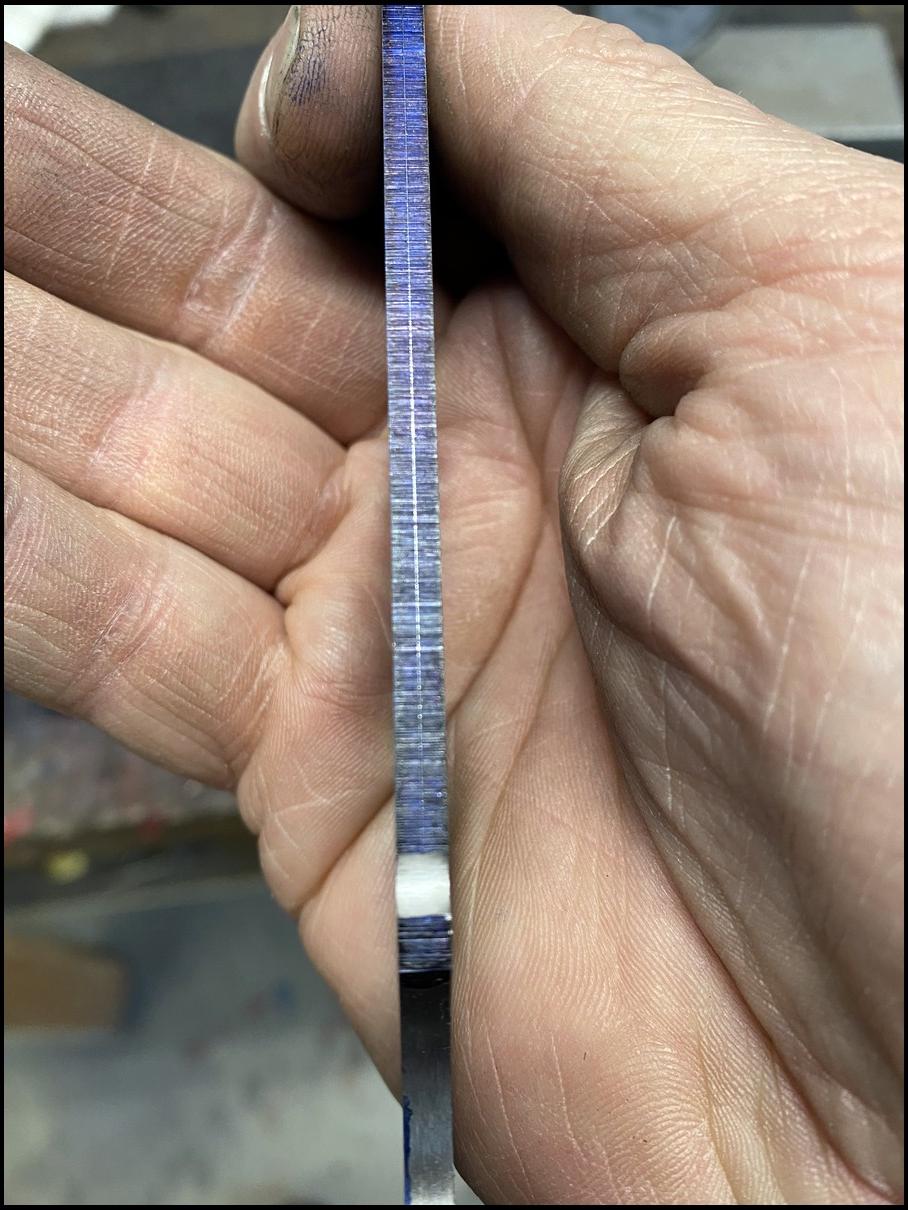
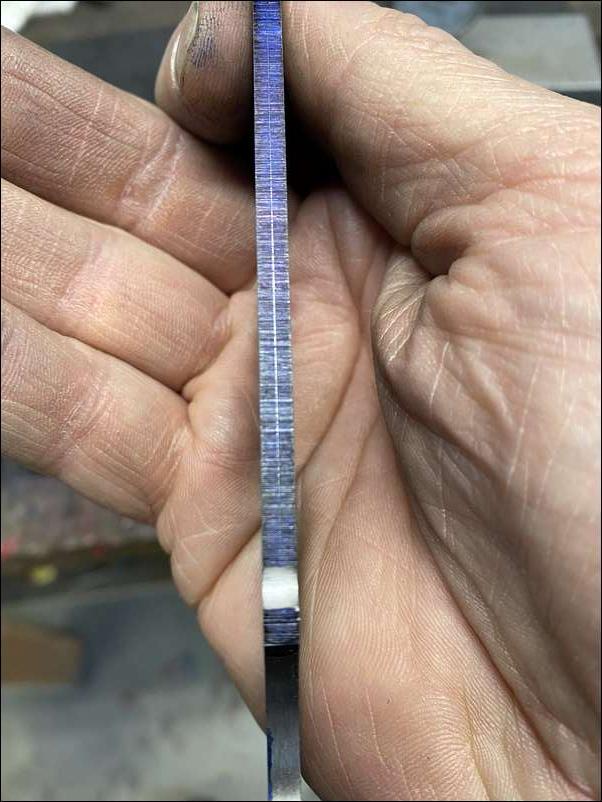
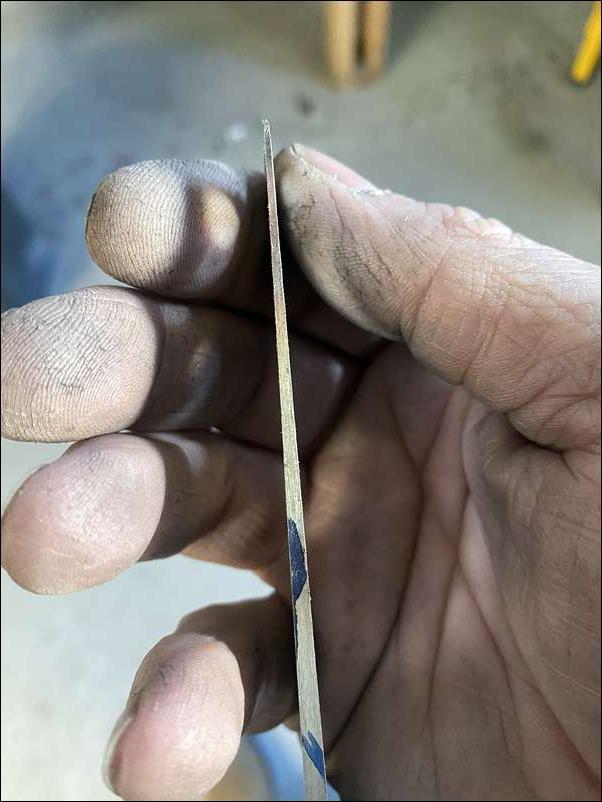
I used a height scribe to mark the center line of the blade
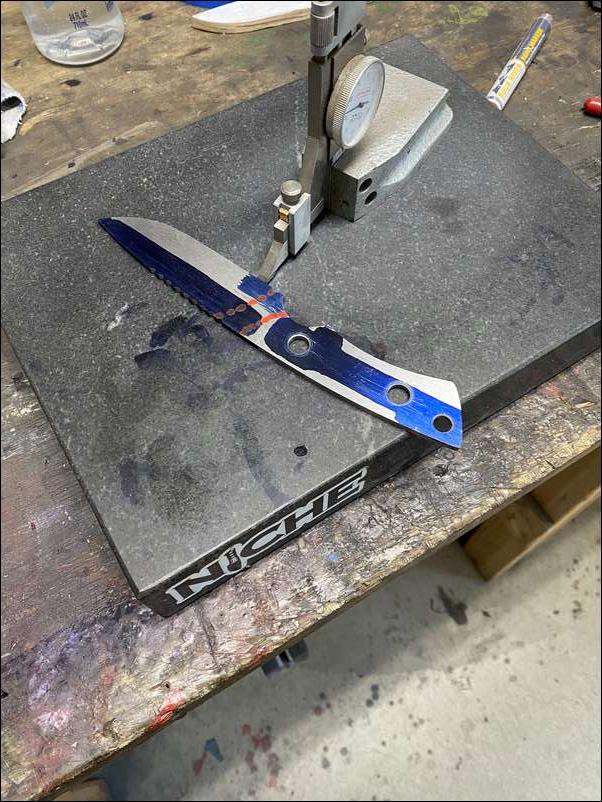
I used a height scribe to mark the center line of the blade
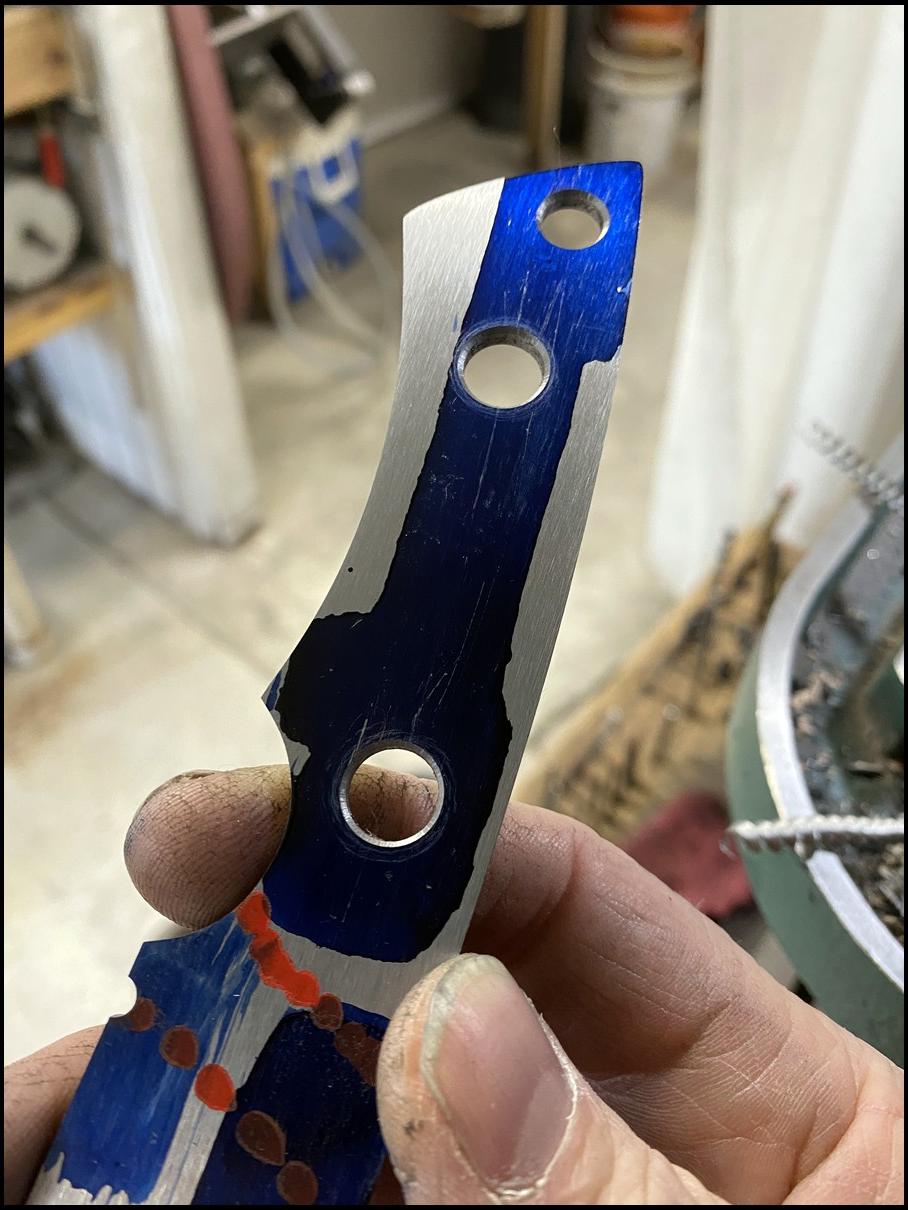
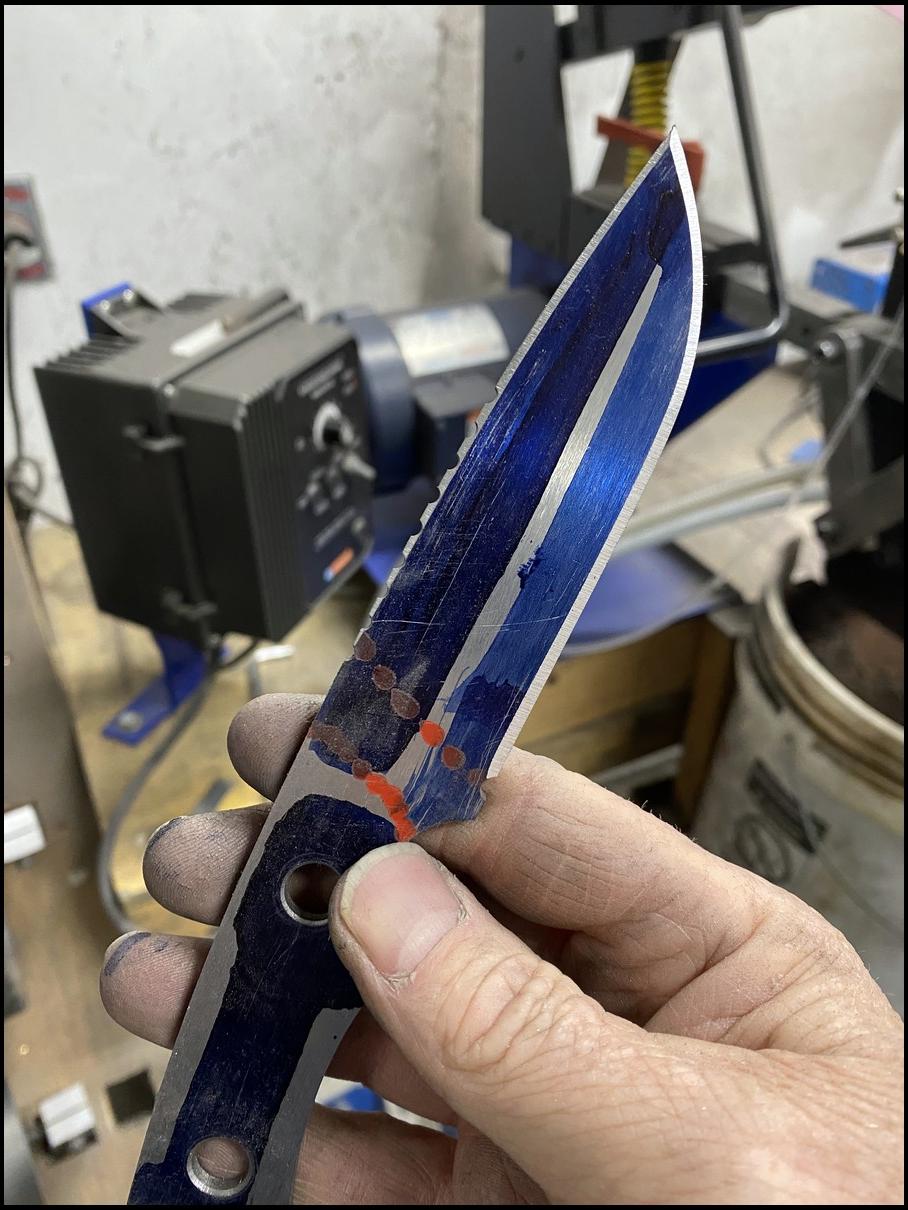
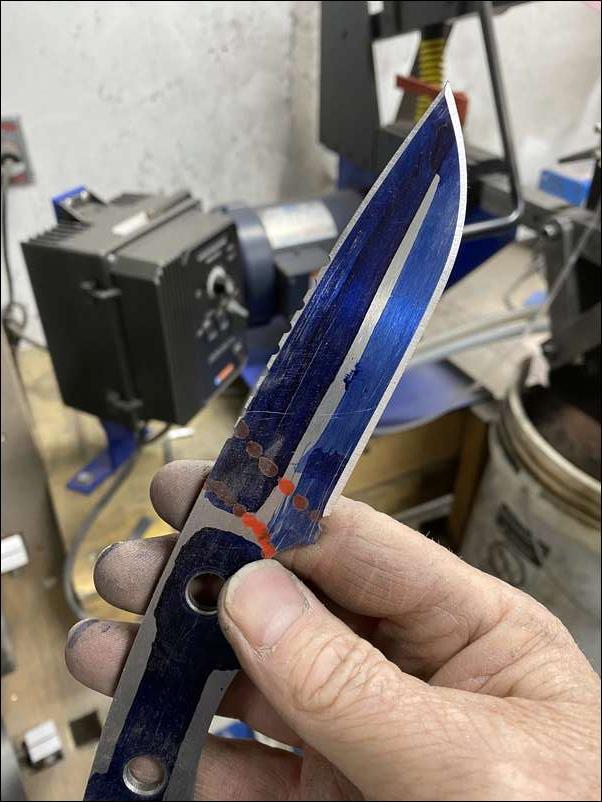
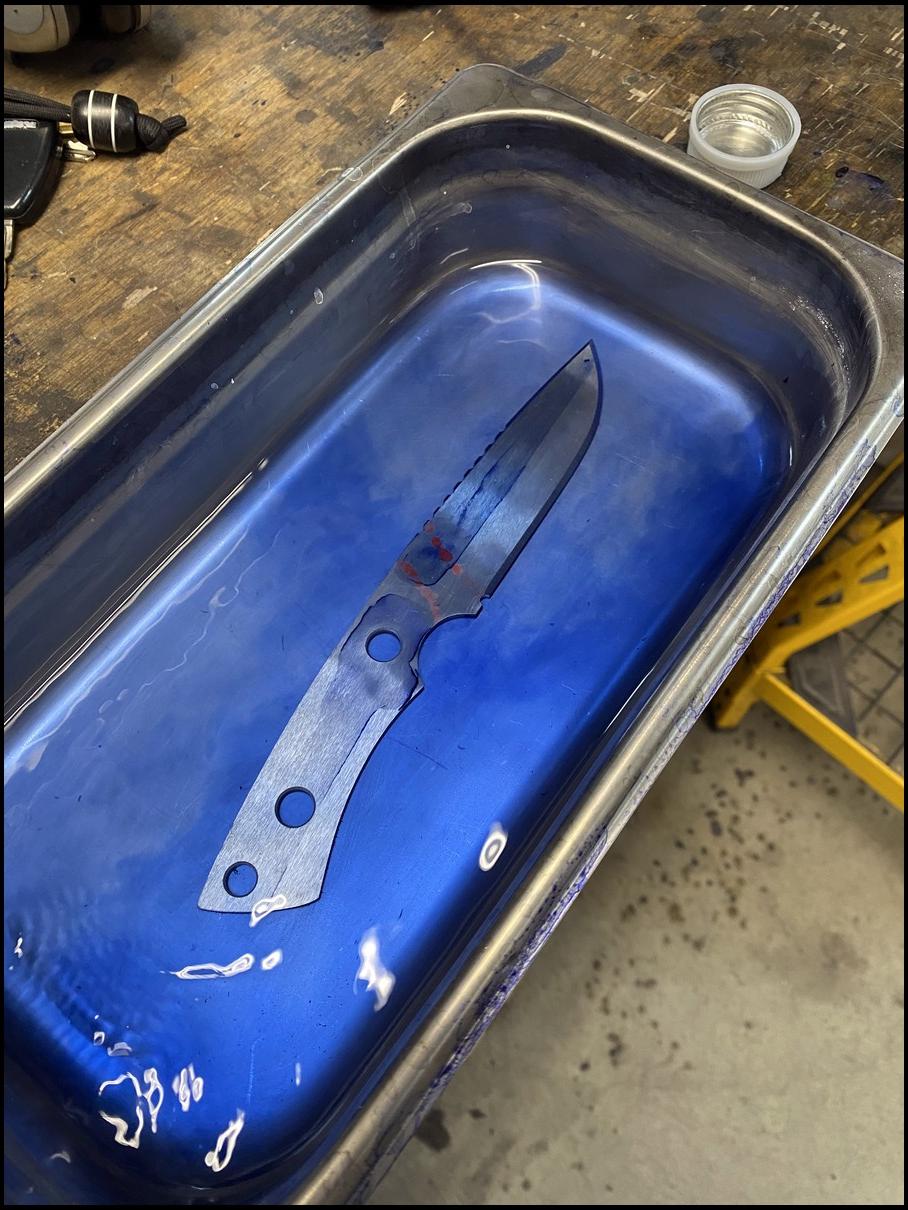
Now we are on to the “pre heat treat” grinds. I cut a small false edge on the top of the blade (for looks more than anything) and take the corner off the main bevel only to the 45 degree. I leave a lot of flats on the knife as during heat treat I will be cooling this blade between two water cooled aluminum plates. Most you have probably seen the knives quenched in oil, while I do that as well, Elmax goes into 35 degree aluminum plates to cool. And also the knife then gets an acetone bath to remove any dykem and oil before heat treat
“Guys that try drilling stainless for the first time get an attitude adjustment….Until you figure out that low speed is the key.” Truth! Like Rob said as well, low speeds and apply some cutting OIL. ;)
Looking good RJ. Your stuff on instagram is beautiful!
Thanks for sharing the process. A medium size drop point with jimping is my favorite.
Love seeing an artist at work.
It always amazes me the vast amount of skilled craftsmen on Bowsite, plus the sharing of their art in threads like this.
So much knowledge and experience. Very humbling…
Beautiful work RJ
Thanks for all the positive feedback. Is fun to share and show others what I do and how I do it.
Thanks for the build along RJ!
Your knives are beauties and I'll be following this thread and can't wait to see the finished product.
I am feeling the urge RJ, I retired last year from 34 years of being a machinist, you know what you are doing and who doesn't like a great knife? This is going to cost me!
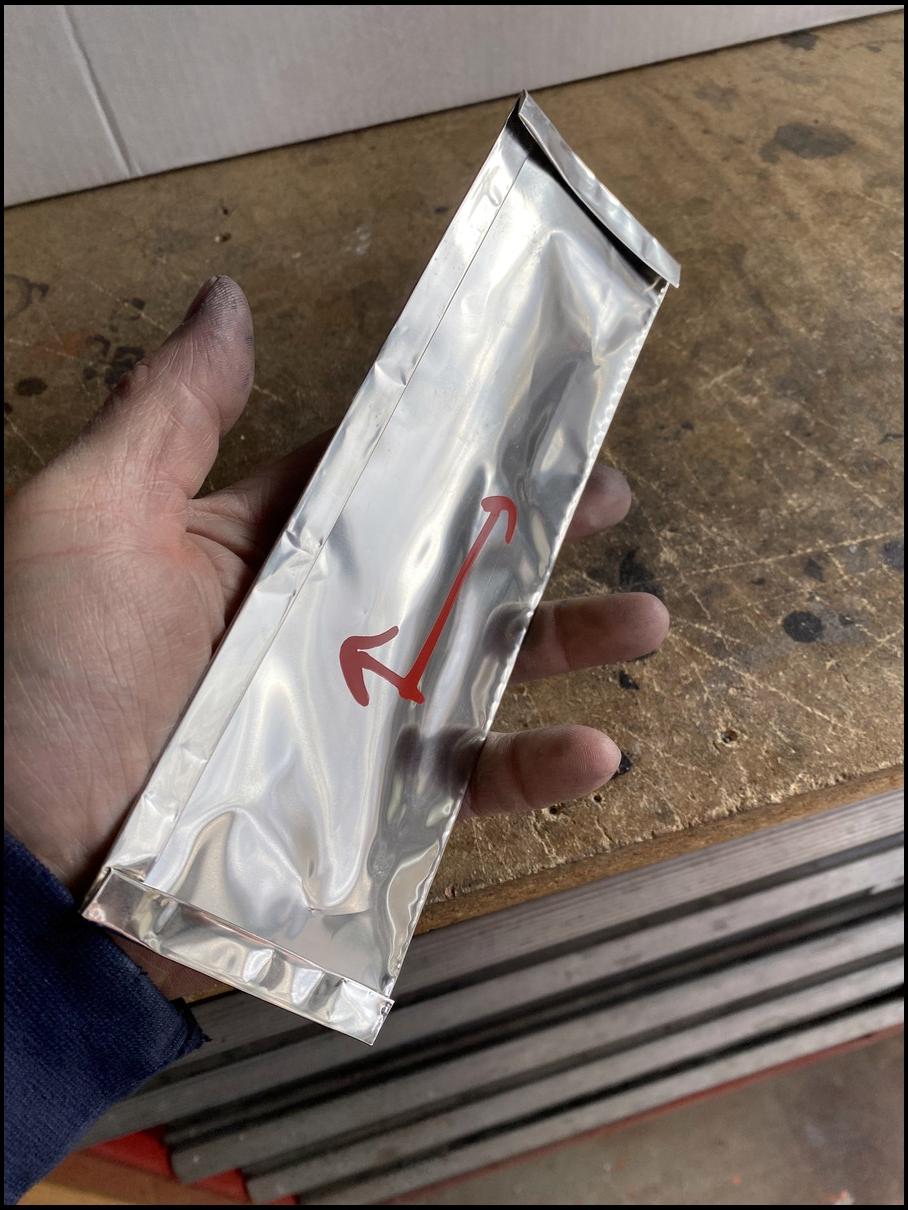
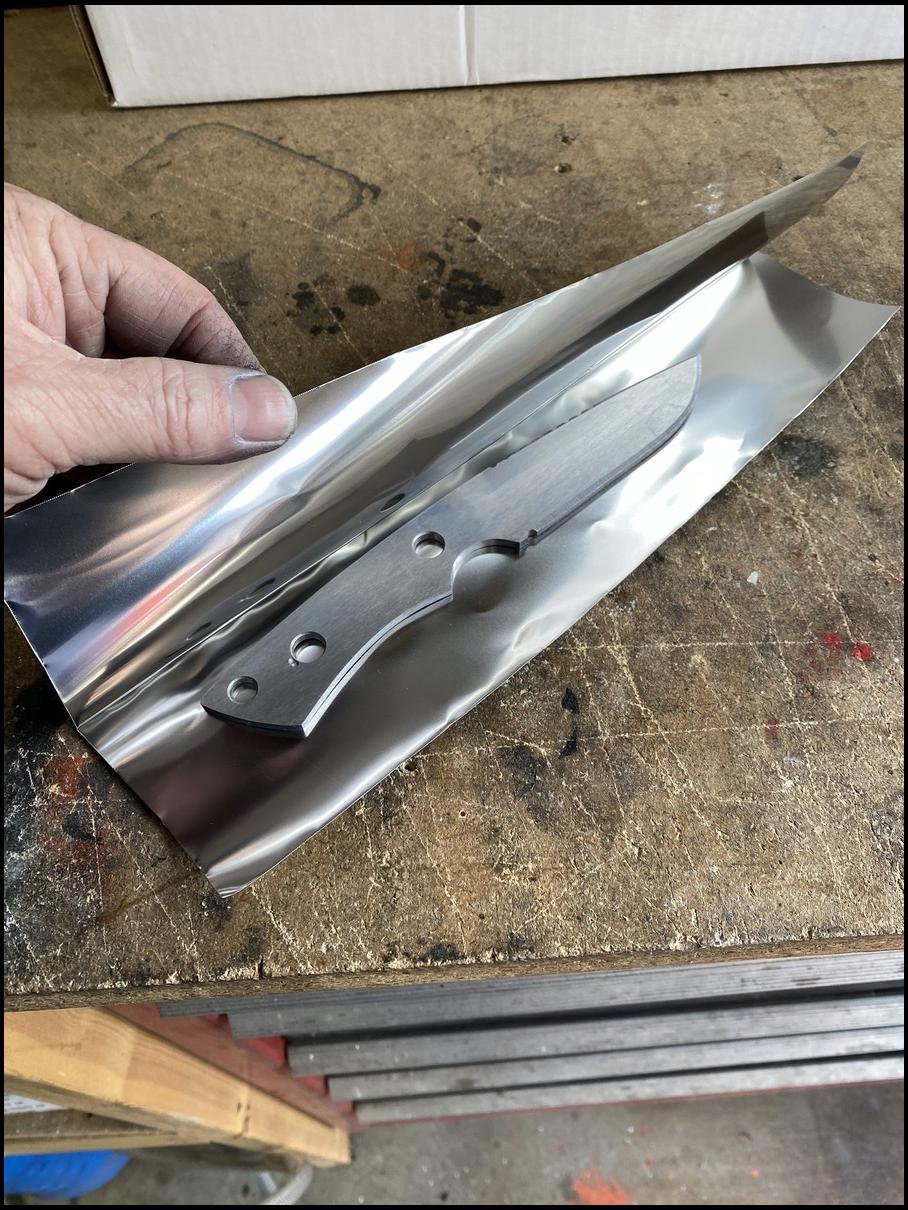
Sealed tight in the foil packet
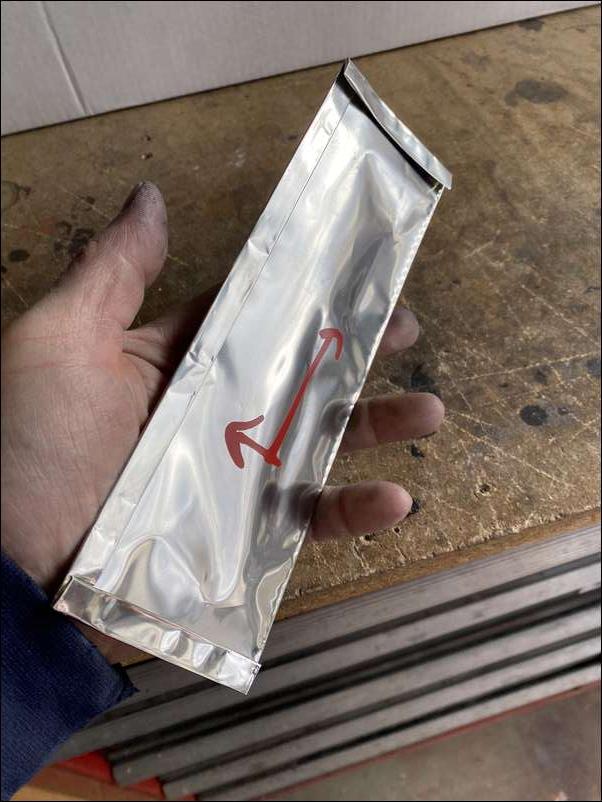
Sealed tight in the foil packet
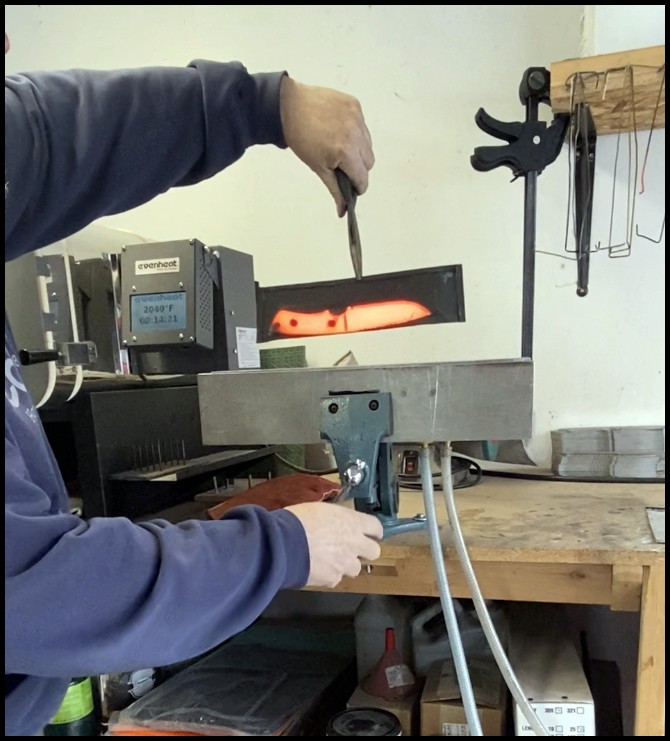
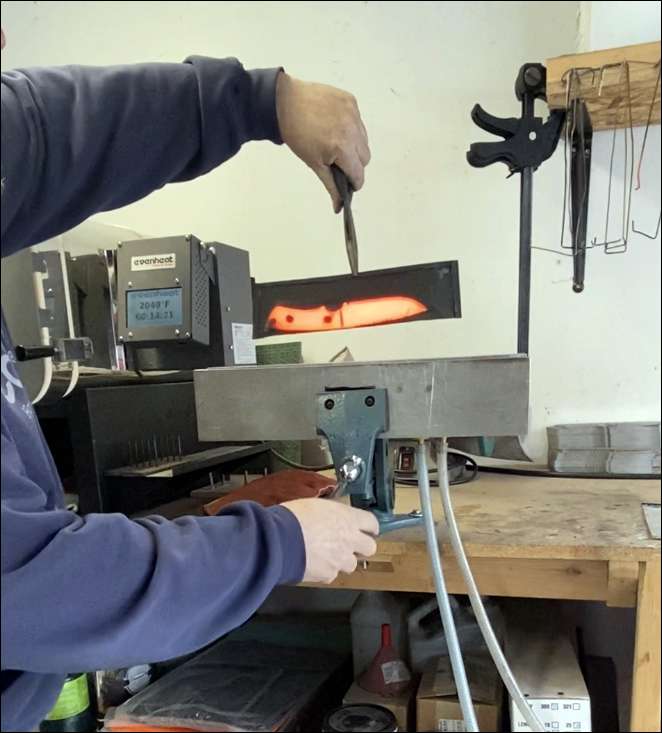
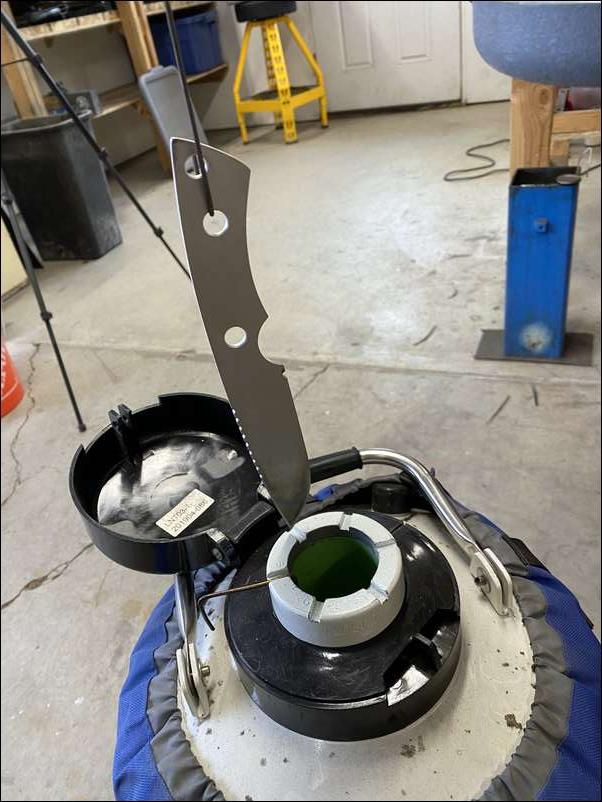
Time to make this knife… a knife. We need to harden this to about 62 Rockwell to perform where we want it to. Many factory knives run 57-59hrc but in my opinion you are not getting the performance you should get out of these high end blade steels. To get to that hardness we will need to cook this knife at an exact temperature for a specific time… some cook for 15 min and some for 45 min. I use a computer controlled oven to hold exact temps for that timeframe. This one will soak at over 2000f then quench in cold aluminum plates then get placed into liquid nitrogen overnight at -320f. Also to protect the carbon in the steel from being cooked out we need to protect it from the environment. I wrap the knife in stainless steel (309 type) foil as just like welding we need to protect the metals from the environment (oxygen) when that hot.
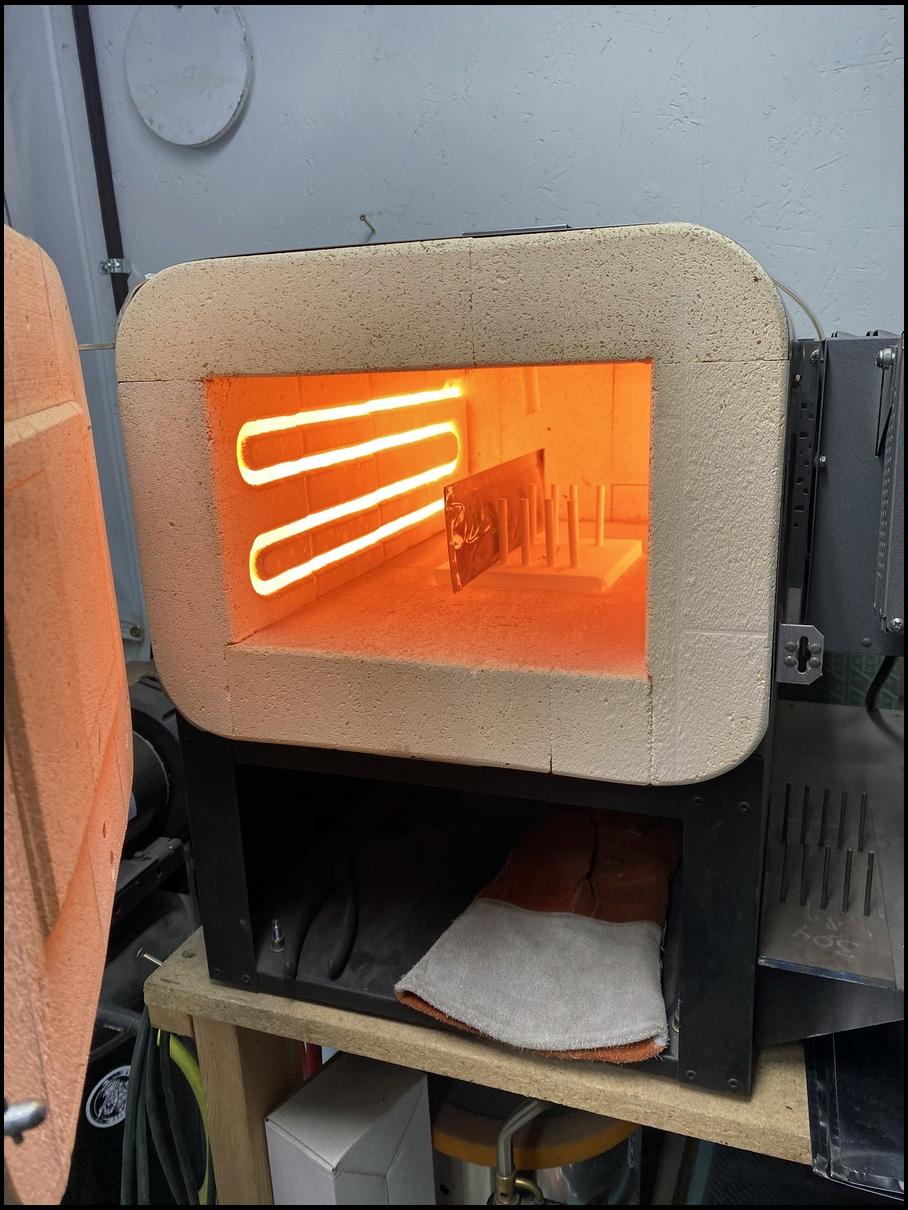
My oven. It cooks up to 2300f
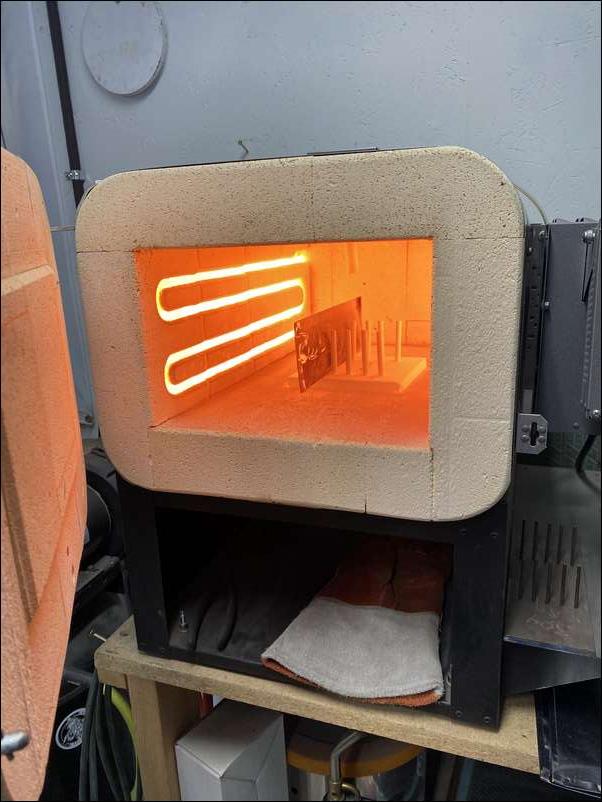
My oven. It cooks up to 2300f
Placing the knife in cold plates of aluminum. Will be cool to touch in 20-30 seconds
Placing the knife in cold plates of aluminum. Will be cool to touch in 20-30 seconds

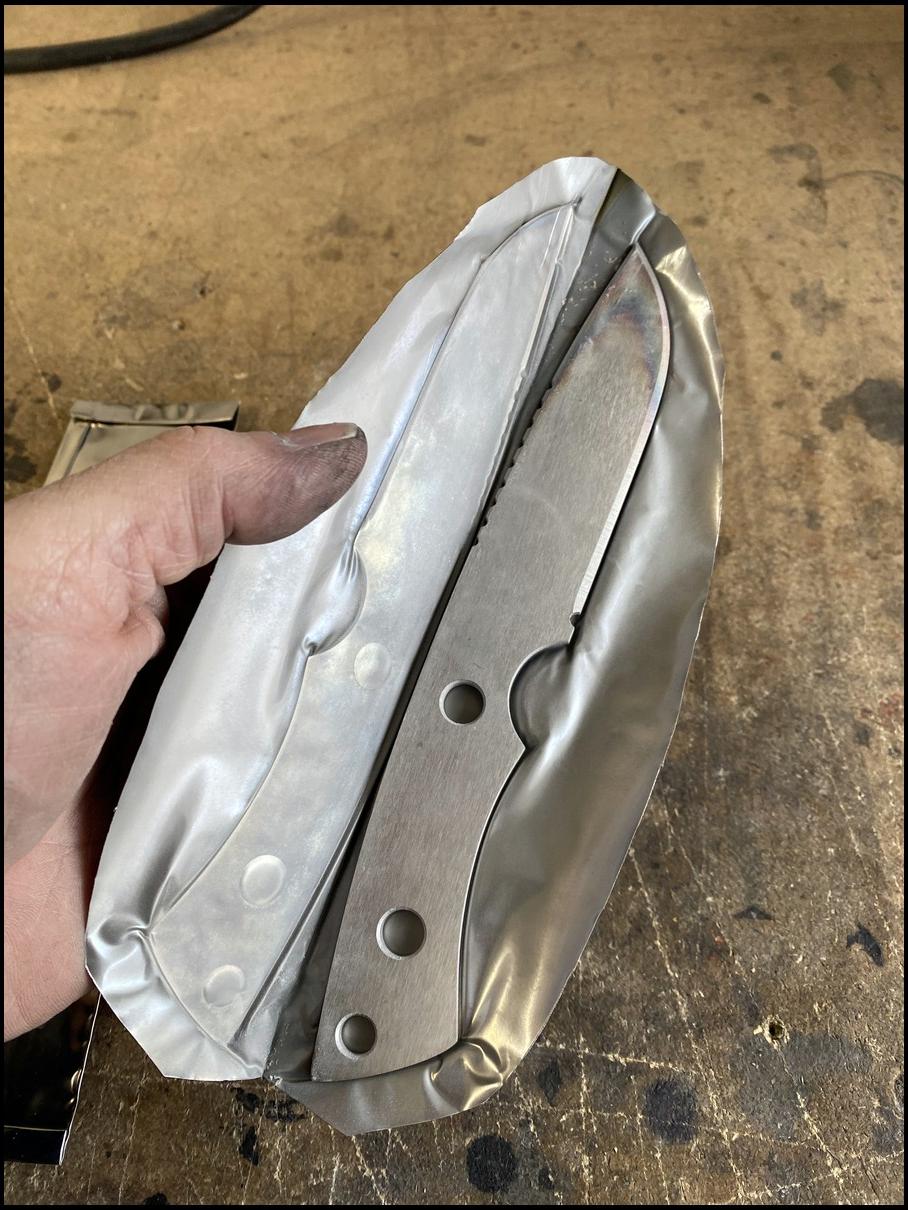
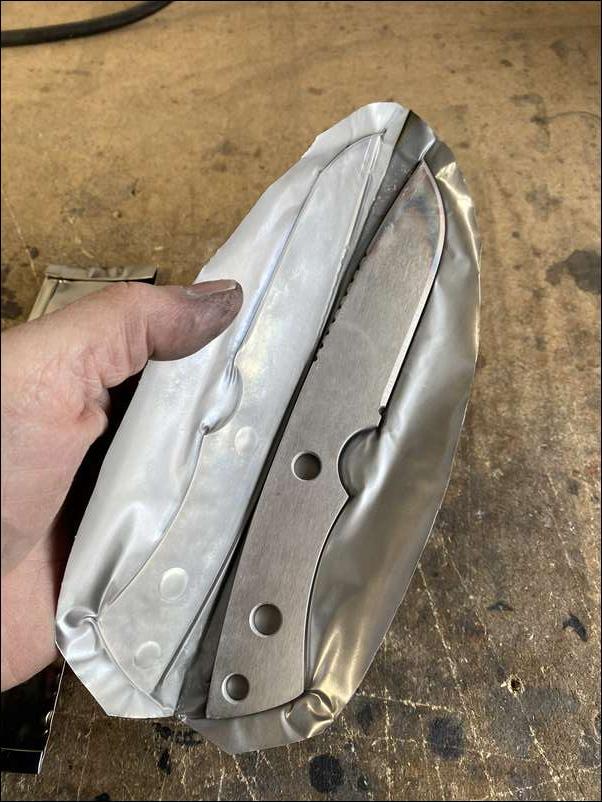
Going into liquid nitrogen within 2-3 min of coming out of the oven
Going into liquid nitrogen within 2-3 min of coming out of the oven
Almost forgot. The knife stays in the foil when going into the plates to cool. When cool to touch I cut out of the foil
Almost forgot. The knife stays in the foil when going into the plates to cool. When cool to touch I cut out of the foil
Thanks drycreek. I appreciate all the compliments and if you guys have any questions hit me up. I will do my best to answer them all as I go.
This is one of the best threads in a while. So cool to see a process I knew nothing about.
Thats neat how it “glows” theough the foil. I woulda thought at those temps they would stick together.
Molon…. Yes they do stick together… they actually forge weld together at these temps but there is a little secret I did not show. ;-) A little baby powder on the blade keeps things from welding while in the oven.
I can't imagine the amount of trial and error that goes into acquiring the knowledge to make those knives.
RJ, we're you mentored by anyone or was it mostly trial and error or a combination of both?
Supernaut I was not mentored by anyone other than YouTube. Lol What I did do was I read everything I could find on forums, in written articles and such. Another thing I did that really helped me was I came to learn who in the business was very good at what they did (some guys were masters at heat treat, some were high carbon steel specialists and what not) and wrote them once every 6 months or so a simple question asking for advice. It was not often I asked as I did not want to pester and felt if I did as much as I could to learn on my own the “old G’s” I should call them, would help me with tid bits of needed information I needed to continue growing.
Rj, thats a nice trick. I woulda been back at the grinder trying to get back to where i started. Lotsa knowledge in this post for sure.
Thanks for the info on your learning process RJ and kudos to you for learning how to craft beautiful knives!
Thanks again for the build along.
Robert, what caused the bit of discoloration at the front tip during heat treating? And how will you address that for the finished product?
Matt
GG. That is from a split second the foil let some air (oxygen) in as the blade was cooling in the foil packet when clamped between the plates. When the blade cools is can shrink up and tighten the foil like a shrink wrap and the corners of the knife can make a small hole. That said that much is not an issue and will all be ground off when we taper in the tip of the blade on the grinder. That shows what that knife would look like if we did not wrap in foil as would be a burned up mess of left to cook exposed for 30 min being that happened in just a split second.
Here is the knife out of cryo treat at a -320f warming back up to room temp. The knife is now at full hardness and we will need to temper that back so will go back into an oven around 400f for about 4 hours to draw some brittleness out and become more durable.
Thanks, that makes sense, and I'm glad it's easily corrected later on.
I'm curious, when you were tapping into the knowledge of experts, did you ever communicate with Phil Wilson in California?
Matt
I did not communicate with Phil Wilson in CA. Though I have read his website and seen a few of his knives I did not get to know of him til this last year.
wow that really cool enjoying watching
Phil is a great guy. At the time I ordered a custom set of knives from him, he was about the only knife maker who would use CPM 10V if requested. He treated mine to HRC 62, IIRC. They are a bit brittle and hard to sharpen, but they hold an edge incredibly well.
I'll stop bugging you, now. I'm really enjoying this thread.
Matt
wow really cool to watch and looking to forward to the finish.
Not bugging GG. I enjoy this kinda stuff.
Great to watch a skilled craftsman at work. Great thread. Thank you.
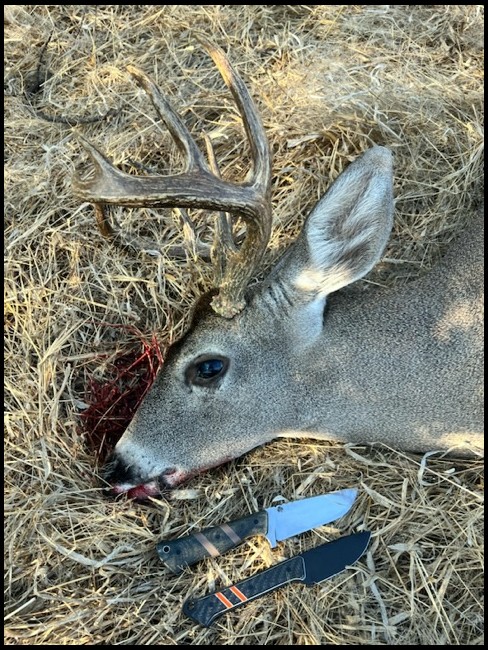
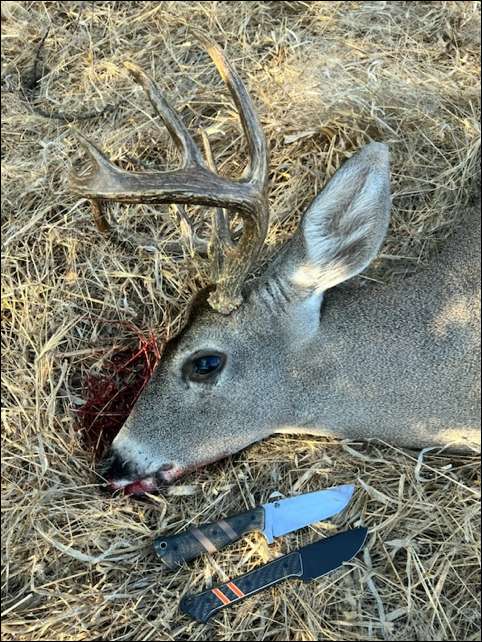
Here’s the specs on my knife Robert made. The retention is amazing. But probably not a good prying tool. Or splitting wood.
But for skinning and caping a dirt encrusted bull it’s the cat’s pajamas
Thanks altitude! Glad that knife worked well for you. To be honest that’s why I started making knives. It just seemed that everytime I had a bull to take apart or a buck my knife always left me wanting something better. After my wife telling me “stop complaining about your knives and go make your own!” I began this endeavor. Anyhow. I do what I love to do and really like making tools that can make a grueling job all the easier.
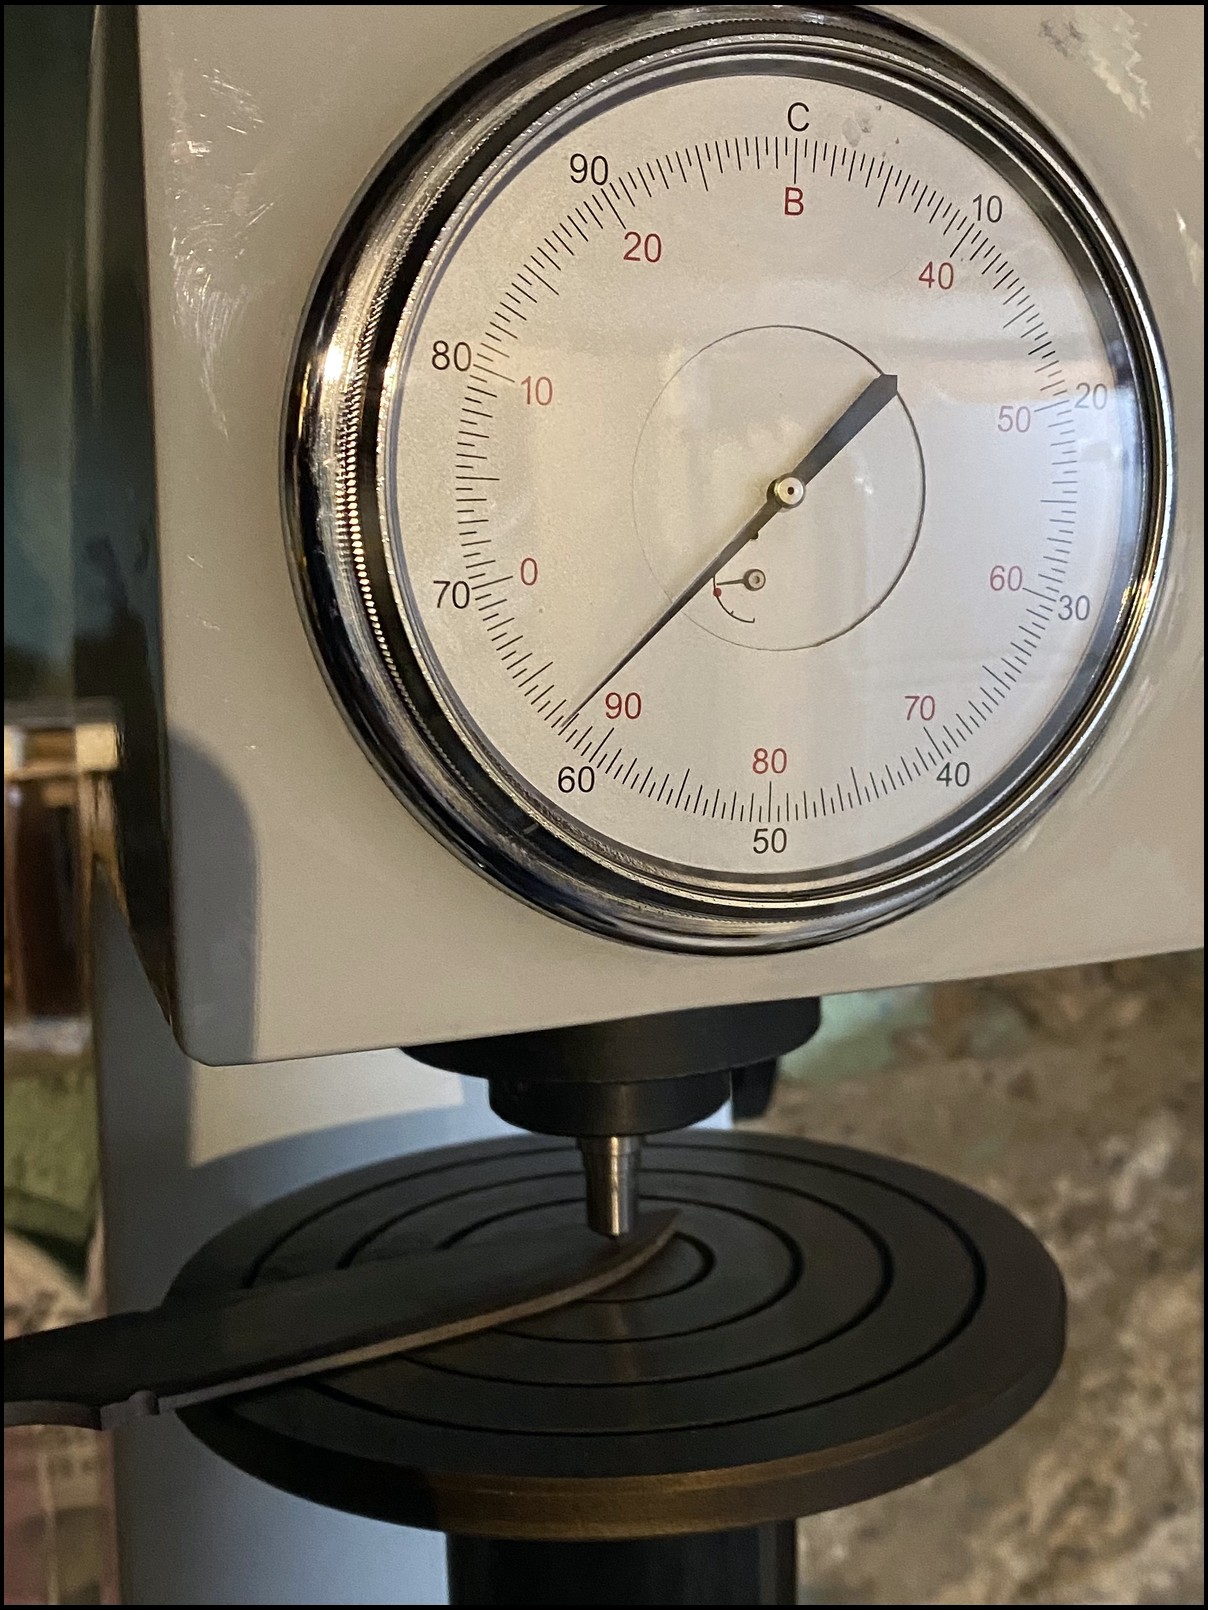
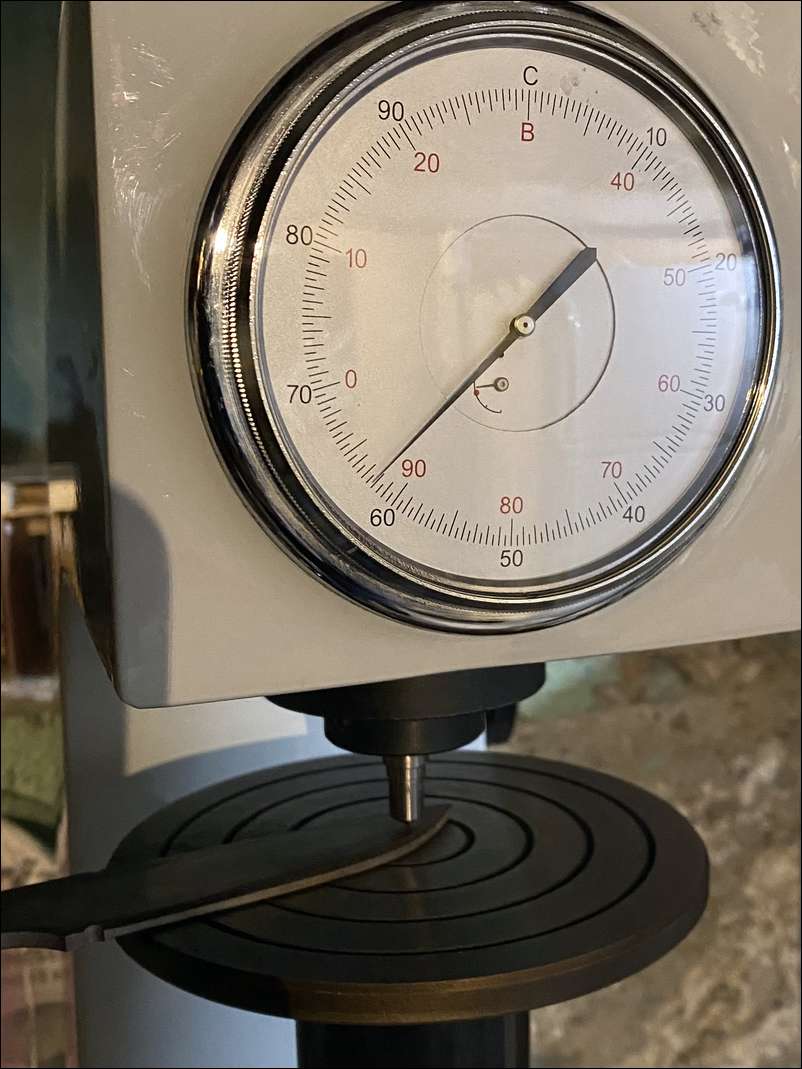
Ok. Got the knife out of temper this afternoon and my goal was to harden the blade to 62.0hrc. I Rockwell test each knife and this one came out at 62.2hrc. That’s a good spot for a hunter in Elmax.
Loving this thread! Hate to even guess how much $$$$ you have tied up in tools and equipment. Great work!
Enjoying the thread also. Your making it look easy! Nice equipment.
I can certainly vouch for Rob and his knives!!
Thanks bowandbird I appreciate it.
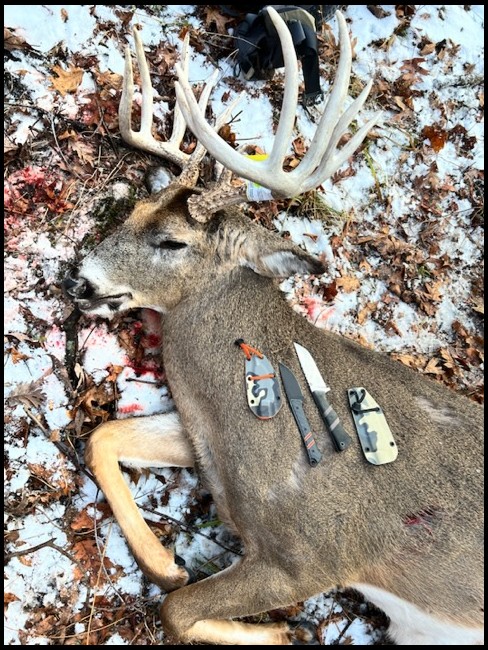
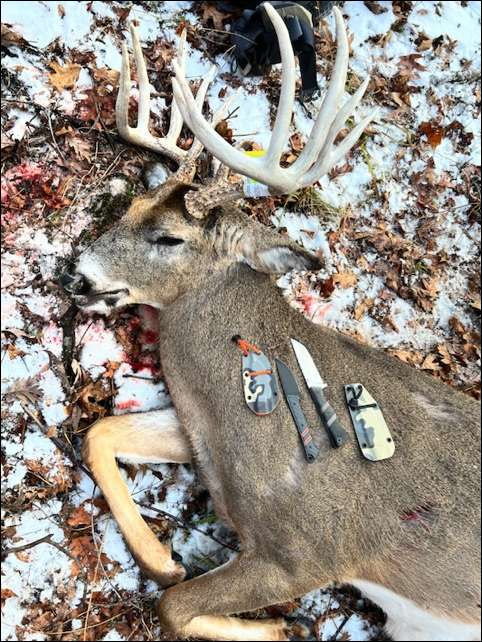
I caped and broke down both the Coues and the Iowa buck above along with my son's Sitka blacktail all without resharpening either knife. I'm hoping to add a caper to my collection very soon!
Not only are the knives incredibly durable but Rob can customize the scales with just about anything you can imagine. I had him make 3 knives with thin blue inserts between the tang and the scales and gave one to my son and son in law who are both Deputy Sheriffs....and they really like sharp things!
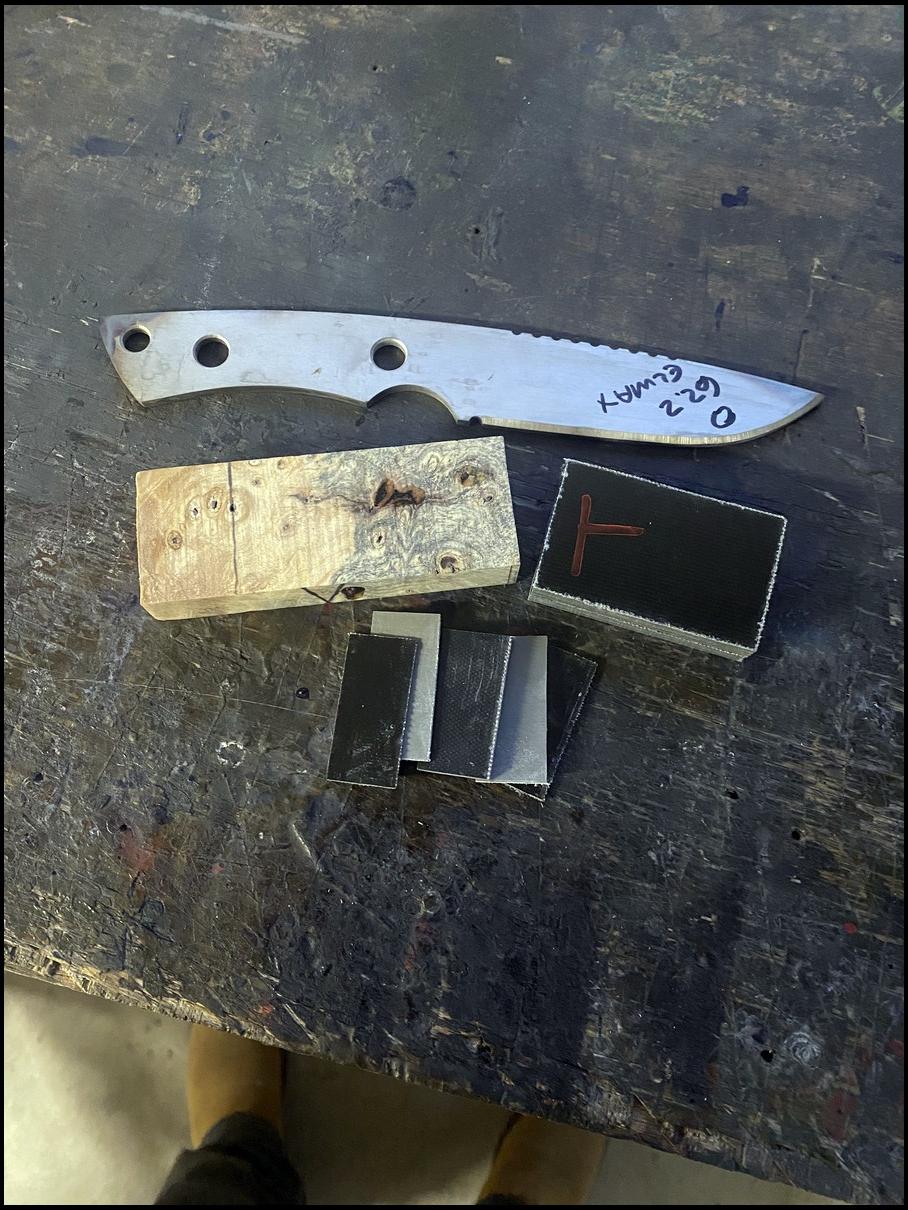
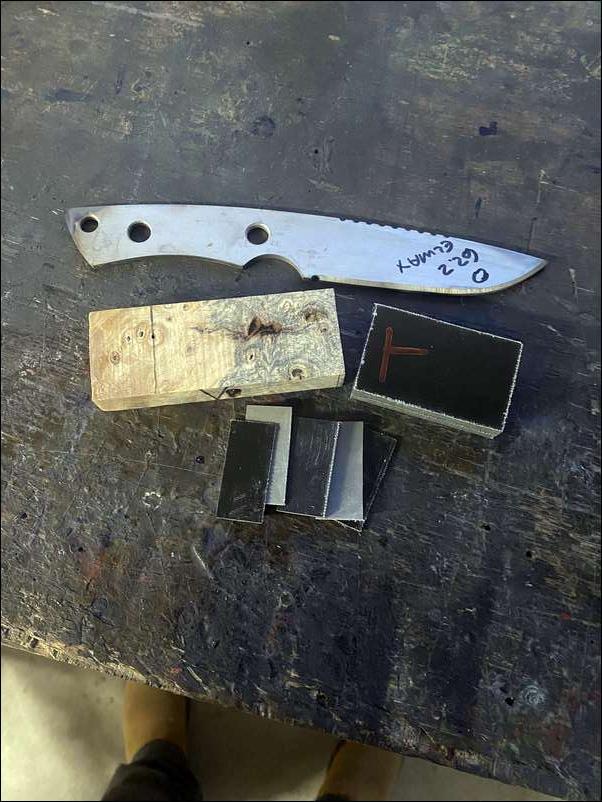
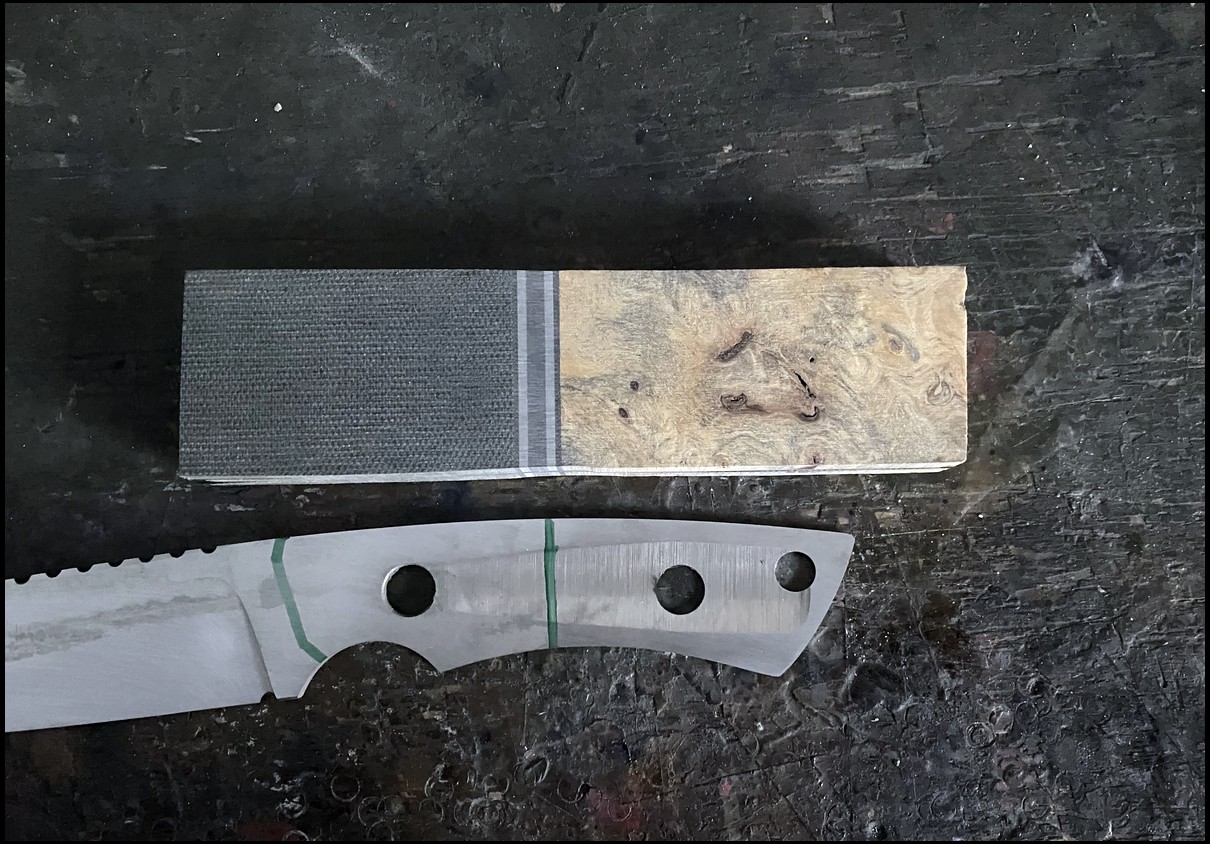
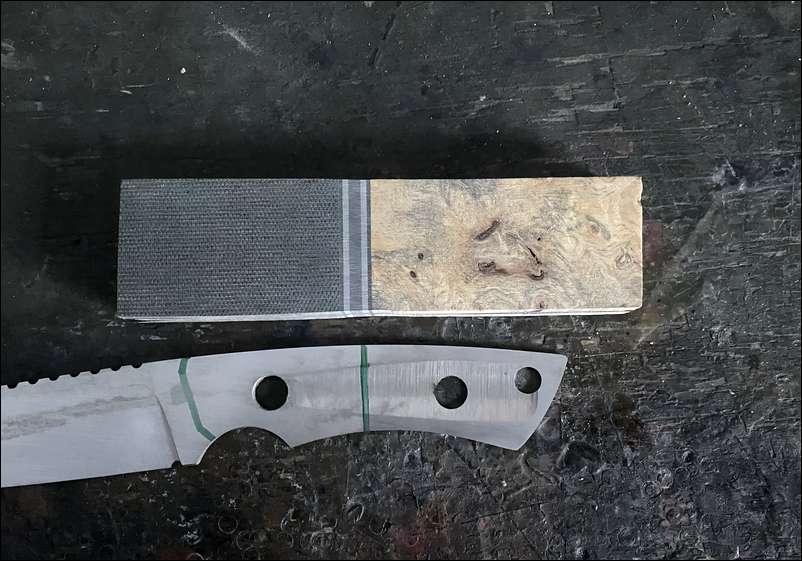
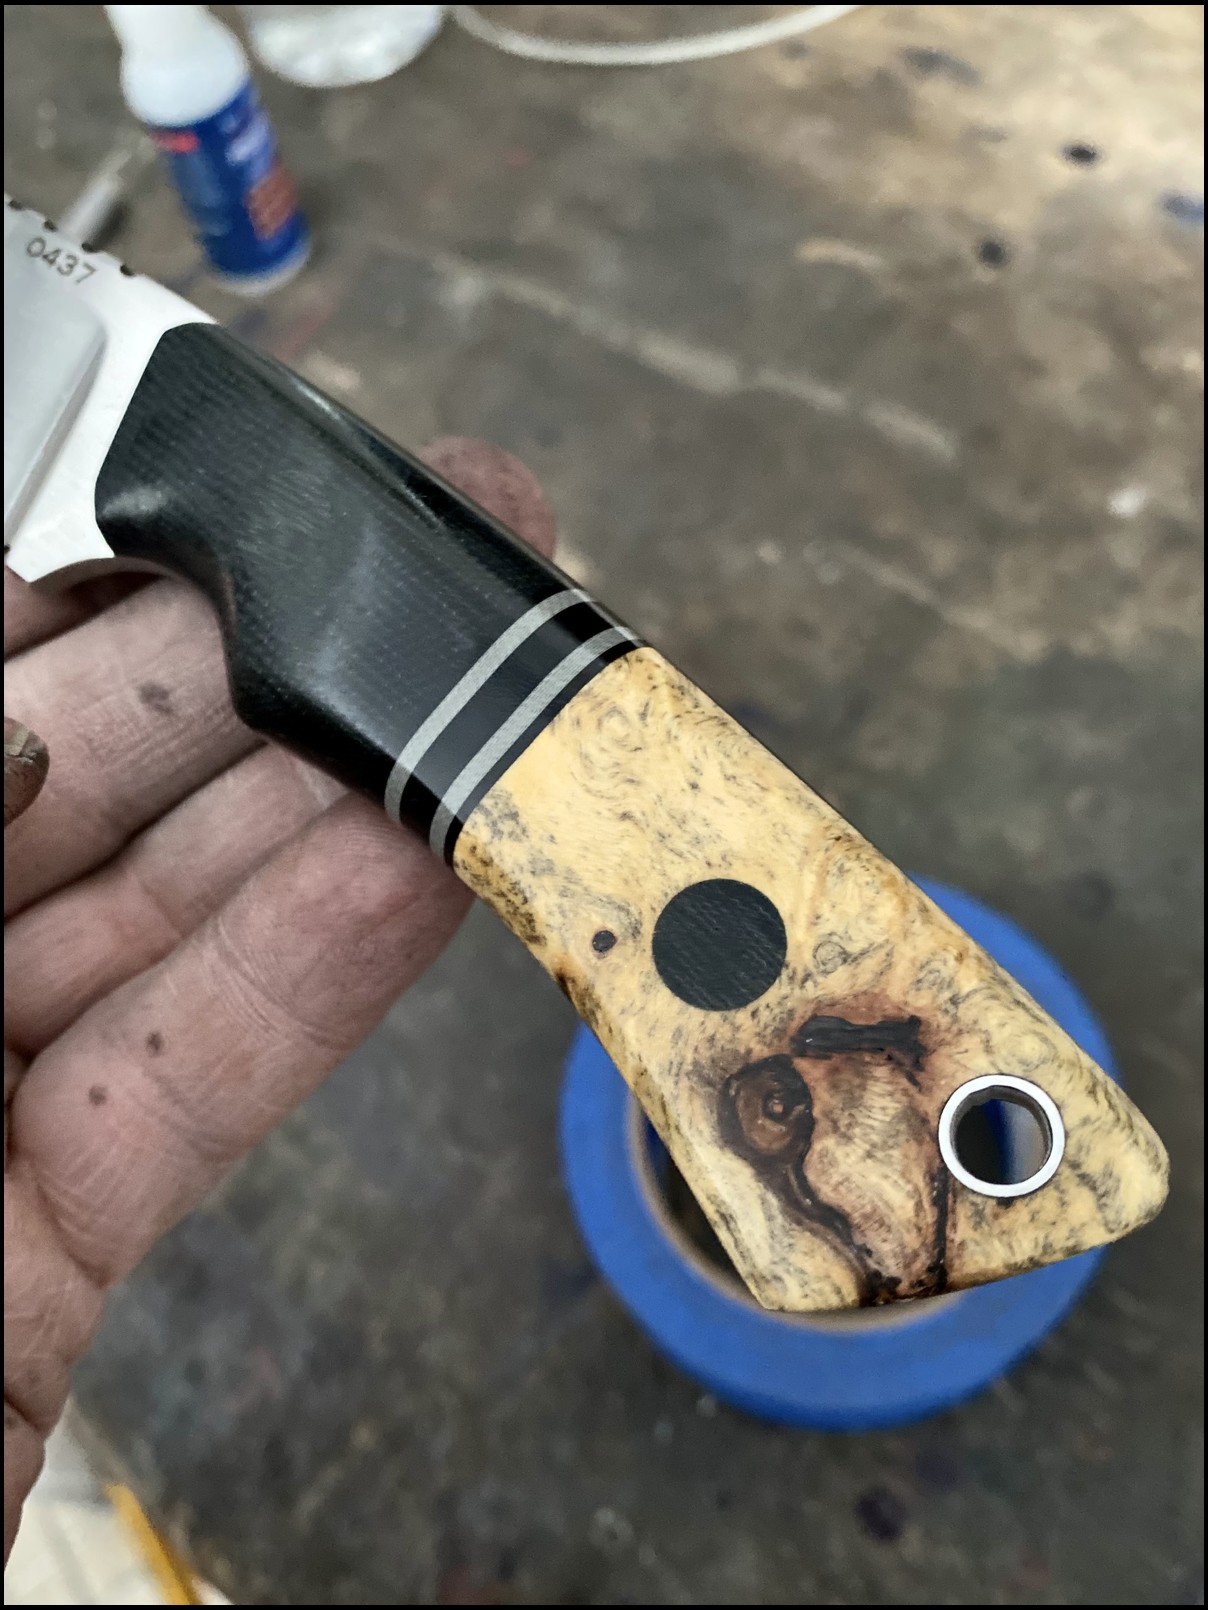
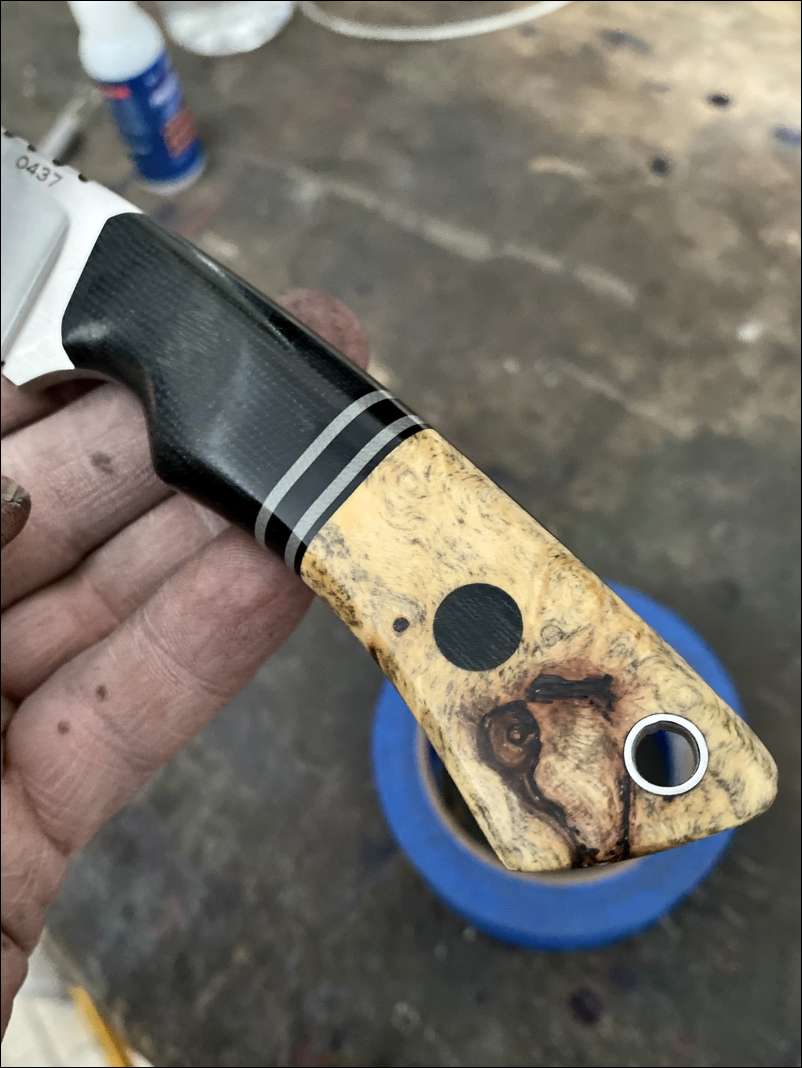
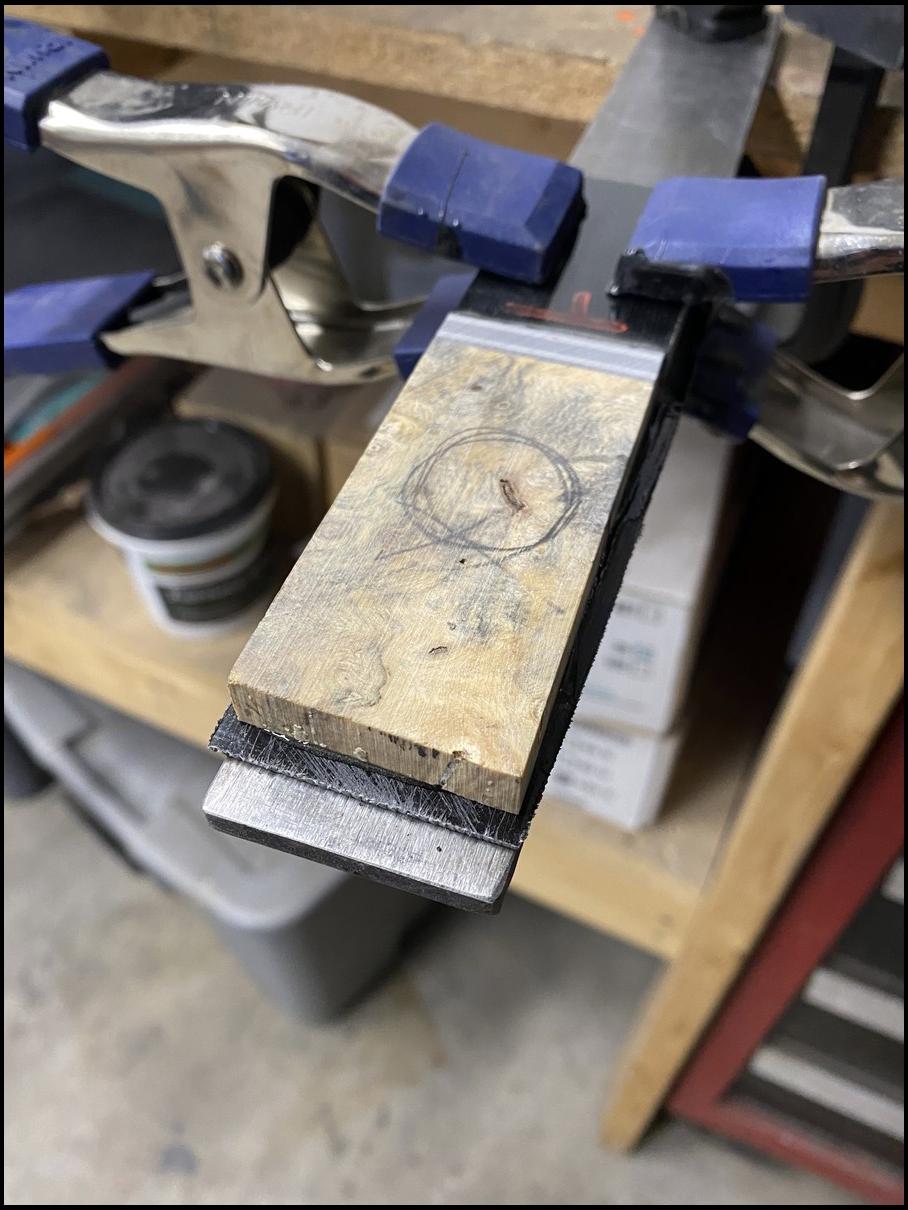
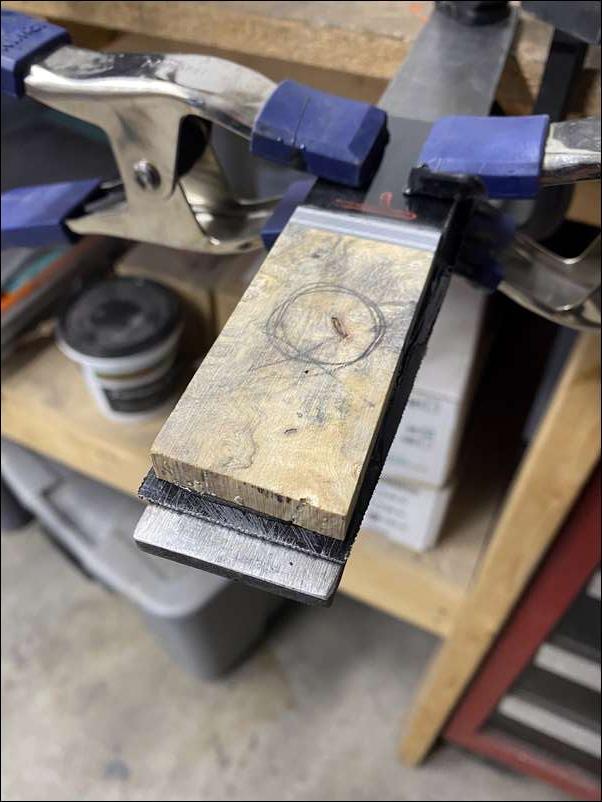
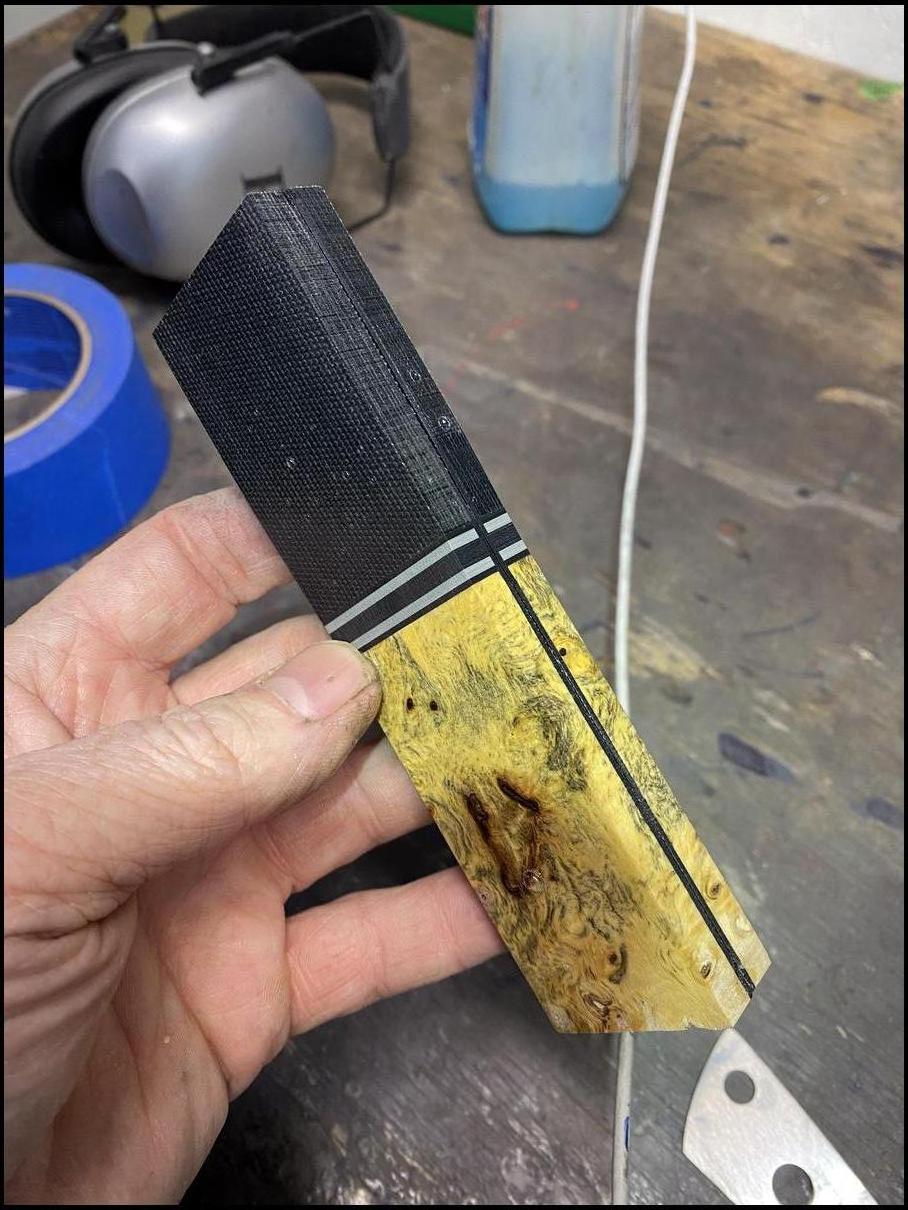
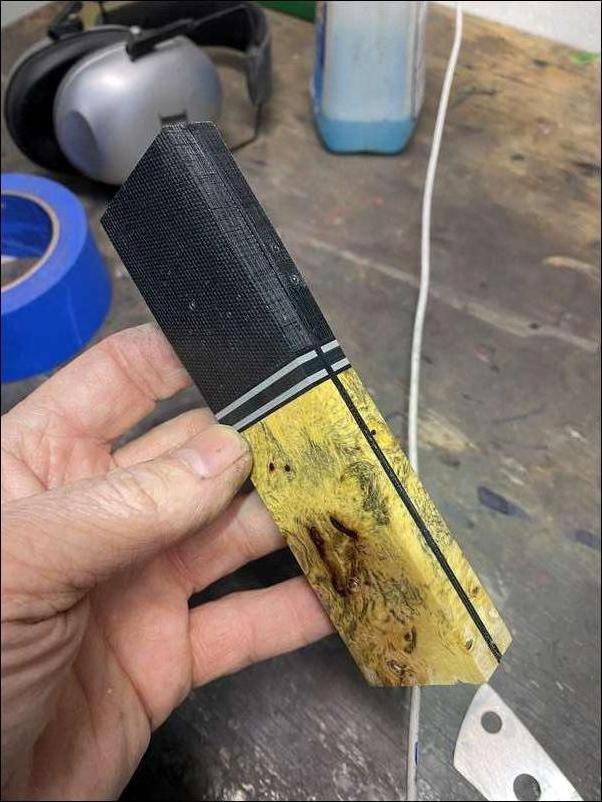
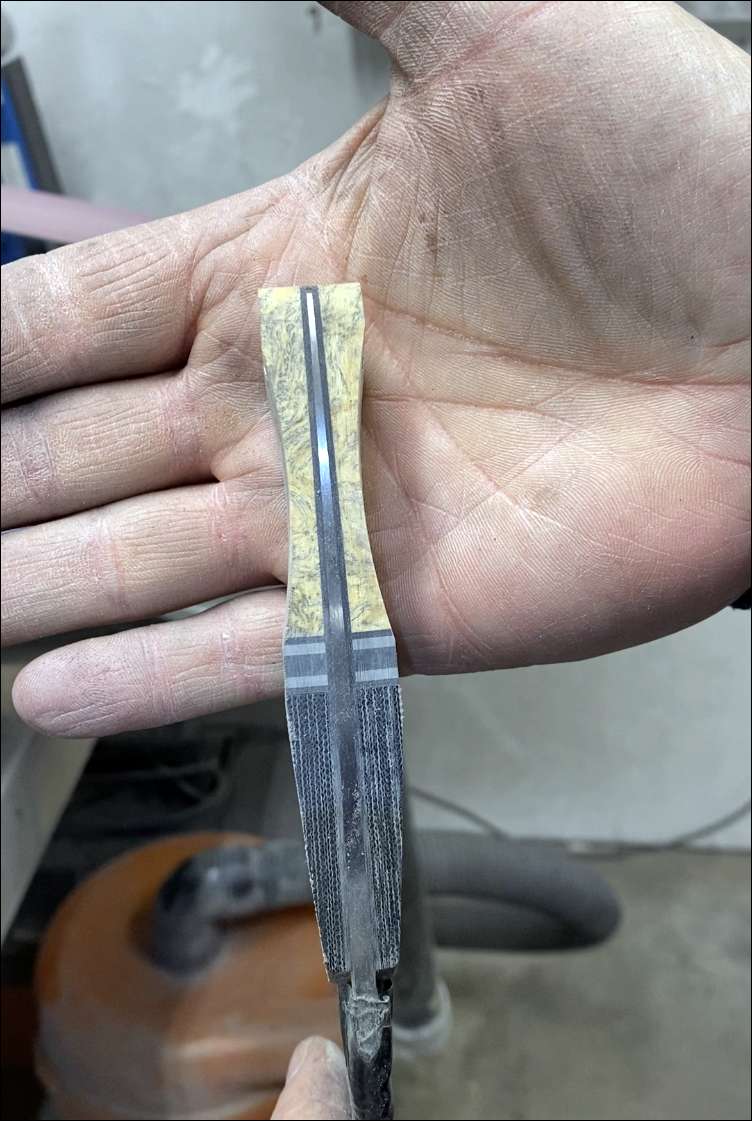
Now that we have a knife blank heat treated and ready to go it’s time to pick out handle materials and construction. This one will be half black micarta and stabilized buckeye Burl with some gray/black accents. First I make a block suitable to for the knife by laminating with structural grade epoxy (no 5 min epoxy used only commercial grade marine epoxy).
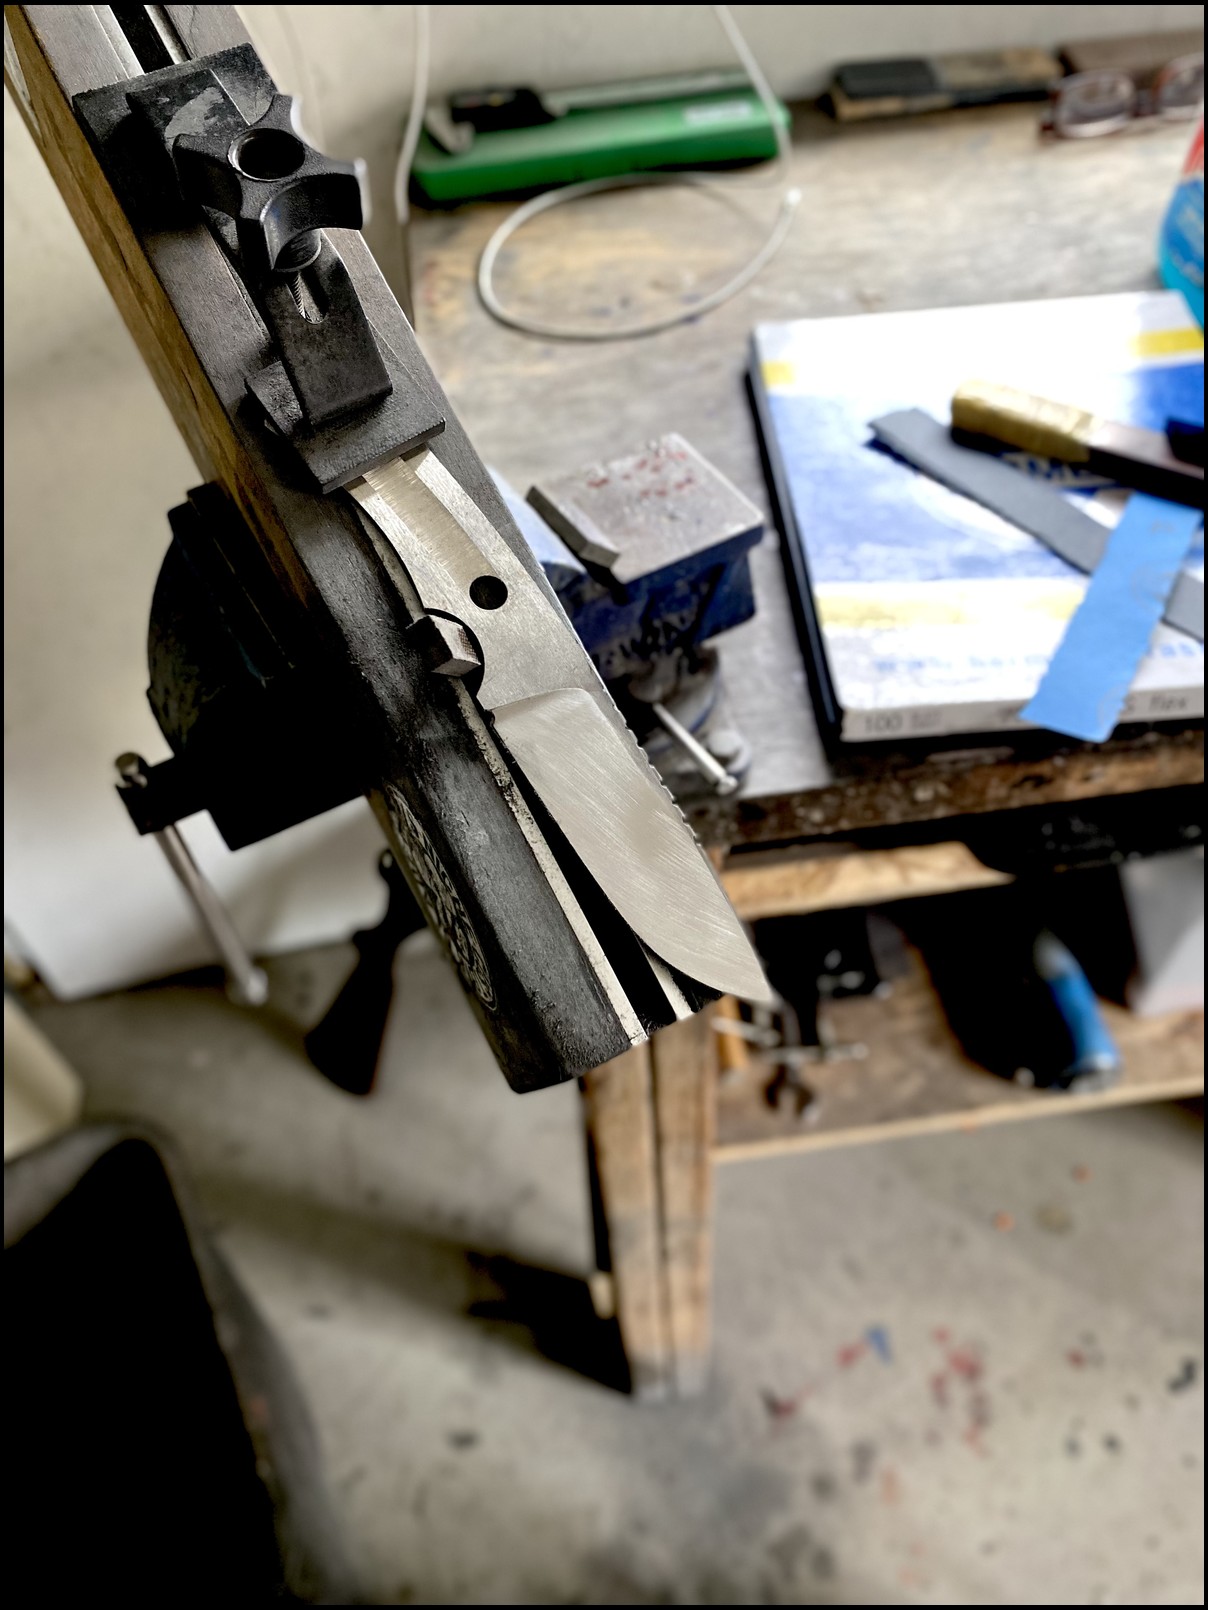
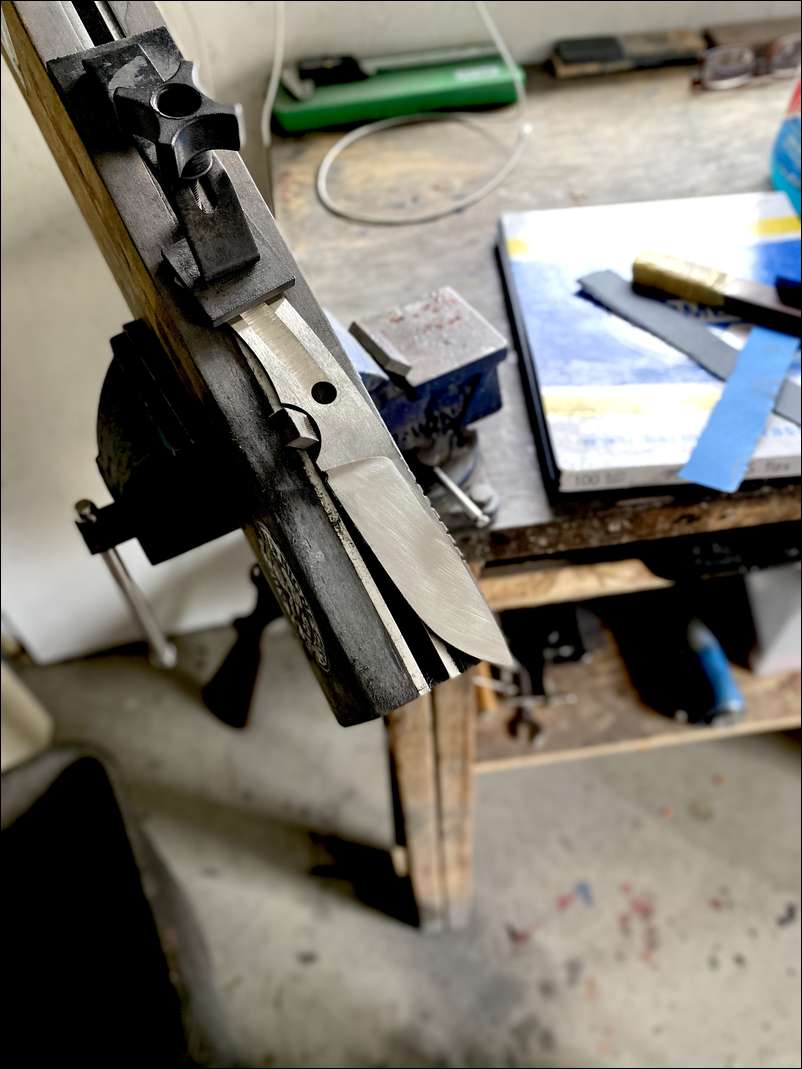
Robert, what is the small notch for at the rear end of the edge?
Matt
GG… that is a sharpening choil. I put them on my knives with the exception of my capers. It allows you to sharpen without running your stone into the plunge. Some like them… some do not.
I thought I was pretty savvy about knife terminology and features, but I'd never heard of a "sharpening choil". Thanks for teaching me something new. I'm actually learning a lot from this thread.
Matt
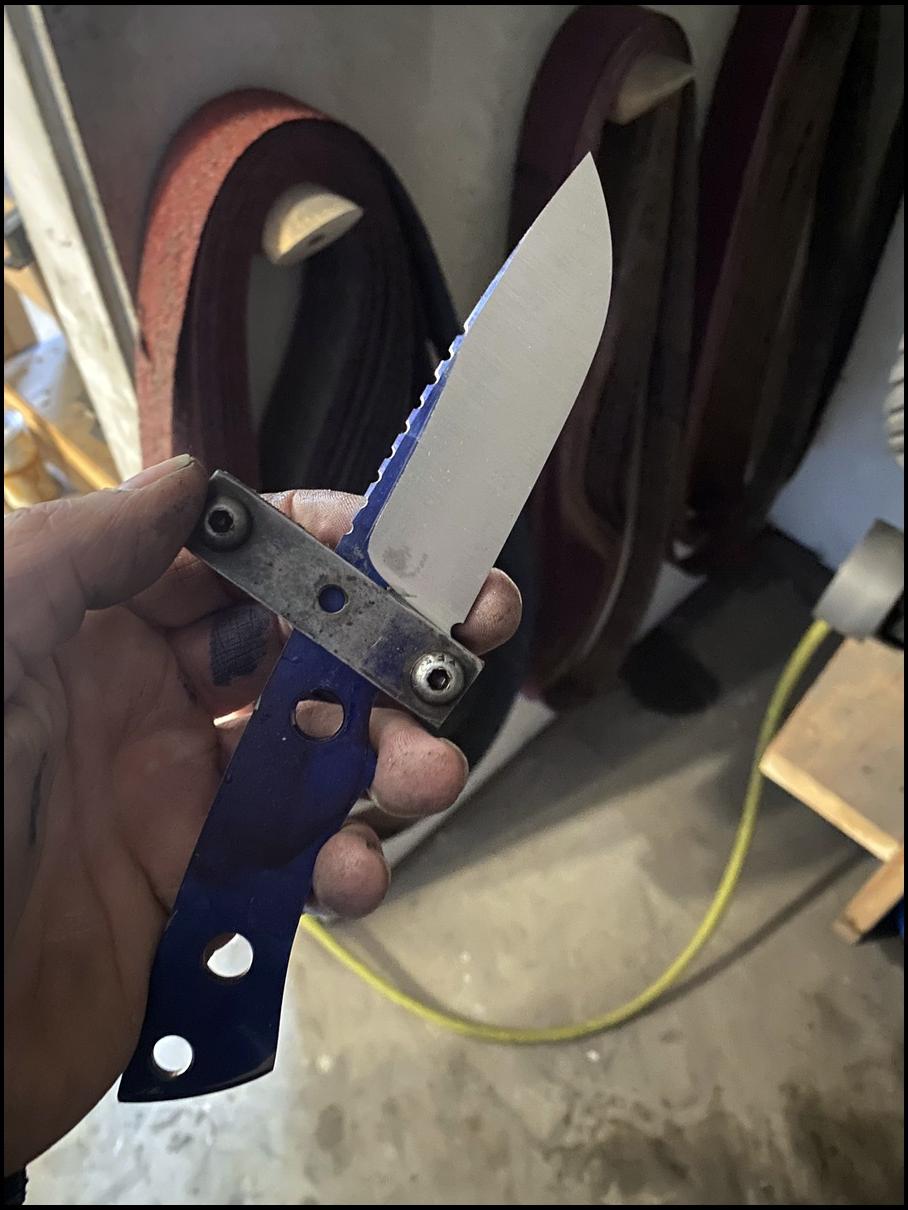
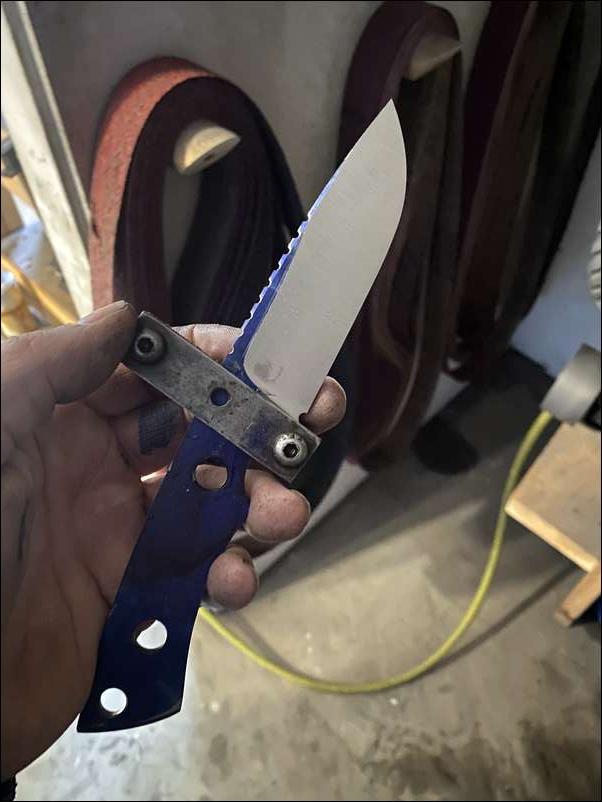
Here is a knife with no choil
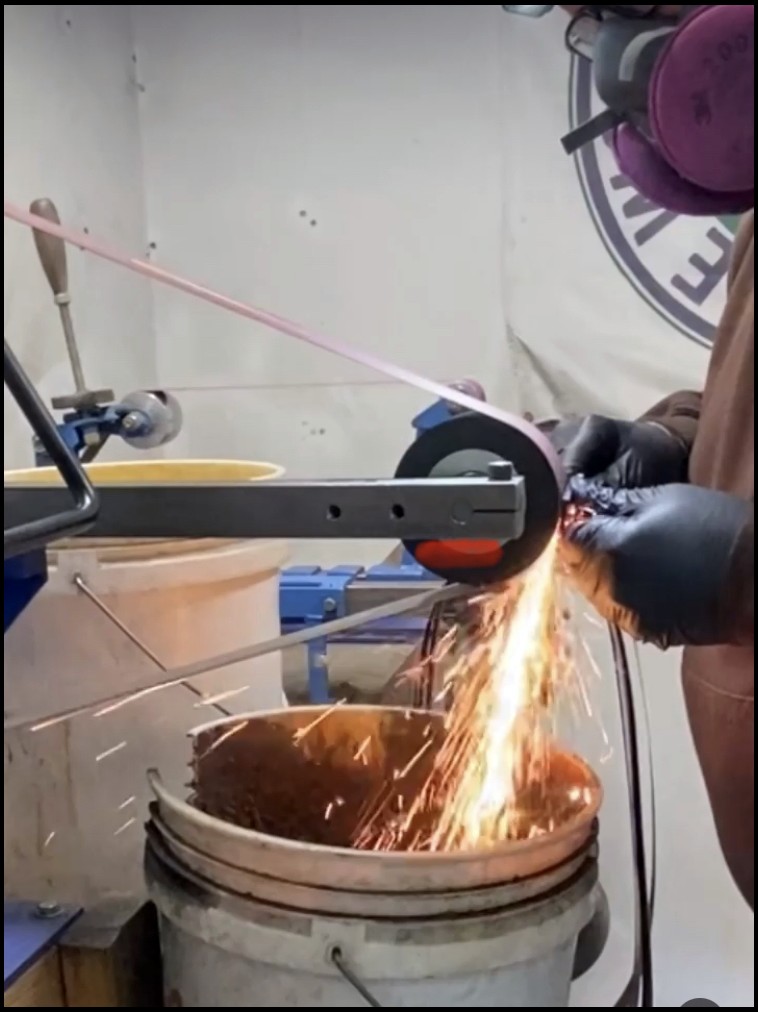
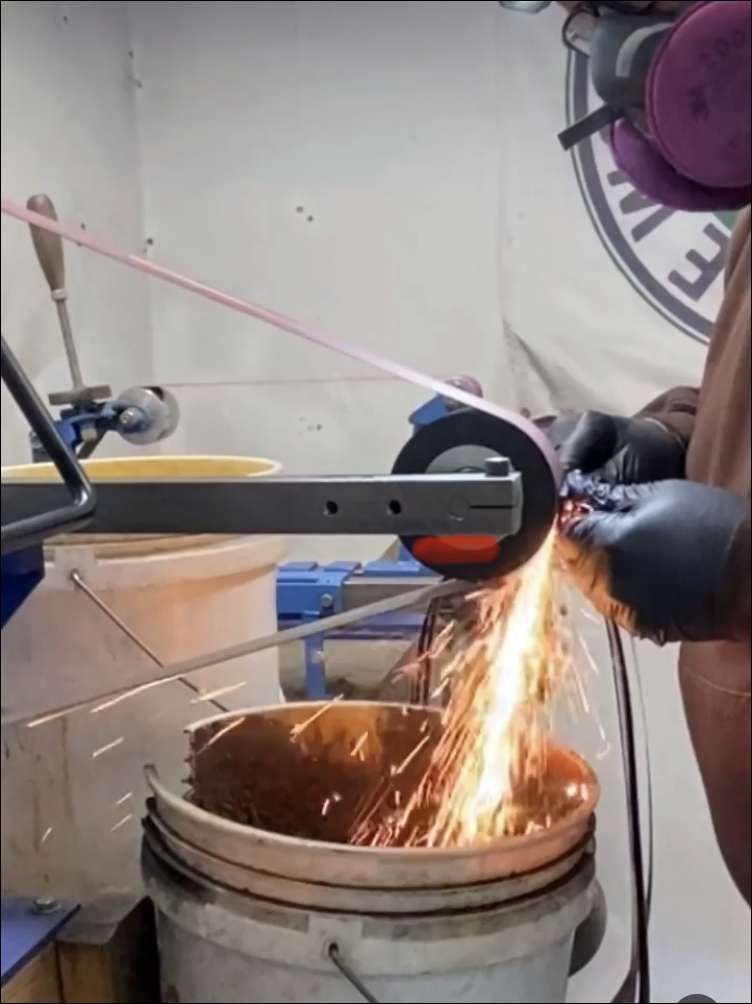
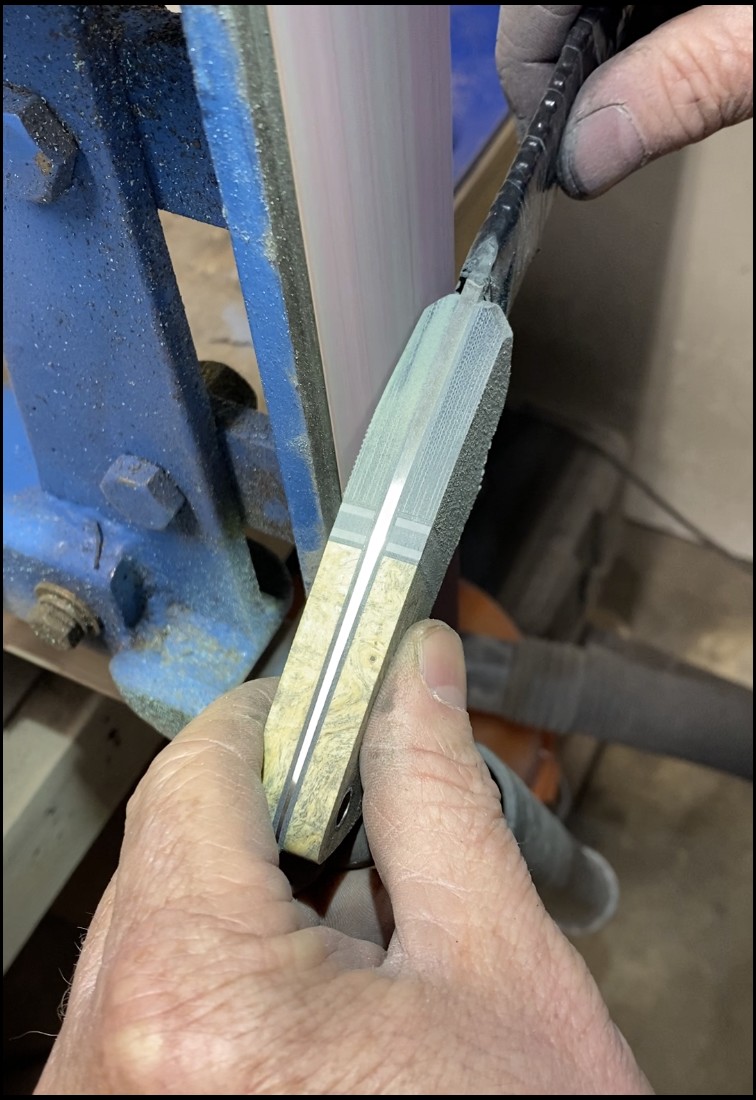
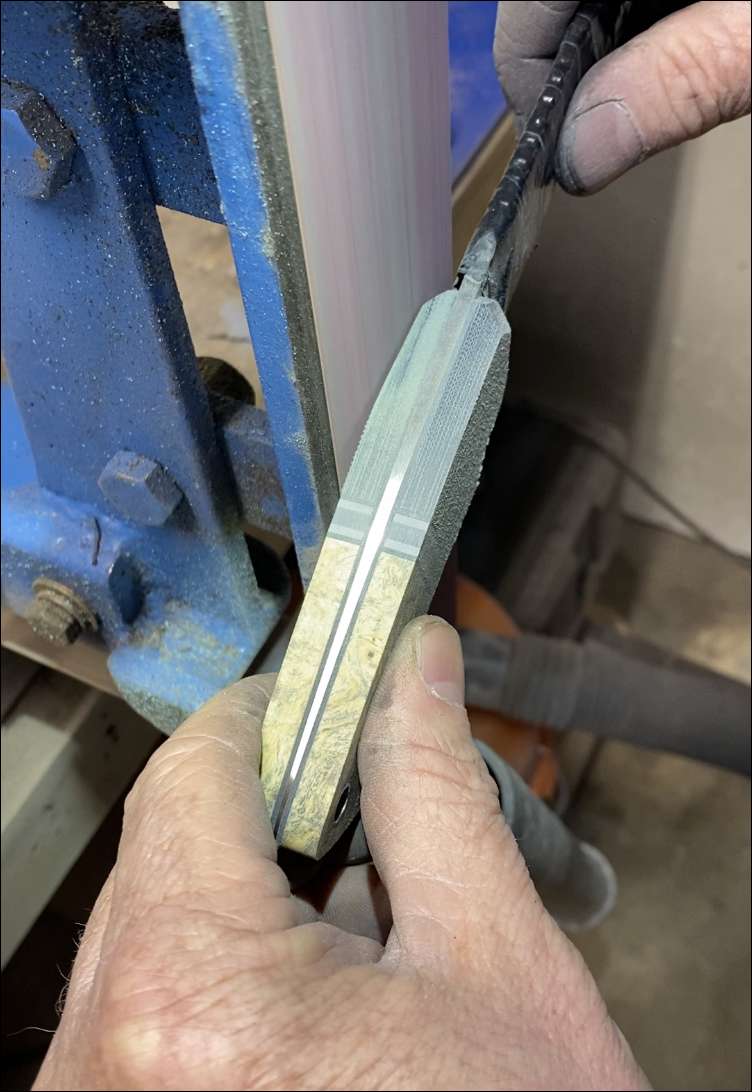
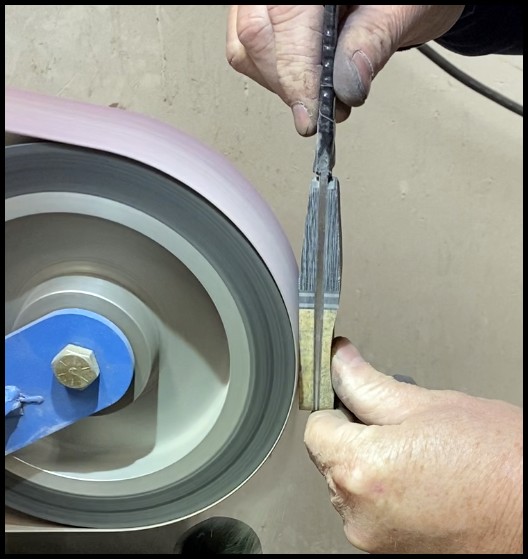
While the epoxy is setting up I will start with grinding the bevels on the knife. Now being the knife has been heat treated and grinding creates heat I must avoid heating the knife blade and or edge beyond 400degrees f or I could ruin the knife. To help with heat control I run sharp ceramic belts, a water cooled platen (you can see the hoses that pump cold water though) and a water sprayer. Yes it makes a mess but is good insurance that when I am done the knife is in the same state as when I heat treated it.
Certainly is a great and interesting thread. Thanks RJ. Will go take out my various knives now in the middle of winter and look at them with a new appreciation.
Very talented for sure! How many 'hands on' hours do you have invested at this point?
Hdaman, I’m not sure how many hours I have involved but I am on year four of making knives and year two of doing full time for my only income.
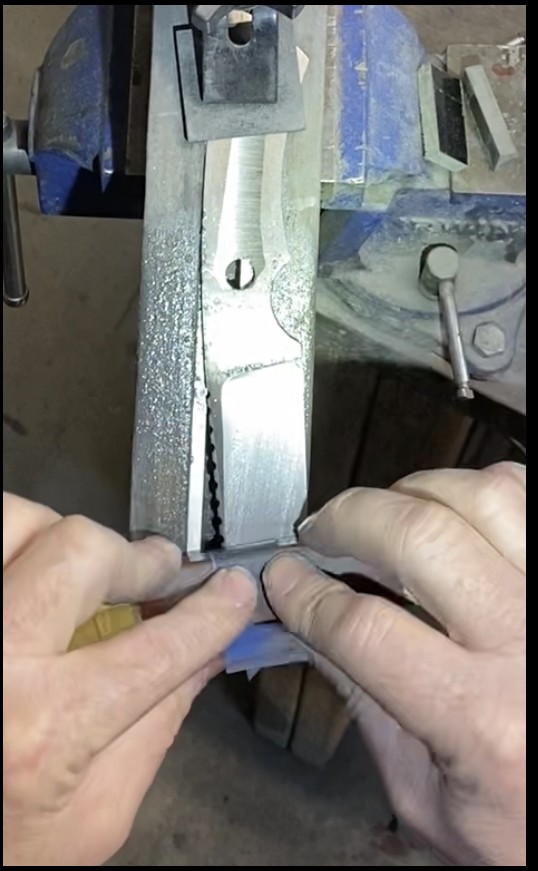
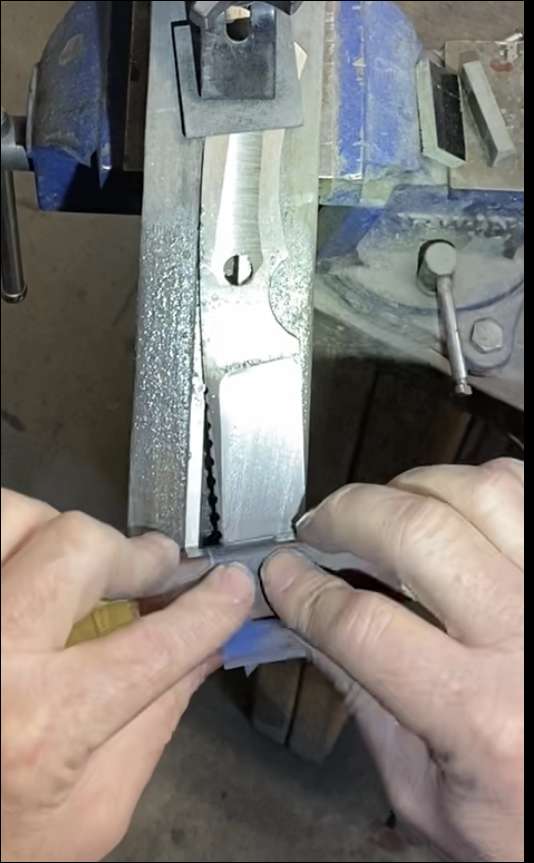
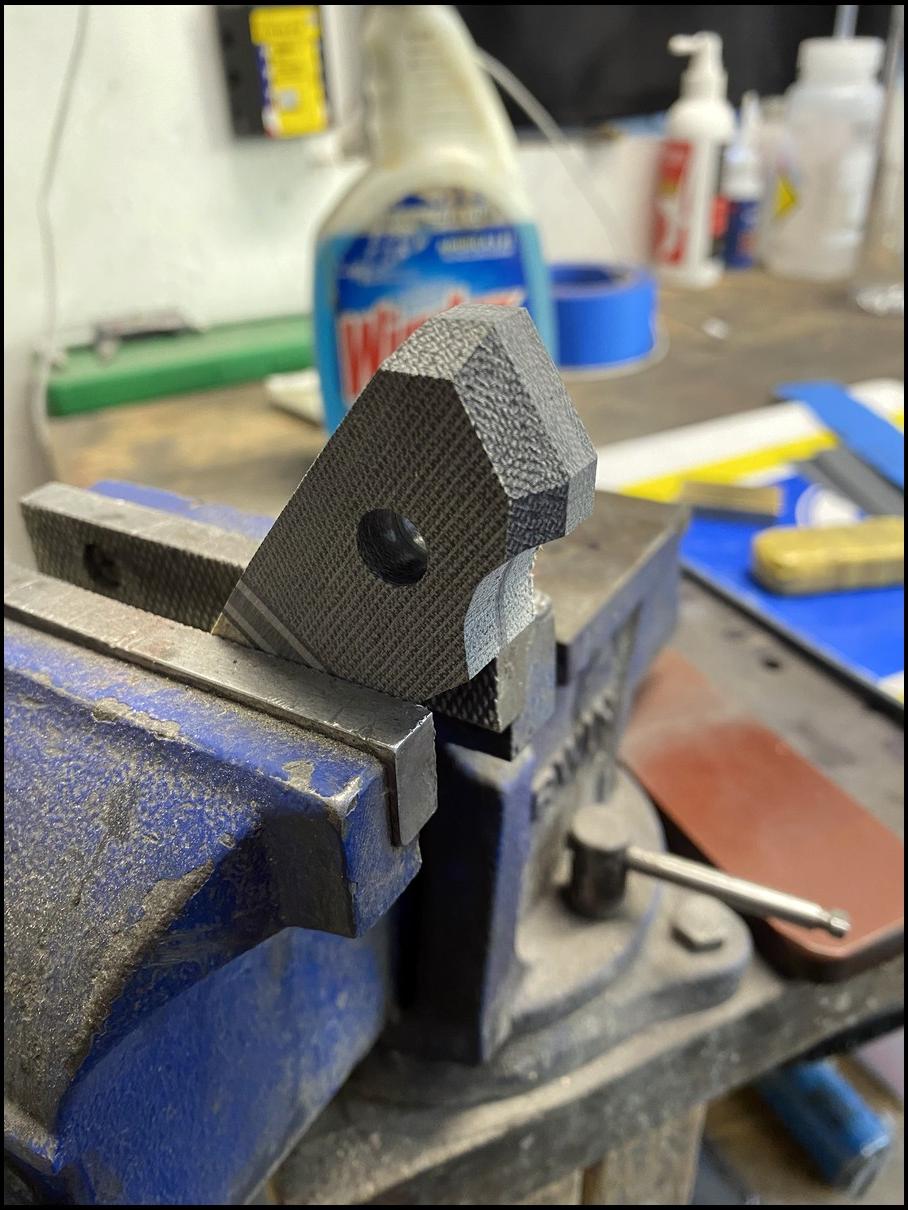
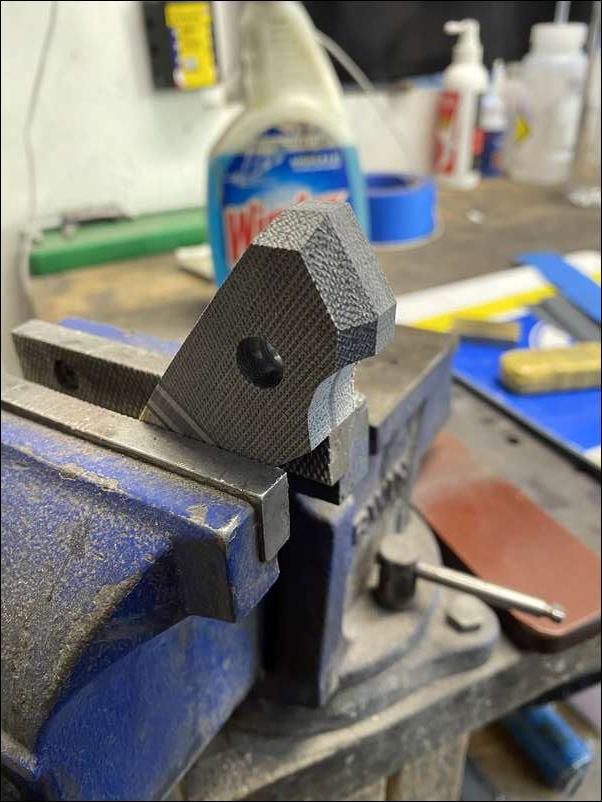
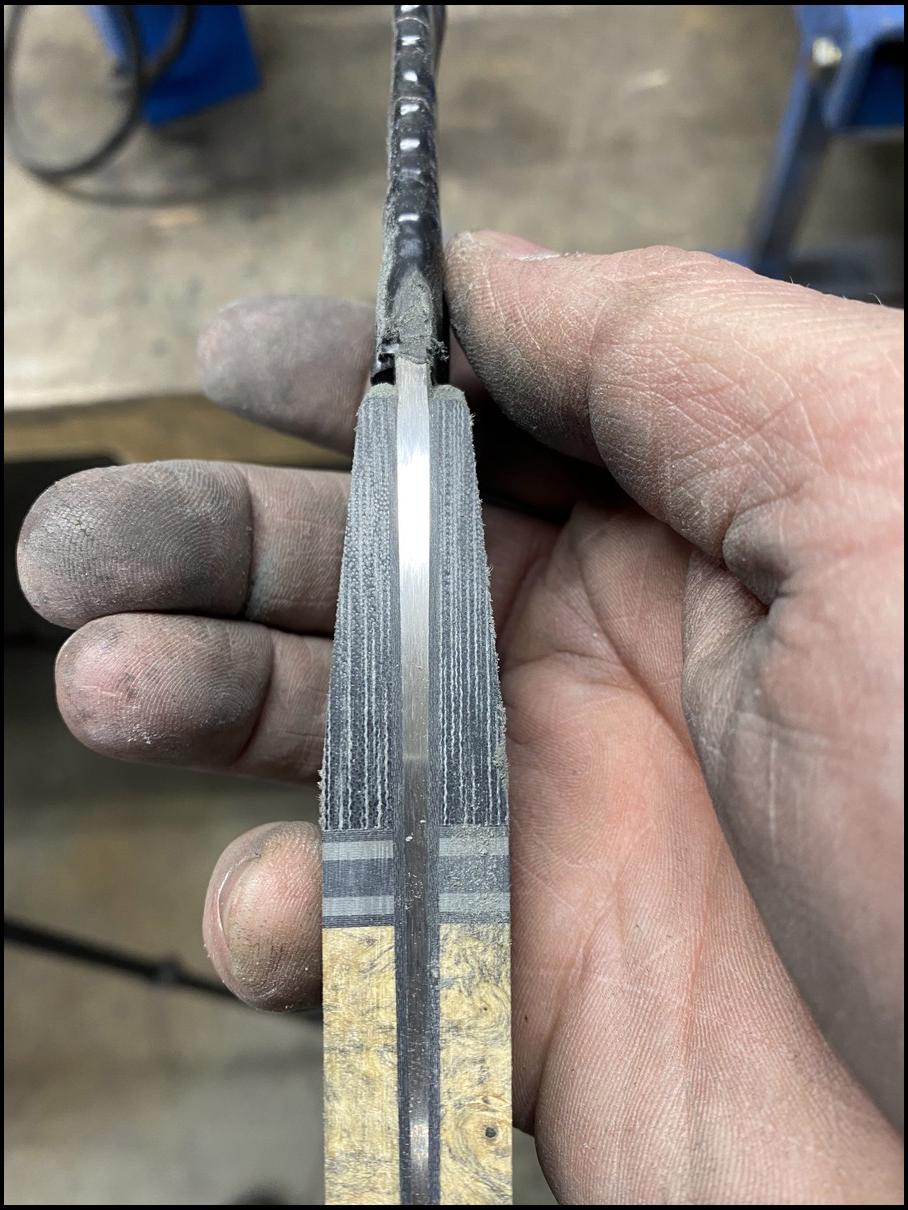
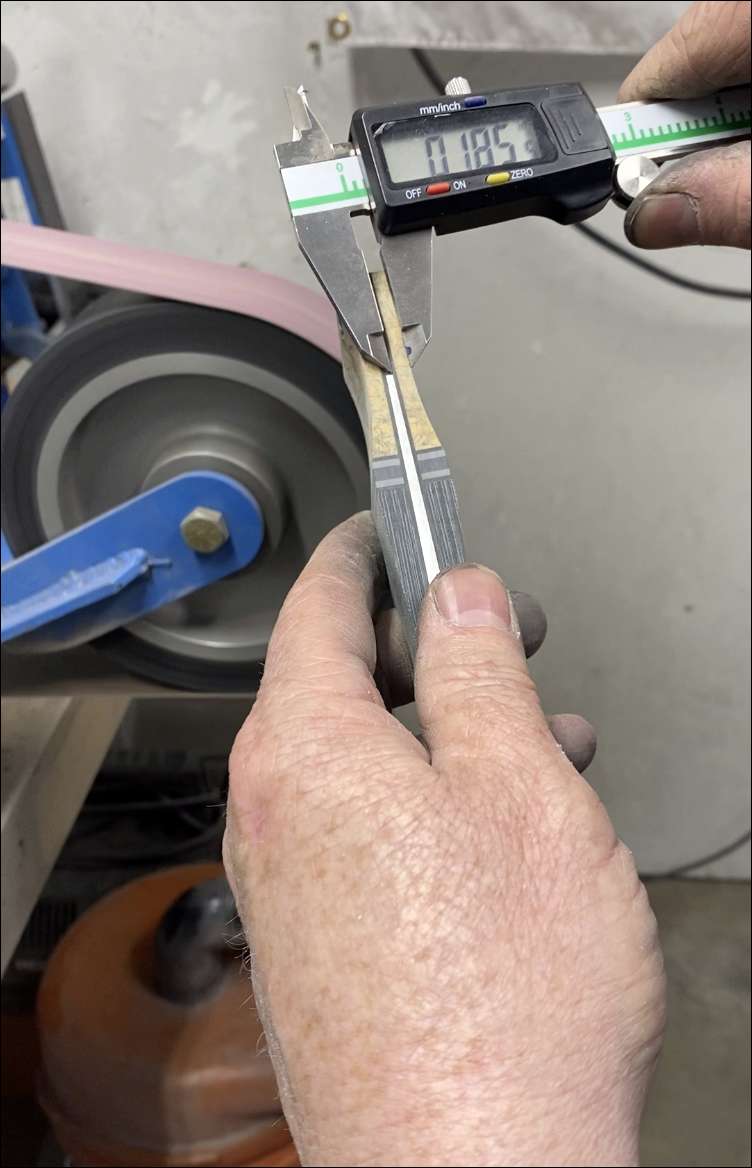
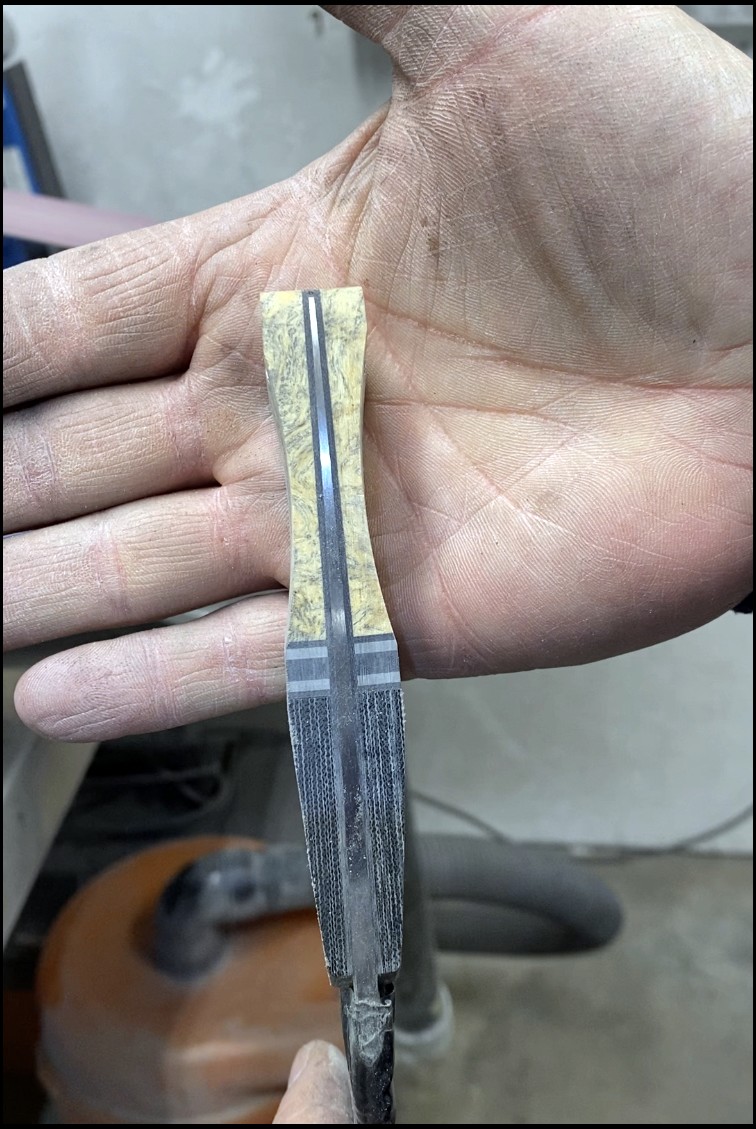
The bevels are now ground ground and we will address the issue of the tang (metal part of the knife where the handle is) weight next. I will hollow grind out the handle then taper the tang of the knife just like grinding bevels. This will make the thickness of the knife about .150 at the handle junction and close to 0.020” at the butt.
That tang taper at the back of the knife
That tang taper at the back of the knife
Now that the tang is hollowed and tapered I will need to spray the Cerakote accents and begin all the hand work
Robert, what tool is used to hollow the tang?
Matt
Matt, I hollow grind them out on a 4” wheel attachment
Thanks. It blows my mind how much of the grinding, shaping, hollowing etc...is done without the aid of jigs. I finally got good at free-handing sharpening a knife on a stone. I can't image the talent required to actually make an entire blade by feel and eyeball. It's truly an art form.
Matt
Amazing RJ. How would one go about to get one of these?? Website? Etc.
GG…. That’s funny you say that. I have to sharpen with a jig.
You guys with this kinda talent amaze me. Good stuff RJ!
You sir are a craftsman. I have learned a bunch from this post.
Cool stuff, thanks for sharing...
Extremely informative thread, RJ! Love these “how-it’s-made” threads.
From start to finish (not including the time in the oven for heating/tempering, and in the nitrogen bath) approximately how much time, on average, will you have in the making of this knife, or one similar?
Incredibly fascinating. Thanks for taking us along on this build! I know there’s a couple machinists that have already chimed in that are researching equipment for their “retirement” shops….lol
I may “need” a new knife soon..
I now feel better for what I paid for my Niche knife. I was 100% satisfied before this post. And never second guessed the price Now I see why the price is what it is.
Excellent Thread. Love the craftmanship. Thanks RJ, will be following to the end.
this thread is so interesting for those of us who had no idea of the technicalities of the workmanship. The specialized equipment you use is awesome.
Thank you guys. T-roy, it takes me about 10-15 hours depending on the knife and if I need to make any corrections as I go. To make one knife at a time is not feasible as if I did one it could take me 30 hours to complete so to keep efficient, I make a minimum of four at a time and often 10. That brings my “per knife” time down to a point I can be profitable. So behind the scenes with this knife I have three others I am working on at the same time as this one.
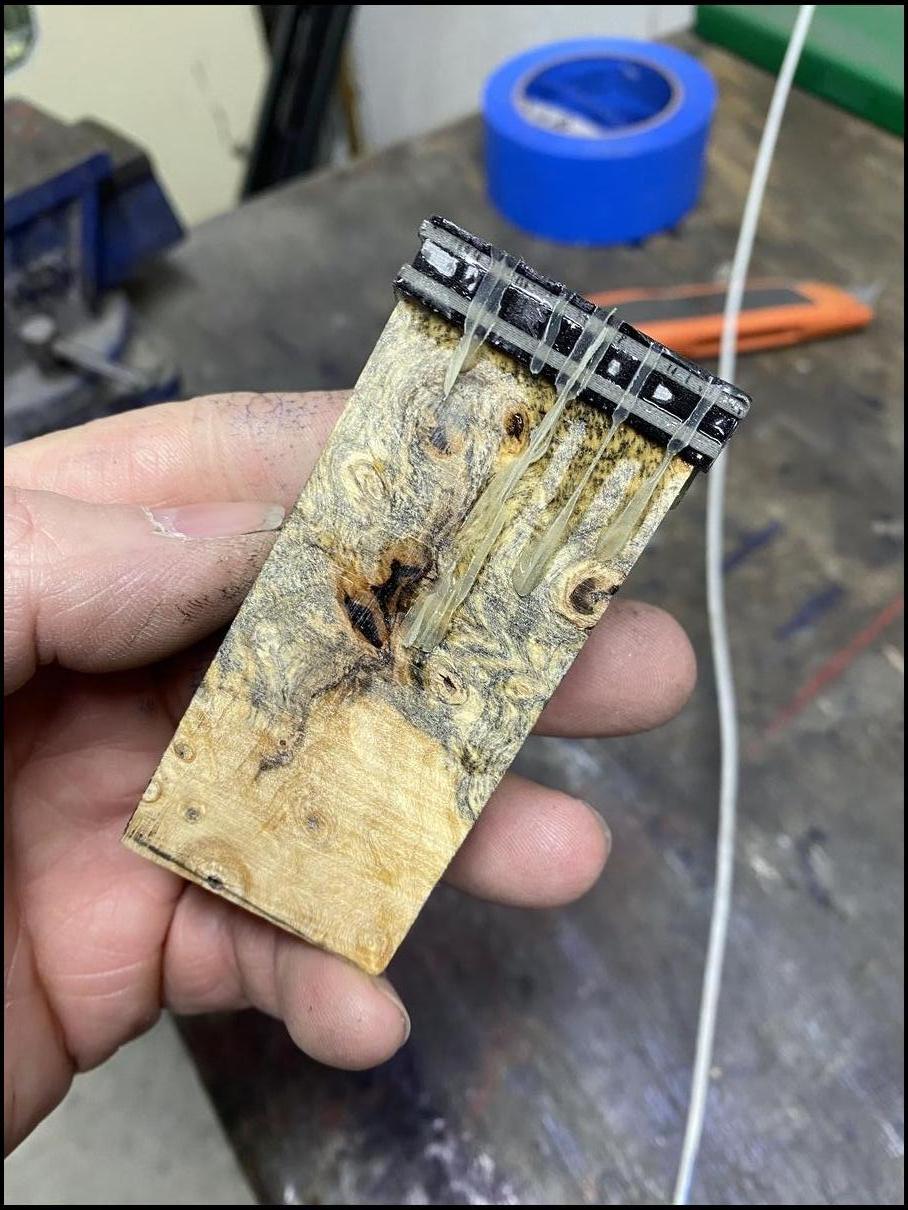
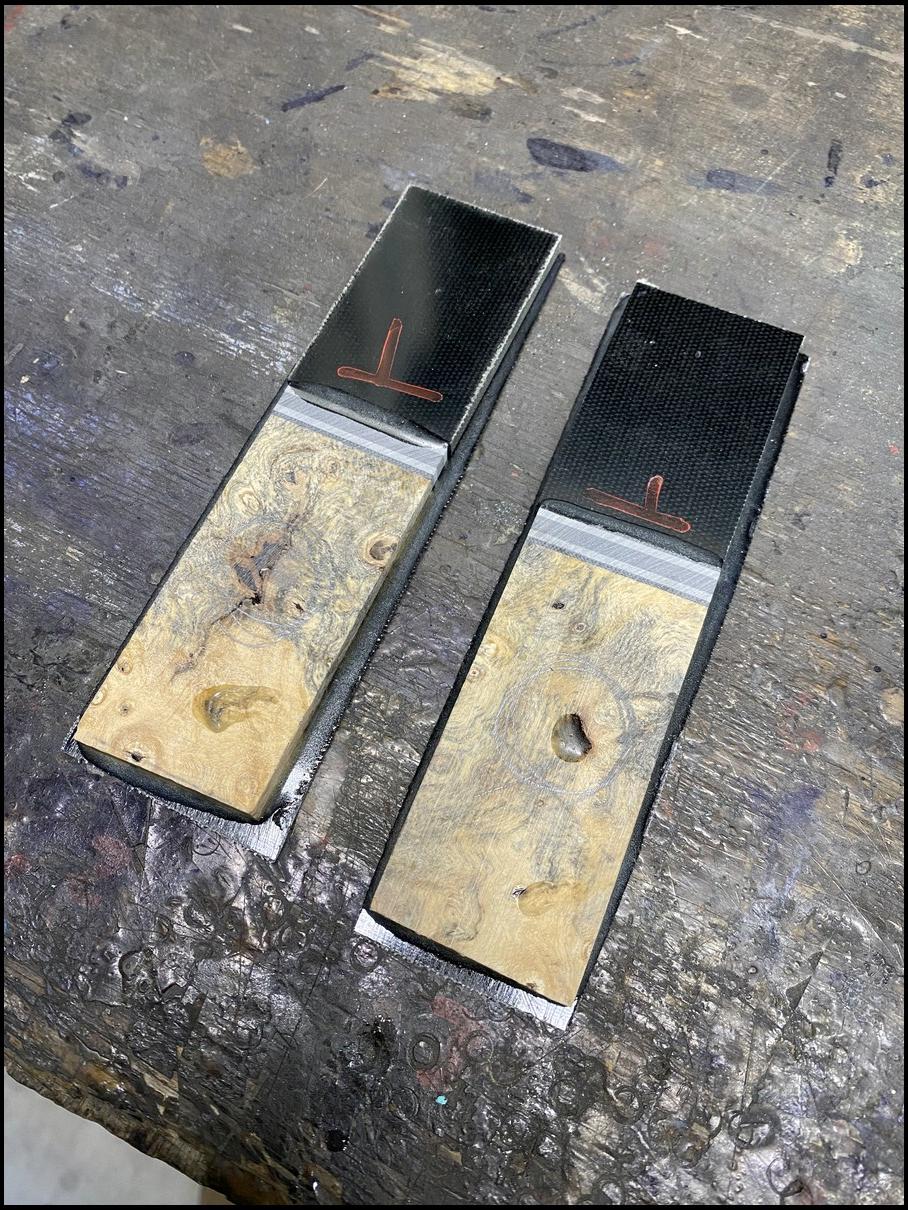
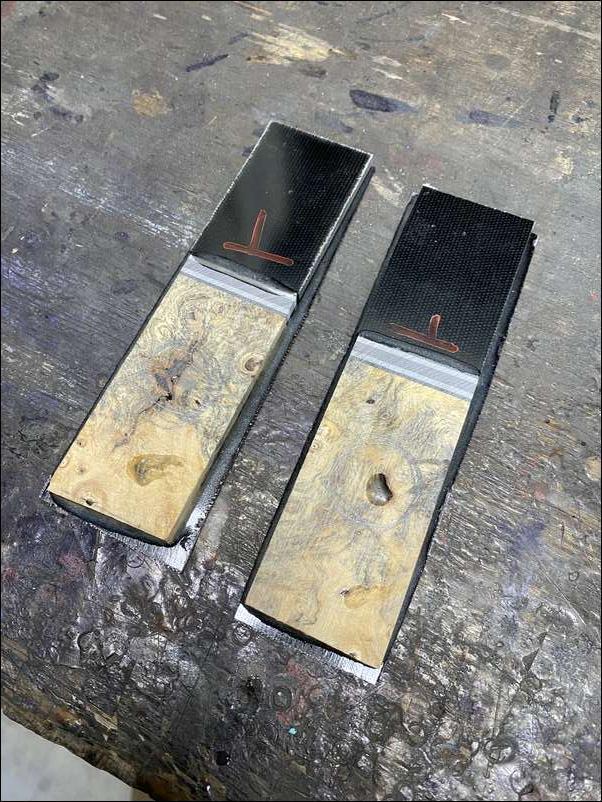
You may remember I laminated some g10 accents onto the buckeye Burl block
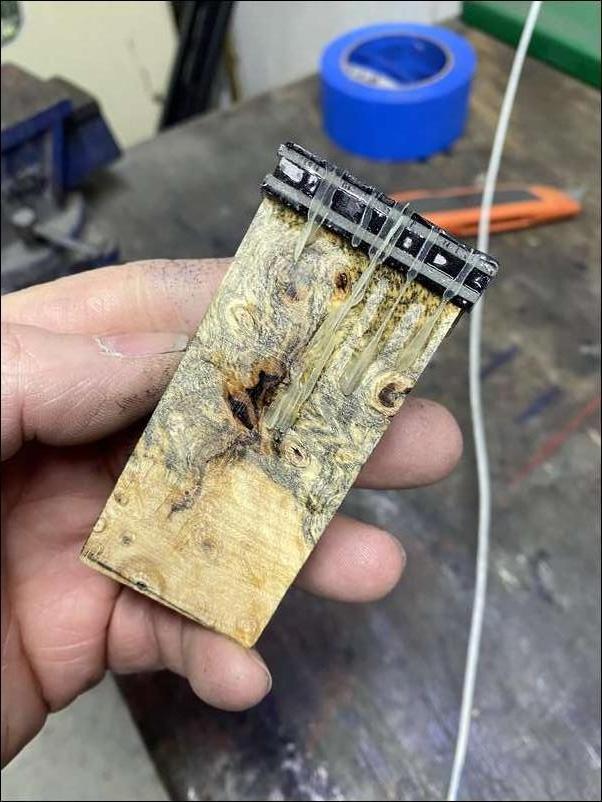
You may remember I laminated some g10 accents onto the buckeye Burl block
I then split them on the bandsaw and flatten them on a disc grinder

I then split them on the bandsaw and flatten them on a disc grinder

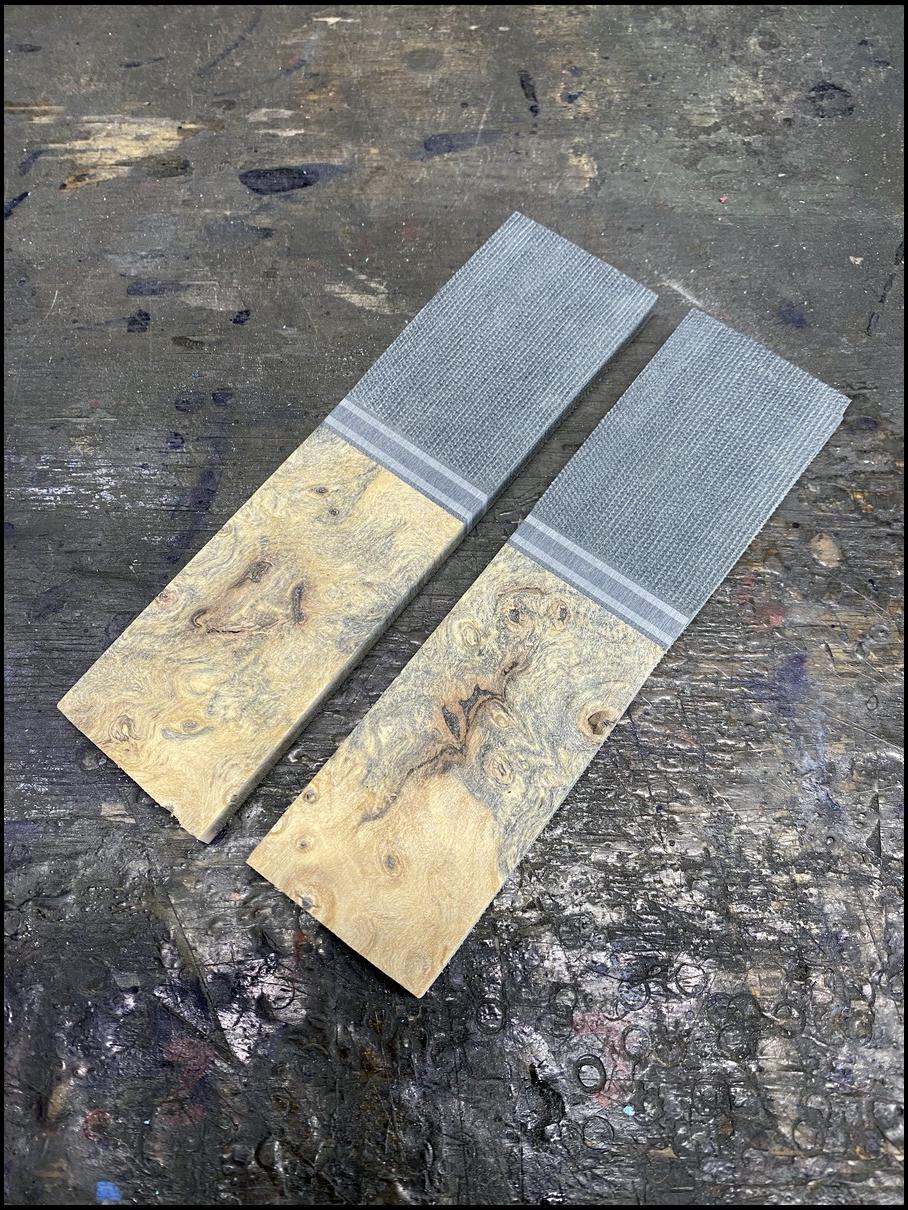
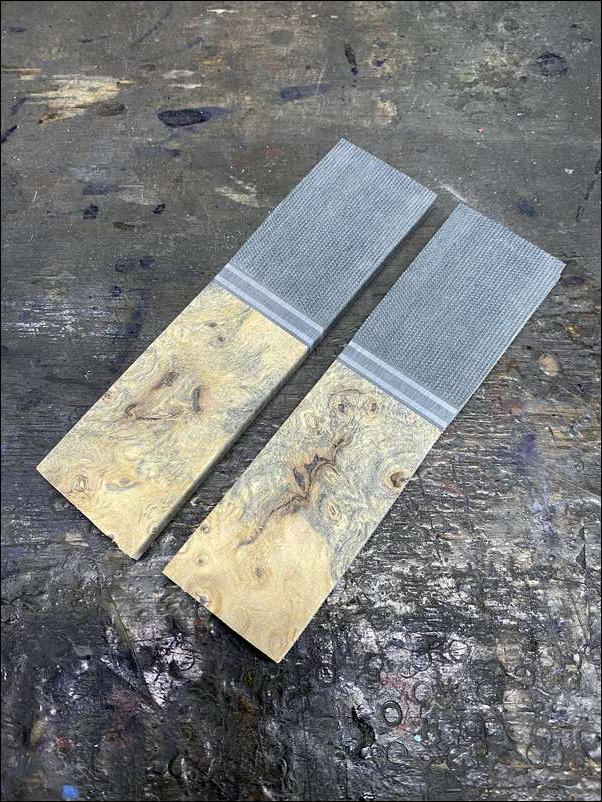
And then glue the pieces onto g10 liners to hold them all together with a 24 hour structural epoxy

And then glue the pieces onto g10 liners to hold them all together with a 24 hour structural epoxy
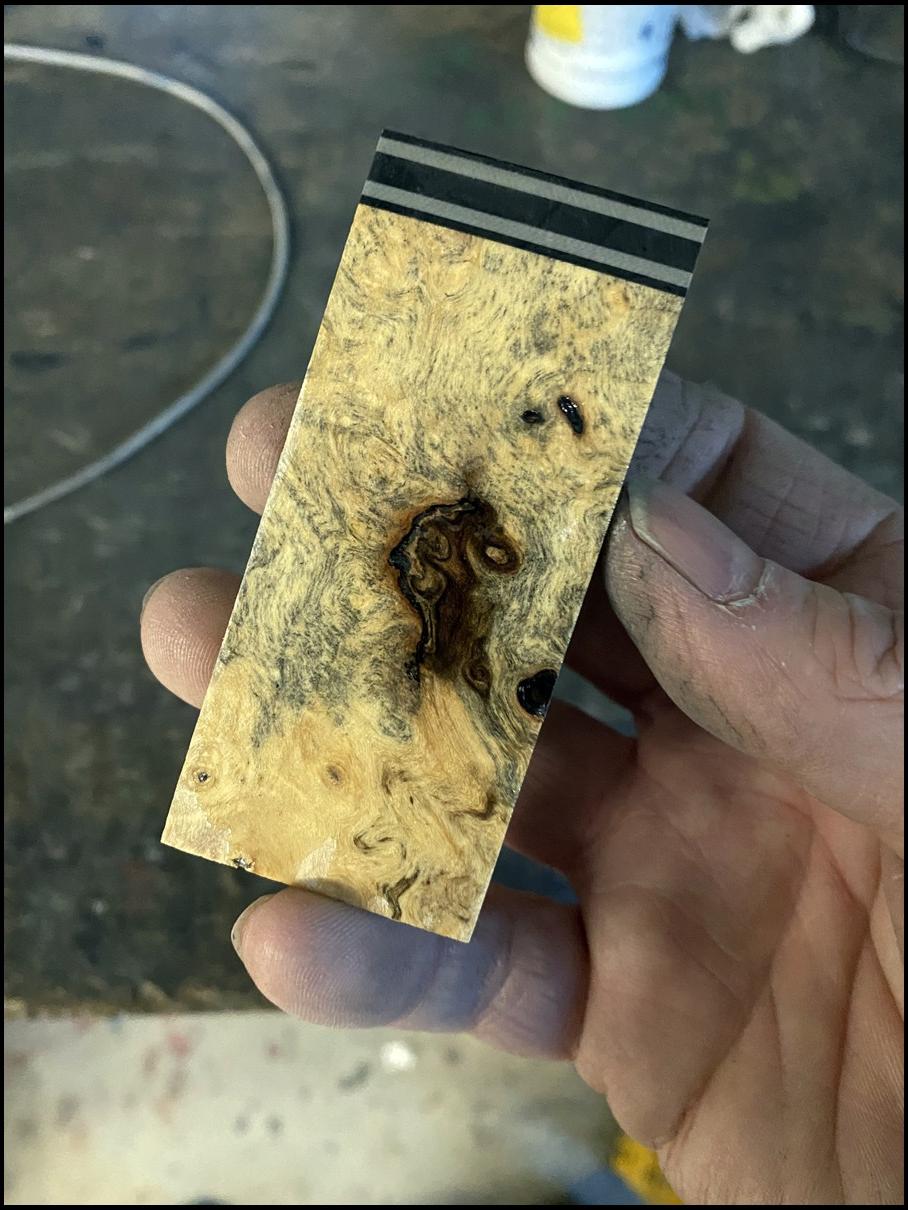
Tomorrow after the epoxy sets we will then flatten the outside and fit to the knife
Tomorrow after the epoxy sets we will then flatten the outside and fit to the knife
Handle construction and layout
Enjoying following along. I do have a question a lot of grinding after the heat treat. Namely the bevels and hollowing the tang. Why is that done after heat treat instead of before when steel is softer?
John, I feel I get a more consistent heat treat when the steel is flat and I can clamp it tight in the clamps to cool. That is stainless steels only. On oil quenching steels (like 52100, W2 or 1095 I will grind 90% of the way to ensure full hardening. Also grinding after heat treat is not that difficult if you use quality abrasives. Also keep in mind there are many great knife makers that do things different than me and I have found doing these methods work for me and allows me consistency in my production.
This is fantastic. Thanks for letting us follow along.
Now that we are ready for the hand work I will blast the file work in the blasting cabinet to allow the Cerakote to stick. This step (applying Cerakote) is not needed but I feel it adds a level of detail. I will be applying Black Cerakote on this knife spine
So thankful that you are sharing such great information! You are a true artist and I definitely want to add one of your knives to my collection in the future. Congratulations on being able to make a living doing what you love!
Rob, looks like pope and young is having a knife making contest at the convention this year. Have you seen anything about this? If so are you gonna enter one of your knives? Really enjoying this thread!
Probably not WV. I didn’t even know they had one, that’s pretty cool bet there will be some sweet knives there though.
Well Dave, I just looked it up and is in Reno, NV. Think that would be a good trip as is only 500 miles from my house and looks like the route goes right through some awesome coyote calling country. I think I should have planned ahead a bit and made a trip… or should I say… hunting trip out of it. ;-)
This is my sanding block
This is my sanding block
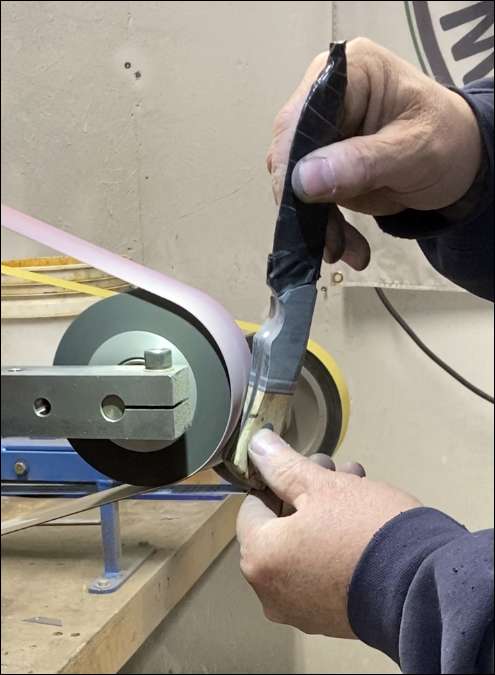
Now all the machine work is done is time to hand sand the knife blade to a nice satin finish. Now being this steel is hardened and very wear resistant, it can take hours to work your way though the grits and get a nice lengthwise finish on the blade.
Robert, why do you do the cerakote detail on the spine before you do the finish sanding? And does that detail only remain on the top edge of the spine after hand sanding?
Matt
Thanks bowbender. Here is an action shot. I use silicon carbide sandpaper with windex (yes window cleaner as the ammonia will not promote corrosion while sanding) to wet sand.
Great thread. Thats' amazing work RJ. Thanks for showing us the process.
Matt, I apply the Cerakote before sanding so I can remove it when I work on the satin of the blade. I sand carefully not to remove the Cerakote from the file work. Here you can see the Cerakote accents on the spine of the knife after I sand the flats and spine. I also do these In various colors to match the handle scheme.
Thanks Robert. That Cerakote detail in the file work is a great idea. It definitely adds to the appearance, and it seems to be a simple step.
Matt
Matt,
It is a simple step but time consuming. Cerakote takes a process of soaking/degreasing, blasting, baking, spraying then baking again to properly apply. That said in the end I feel is well worth the added detail.
Scales after resin setting up
Scales after resin setting up
Ok. Sorry for being absent a couple days… I had some things I needed to get some for the week. Back to where we left off. ……Now the knife scales (handles) are set up it is time to square them off, true them up and the spot glue back together to fit to the knife.
Flattened and squared up
Flattened and squared up
Glued together and sprayed with some water so can see the colors.
Glued together and sprayed with some water so can see the colors.

Drilling the pin/ lanyard holes
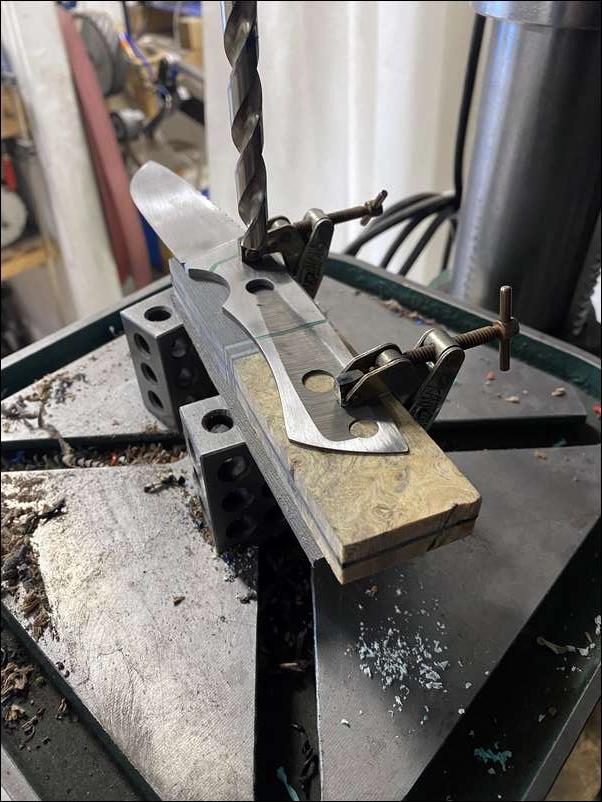
Drilling the pin/ lanyard holes
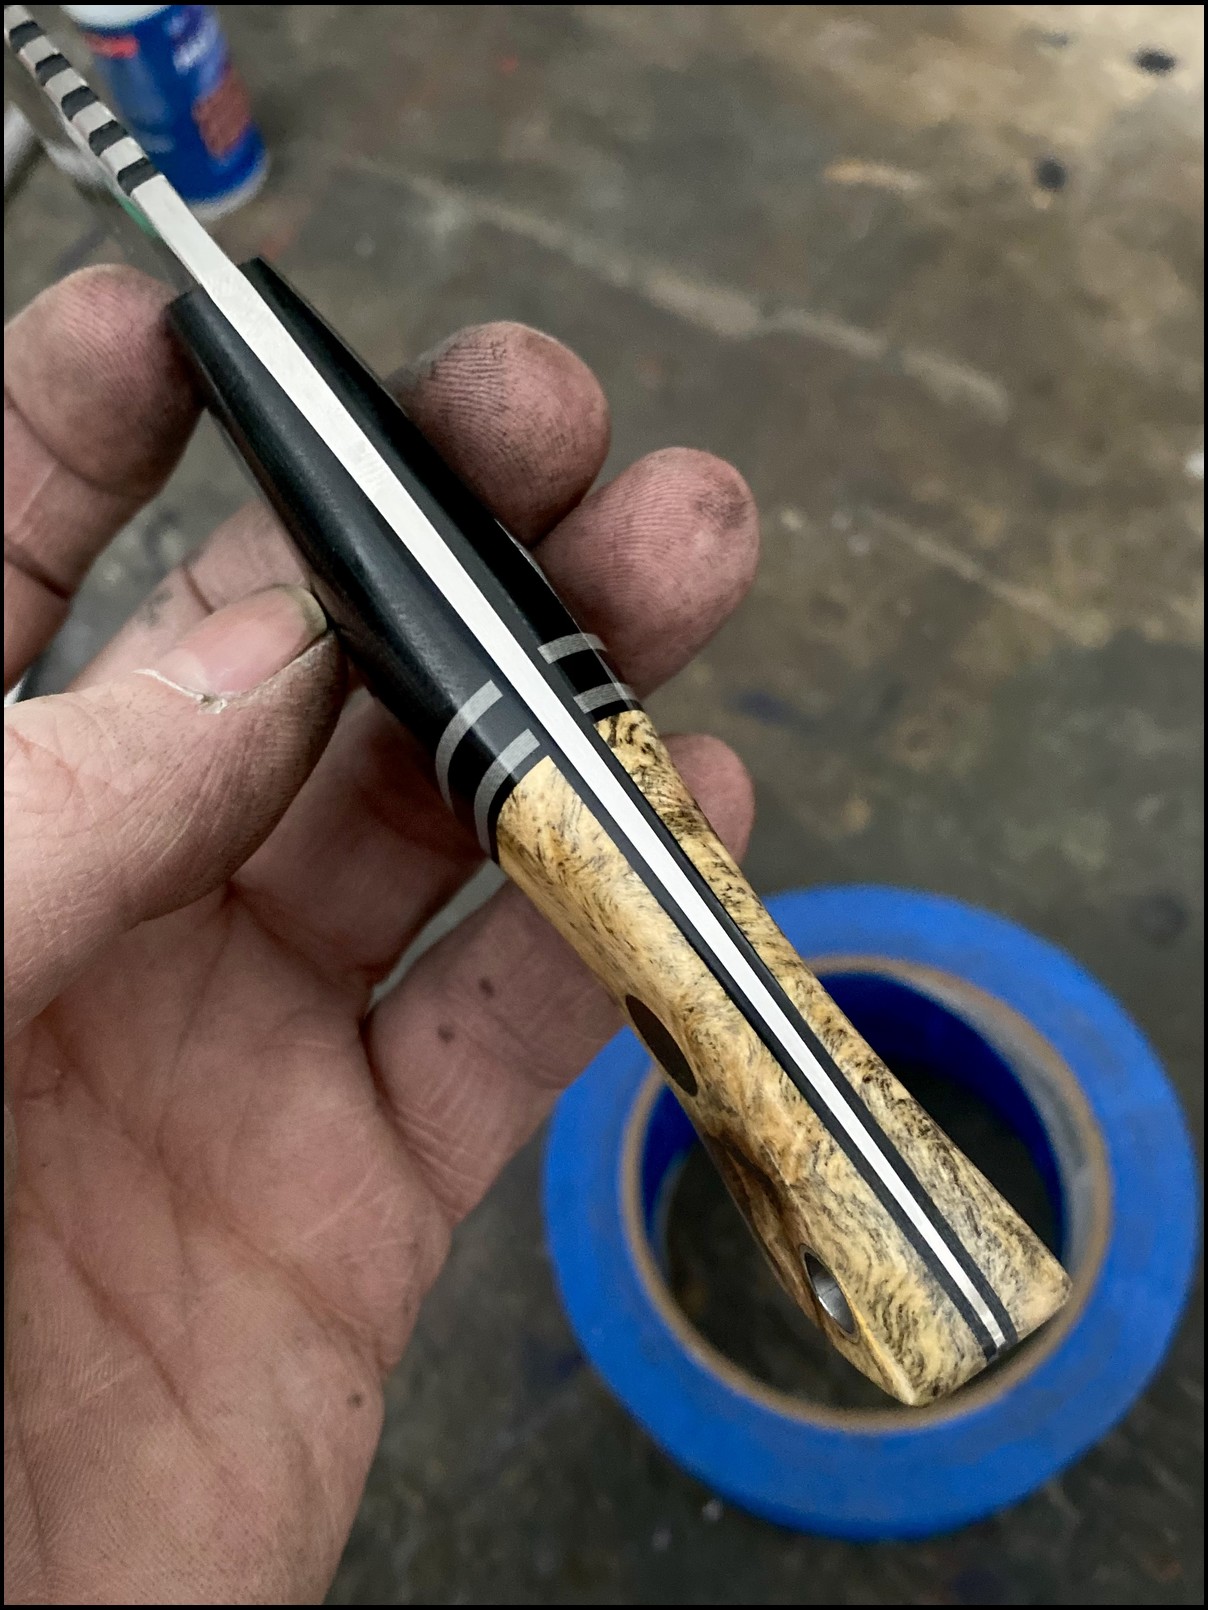
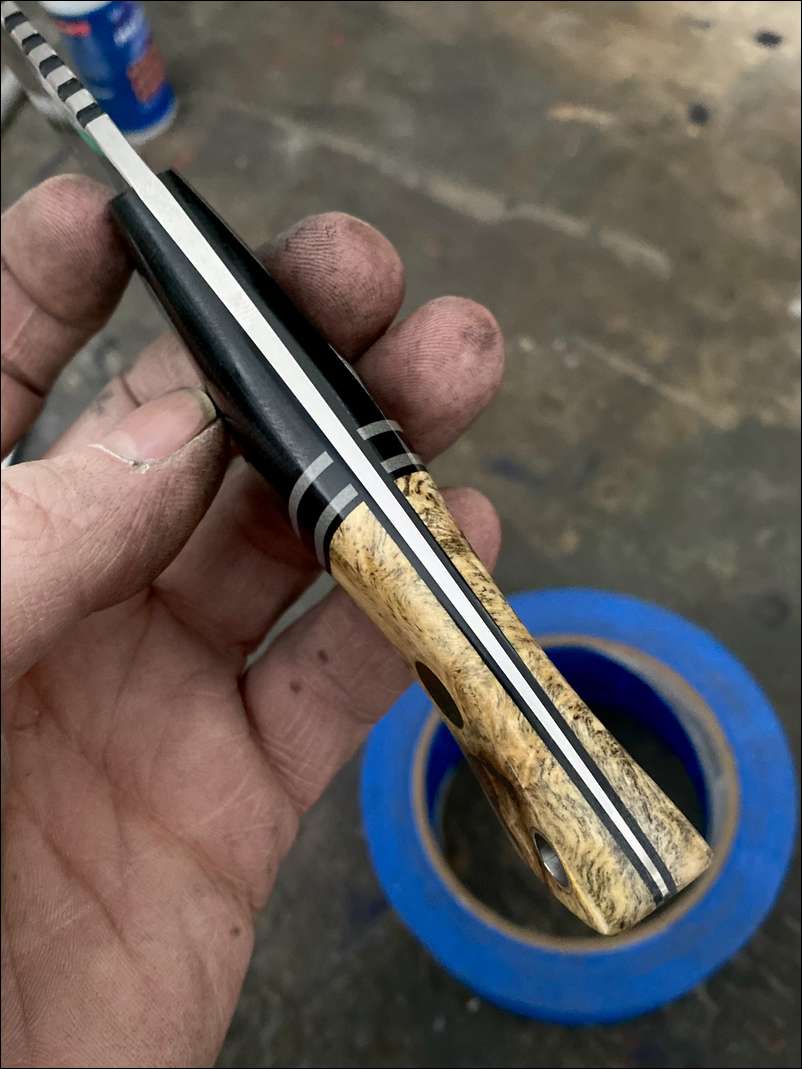
I draw out the knife scales onto the knife so I can center the spilts
I then transfer the knife tang outline into the scales and rough shape them to fit leaving them oversized by about 0.030 as we will grind them to fit after glue up with the exception of the fronts as those get finish sanded now
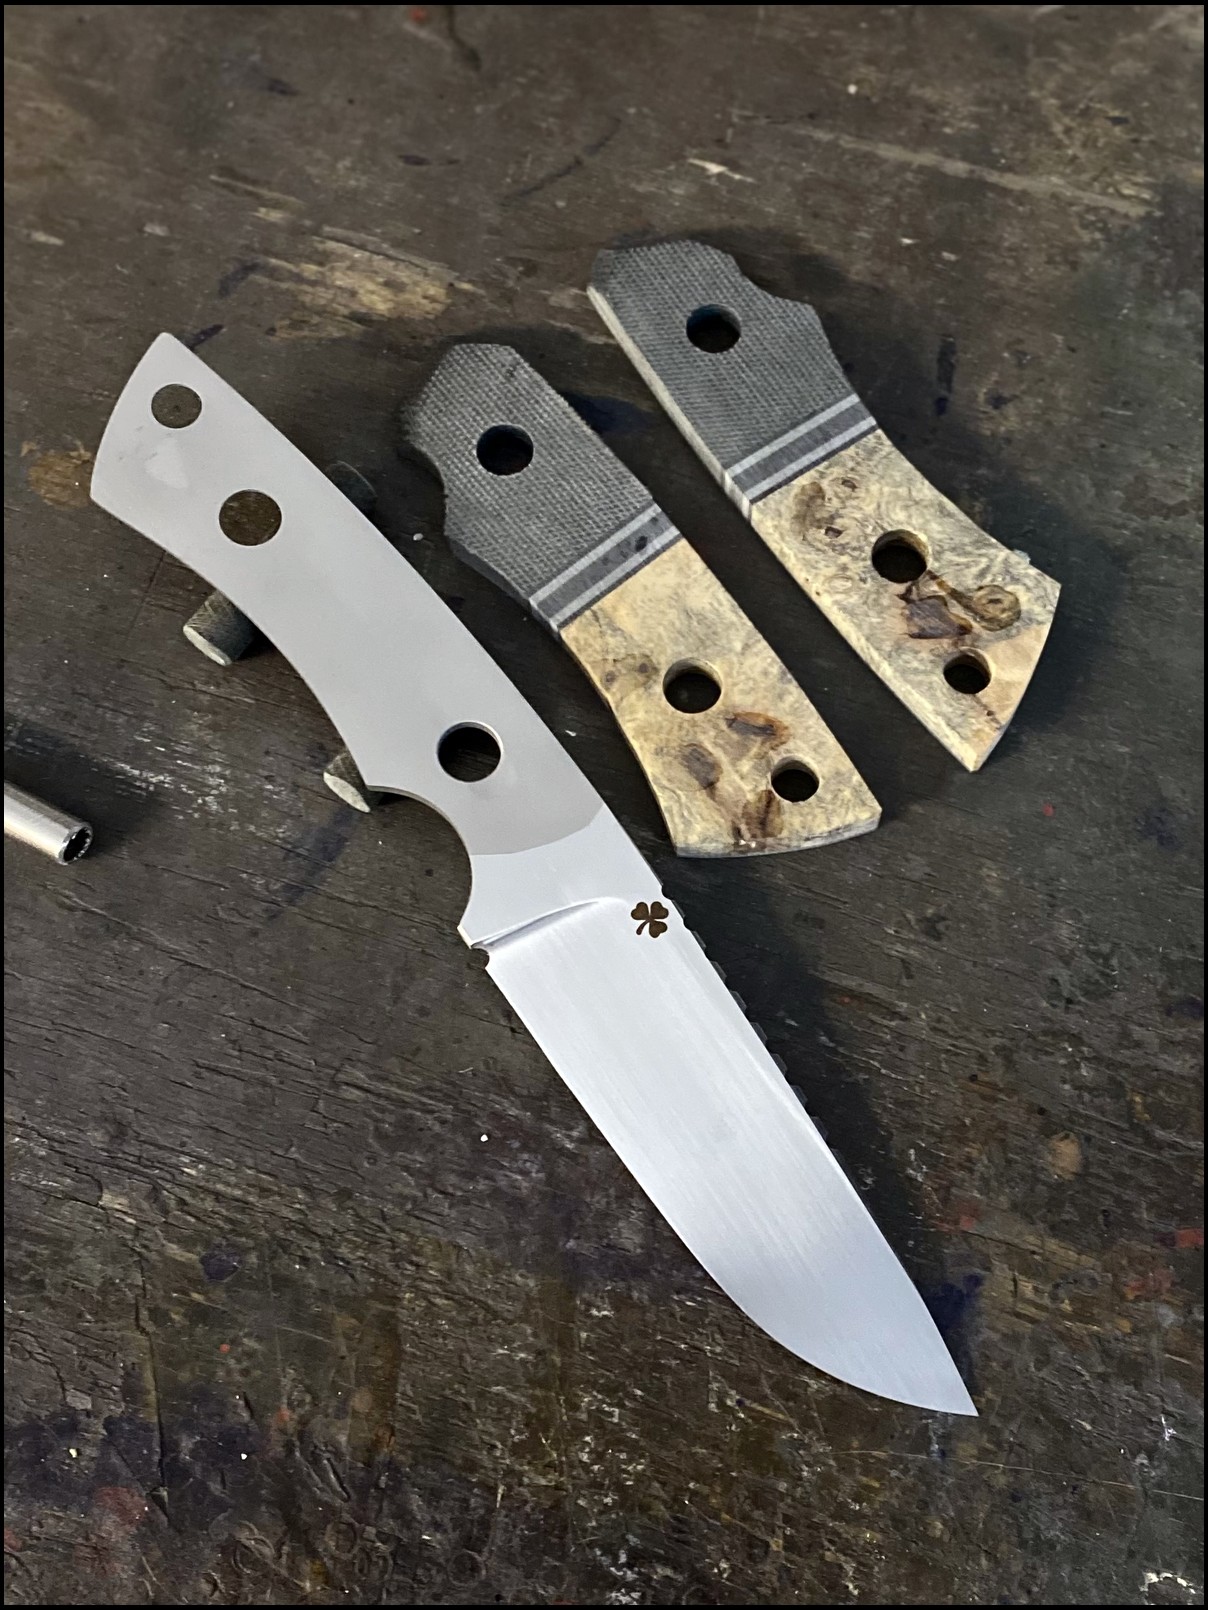
Now the handles are roughed out ready to fit to the knife
Keep it up ! Very interthread.
Sanding the front of the knife handles to a clean finish before glue up
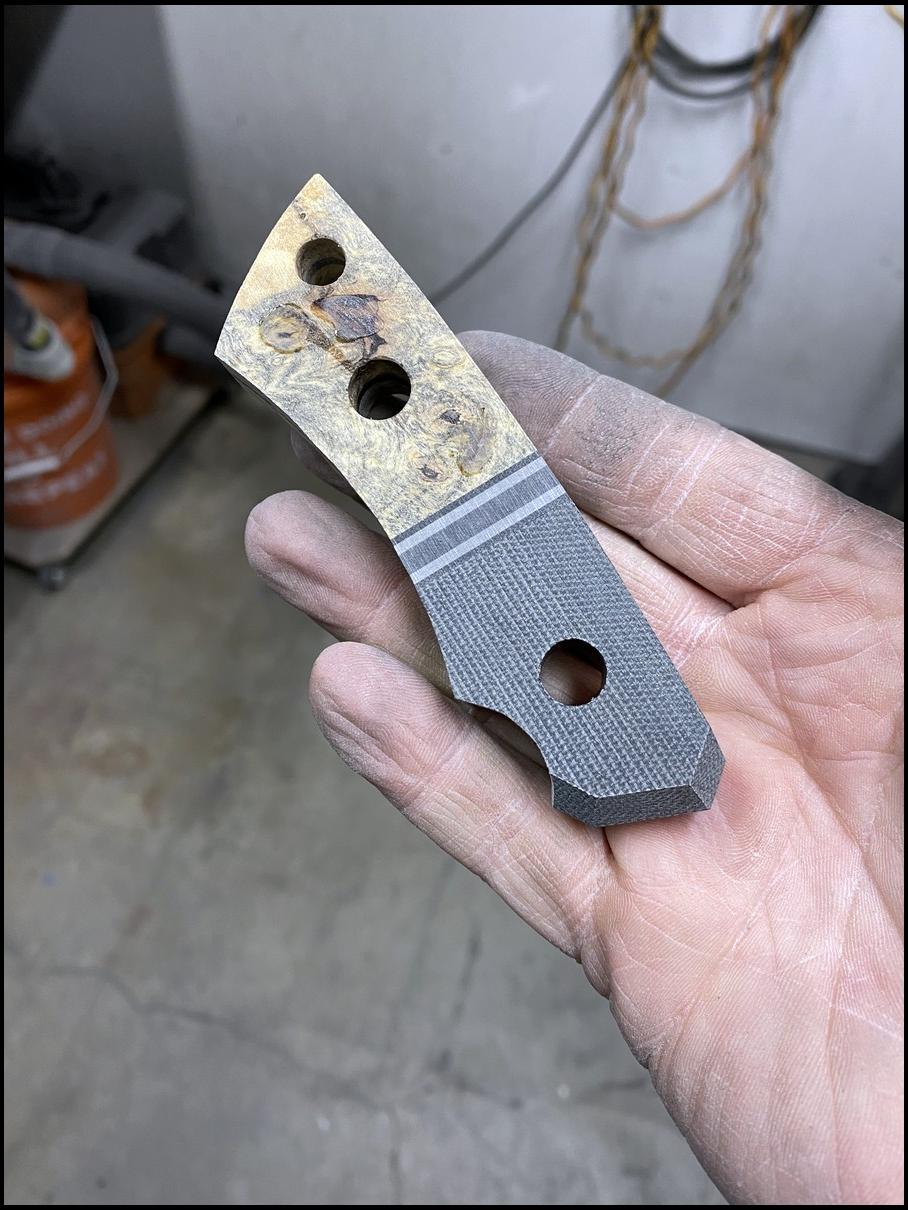
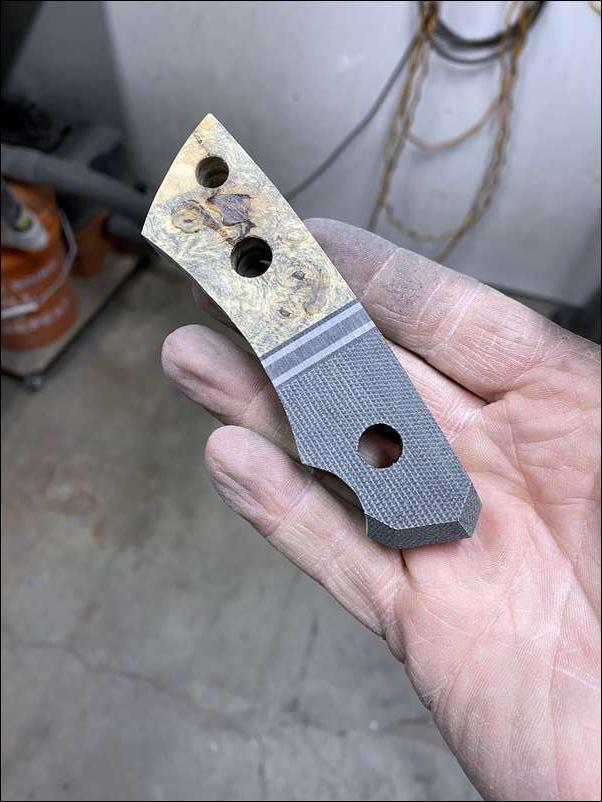
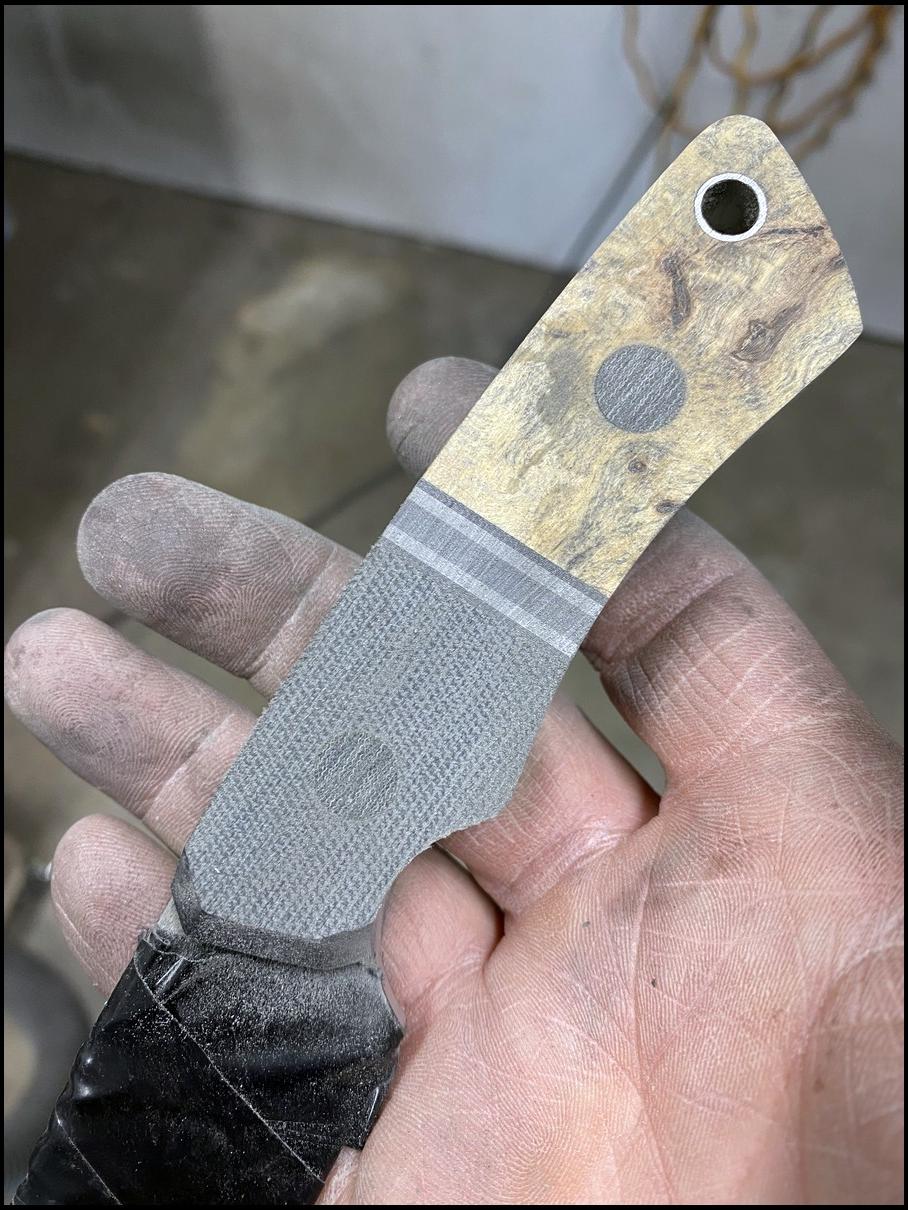
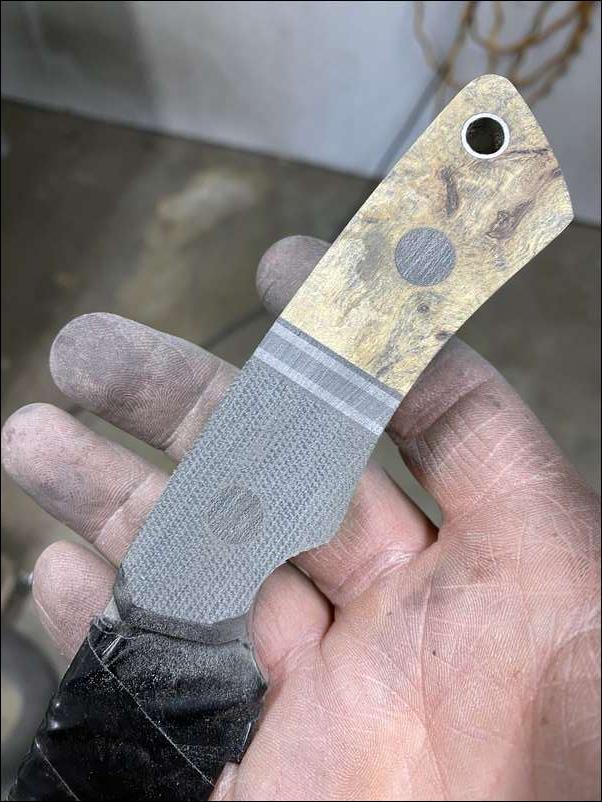
Now the handle scales have been roughed out and fit to the knife to make sure all surfaces are mating well I will now finish sand the blade. Here is our current progress so far:
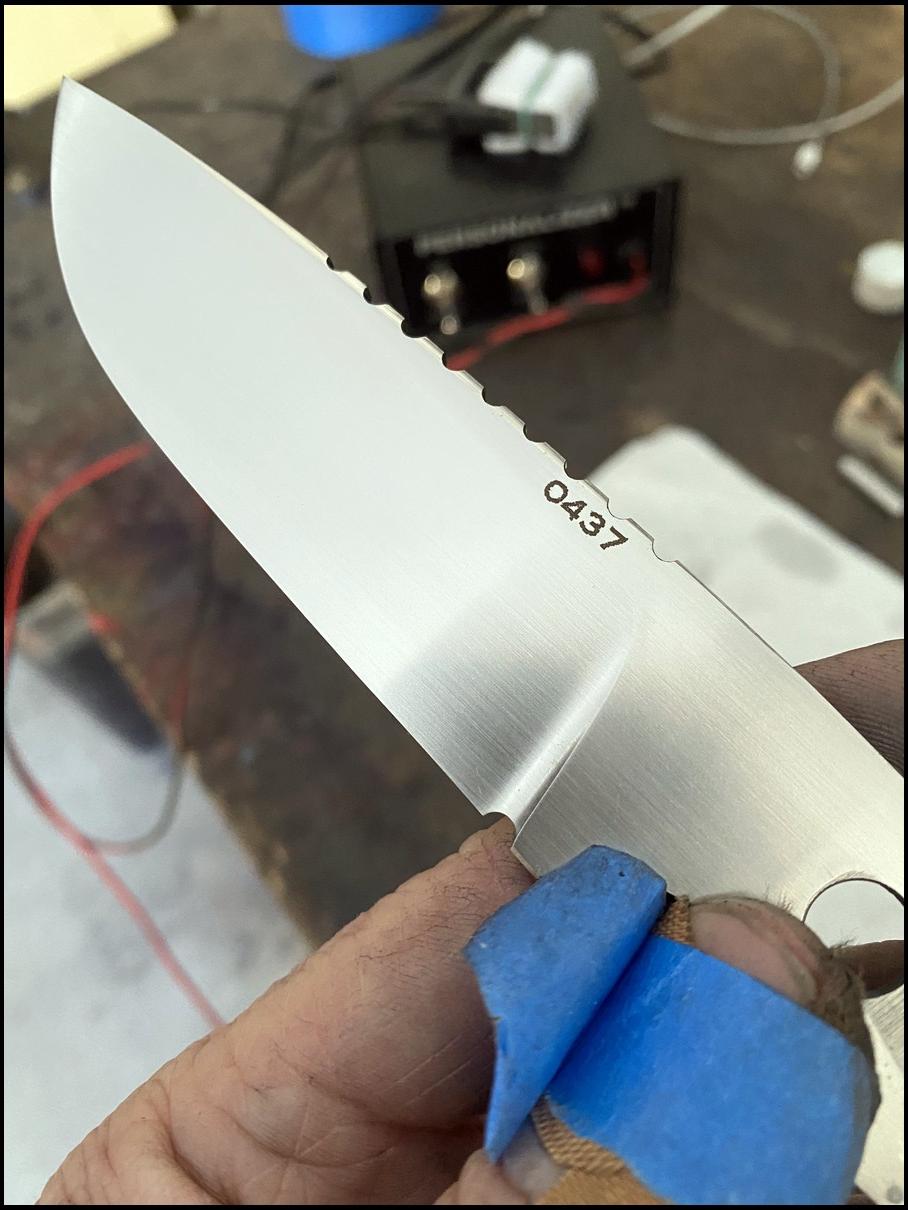
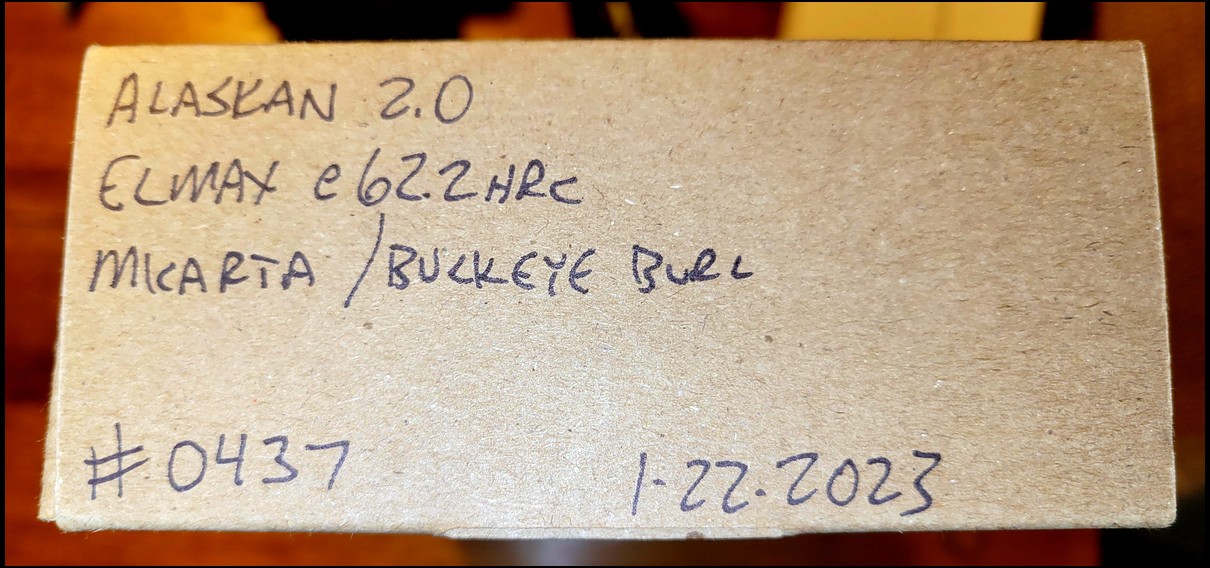
After I get the blade hand sanded to a nice satin finish I have to add my makers mark and the serial number. I do that by electro etch and stencils I have made. This is knife number 0437. That is the four hundred and thirty seventh knife I have made to date.
Ready for glue up. I attach the handles and pins with gflex marine grade 24 hour set epoxy. Is an extremely strong, flexible and long lasting product
Ready for glue up. I attach the handles and pins with gflex marine grade 24 hour set epoxy. Is an extremely strong, flexible and long lasting product
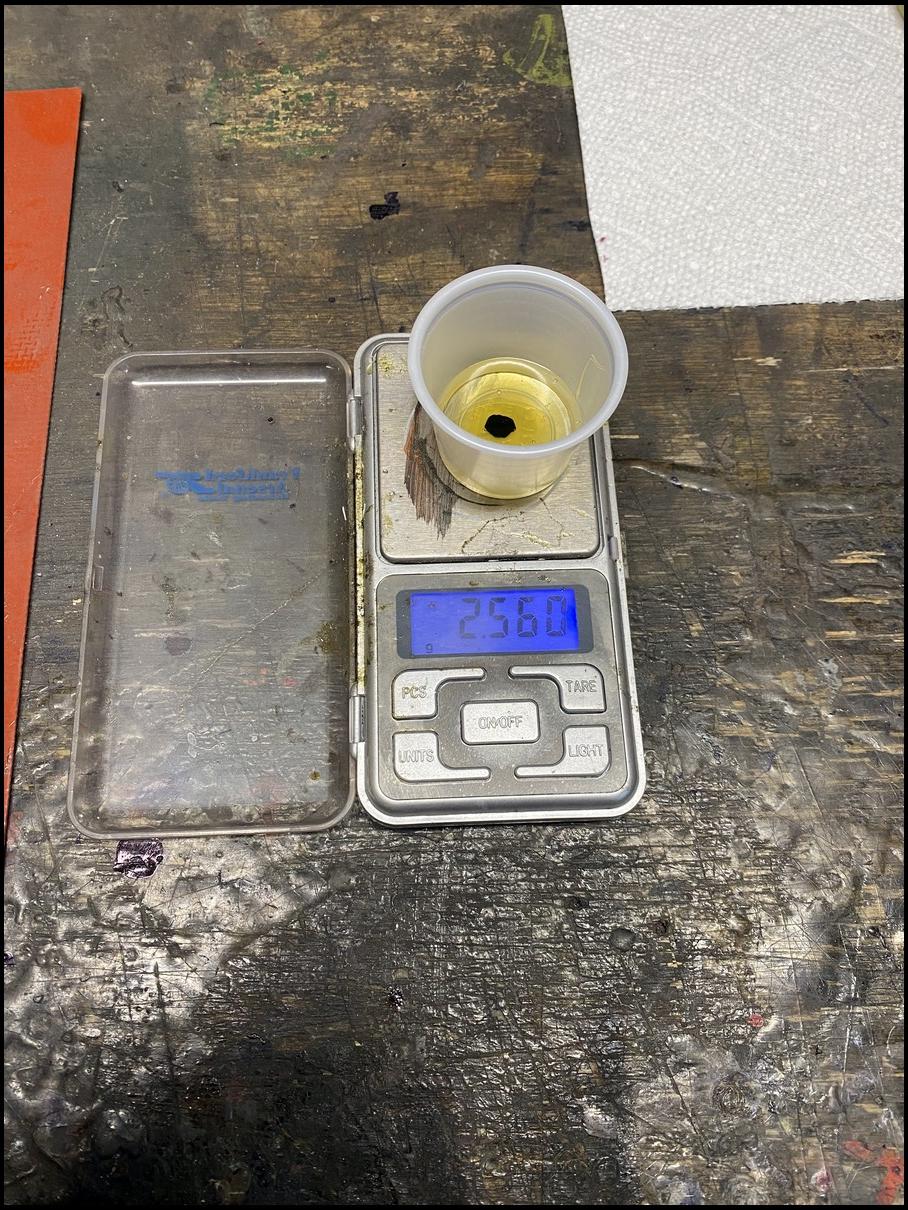
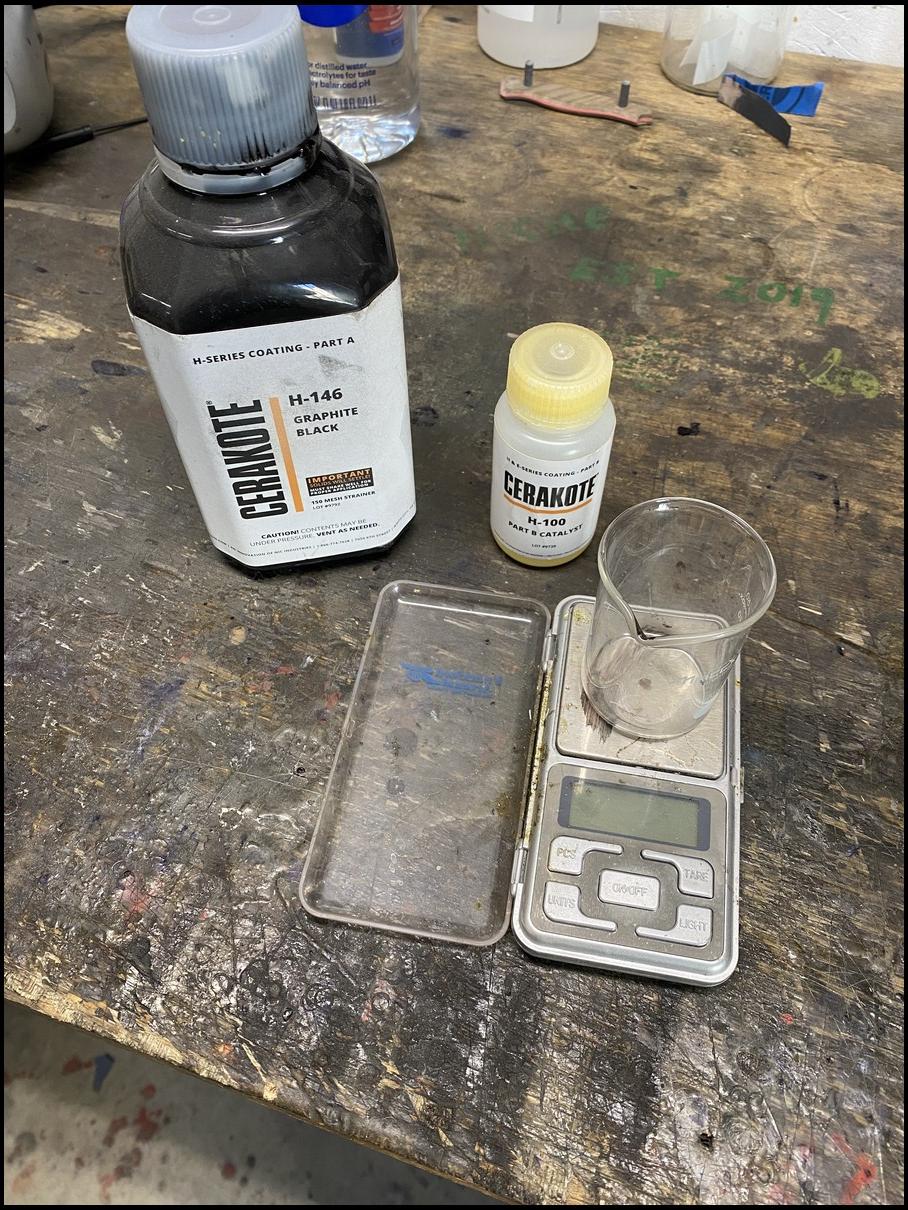
I weigh my epoxy on a scale for exact ratios and I add a black pigment to match the knife scale pins and liners

I weigh my epoxy on a scale for exact ratios and I add a black pigment to match the knife scale pins and liners
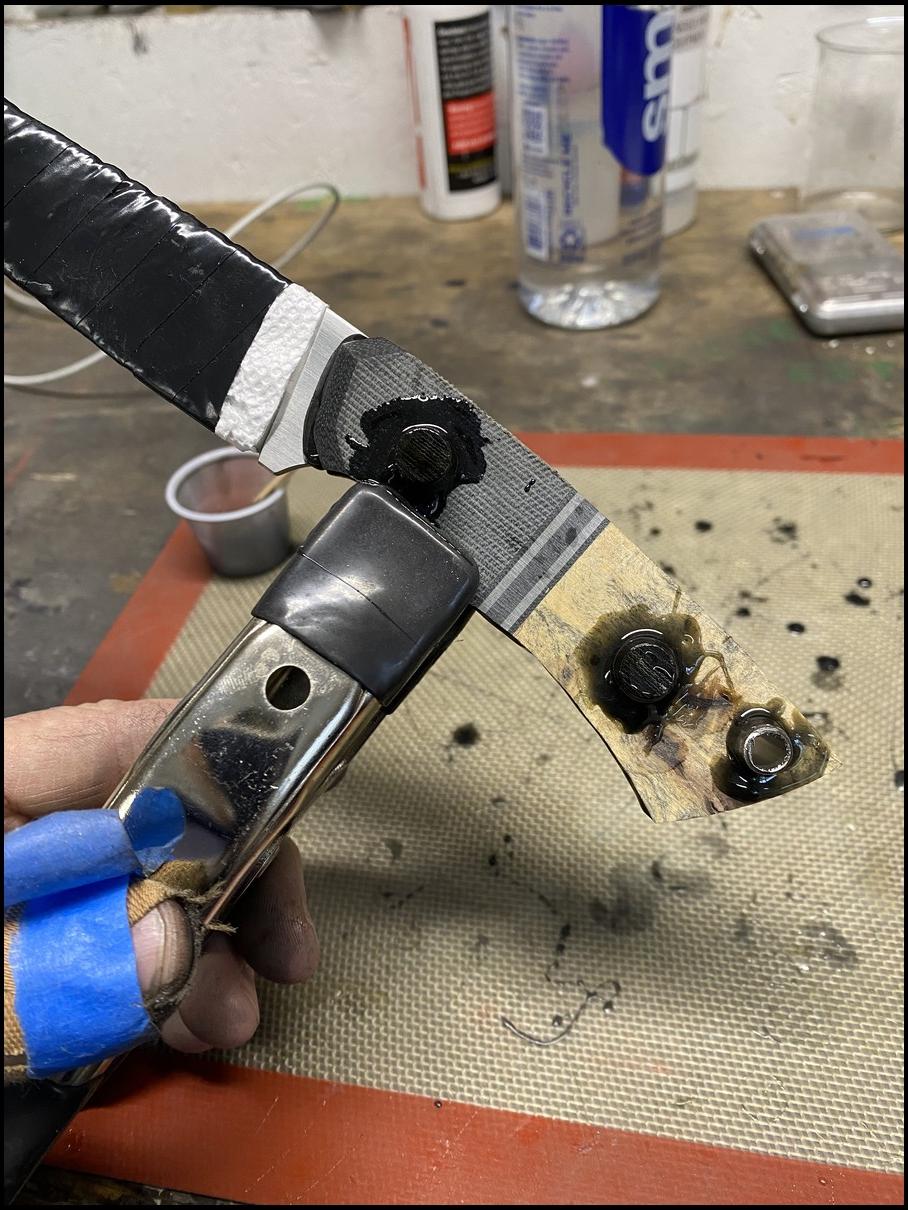
Adding spring clamps

Adding spring clamps
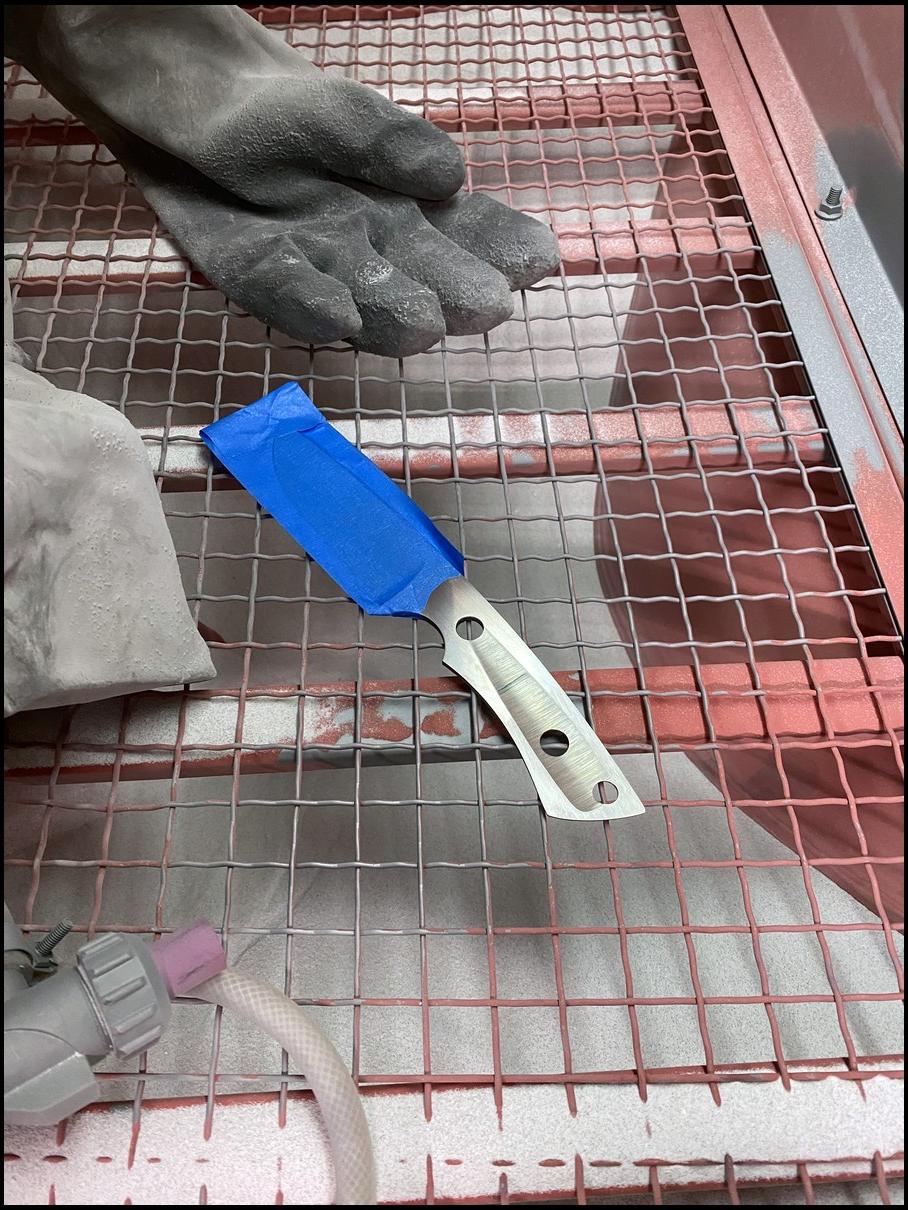
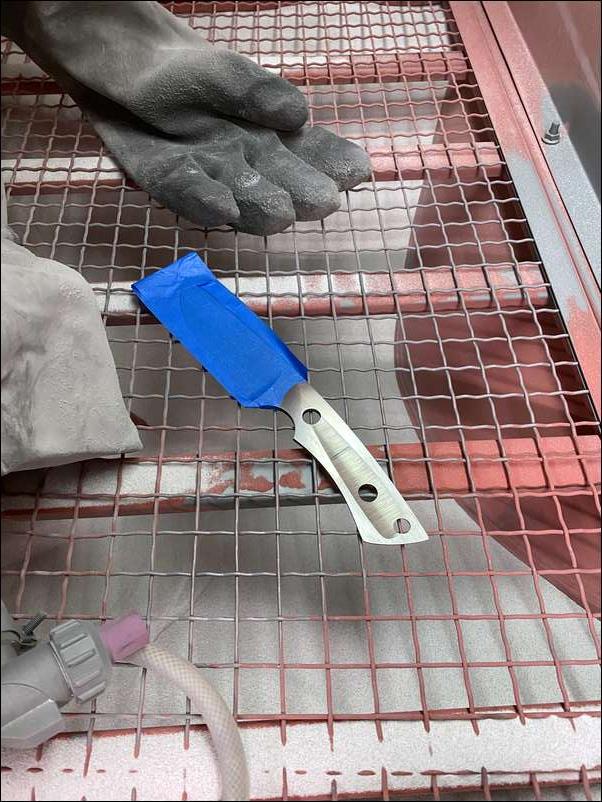
After adding my makers mark and my serial number the knife tang needs to be prepped for glue up. An important step is to degrease and blast the surface with aluminum oxide to give a surface the epoxy can bond to. I mask off all the areas I want to protect and place back into the blast cabinet
I hope this is making sense to everyone. Any questions or things you may want explained? Thanks guys.
It makes sense!!! Outstanding thread!
Still following along for sure. Have you shared pics of your other 437 knives on bowsite? Need to find that thread if they are out there. Thanks for smearing the process. What the tool look like that you etch the numbers with?
Gotta love that shamrock too. Great thread, work of art.
Ok, I’m gonna ask THE QUESTION ;-) How much is this knife gonna sell for ?
I have shared a few of my knives but not many.
Very nice, looks like A nice hunting knife.
Drycreek. DM sent and it has already been claimed.
I appreciate you taking the time to share what goes into creating a knife like this! I find threads like this incredibly interesting.
I look forward to seeing the process daily. Thanks for doing this thread.
Robert, why large diameter pins. Instead of the traditional small ones
Altitude, I do all sizes of pins from 1/8” up to the 3/8”. On some knives I use the 3/8” pins for a look I am after. That said is a personal preference. I can use any size requested within reason. I also can use metal pins like brass, stainless steel and even mosaics. Thanks Jay
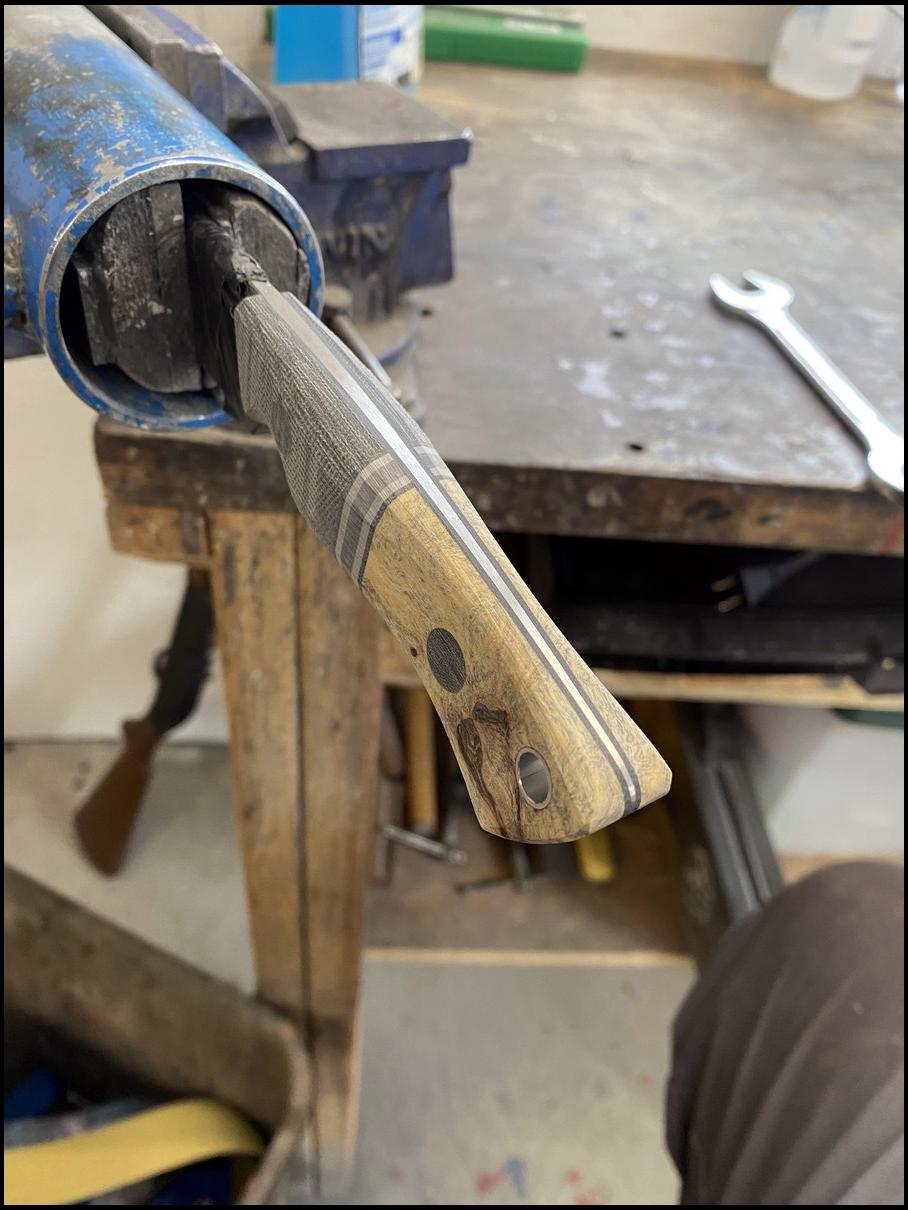
Ok. The gflex resin has now set up and is time to finish and shape the handle.
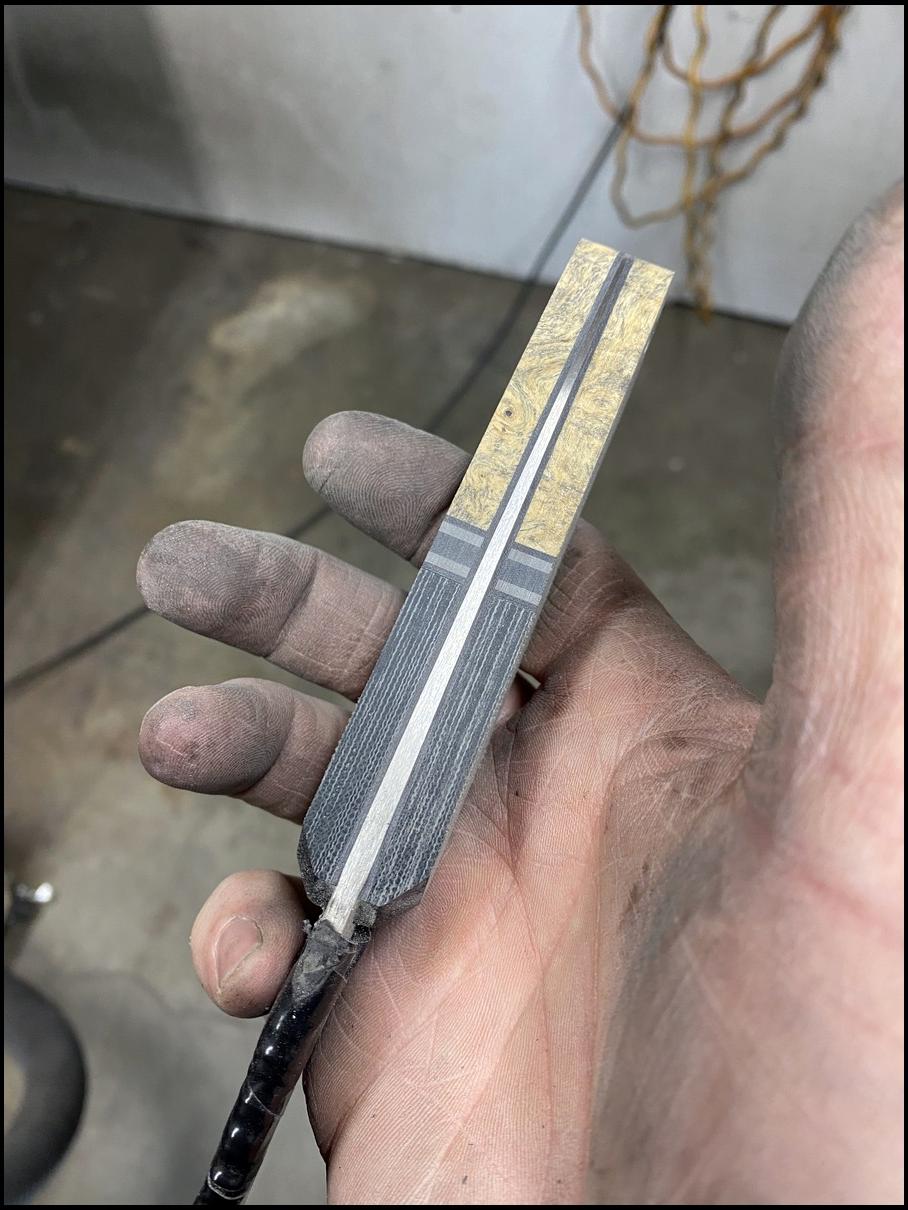
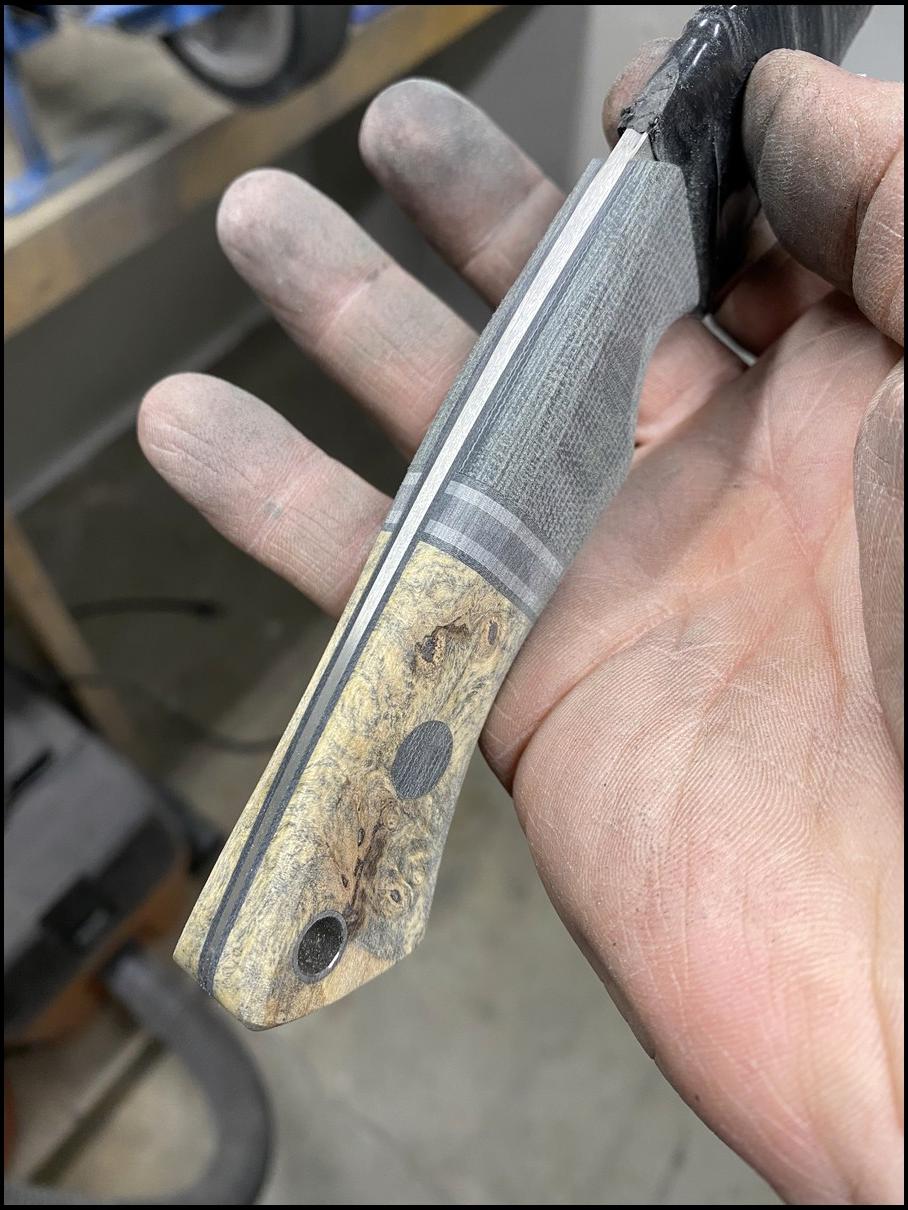
Here you can see the taper in the tang
Here you can see the taper in the tang
Grinding the taper to the front of the handle
Grinding the taper to the front of the handle
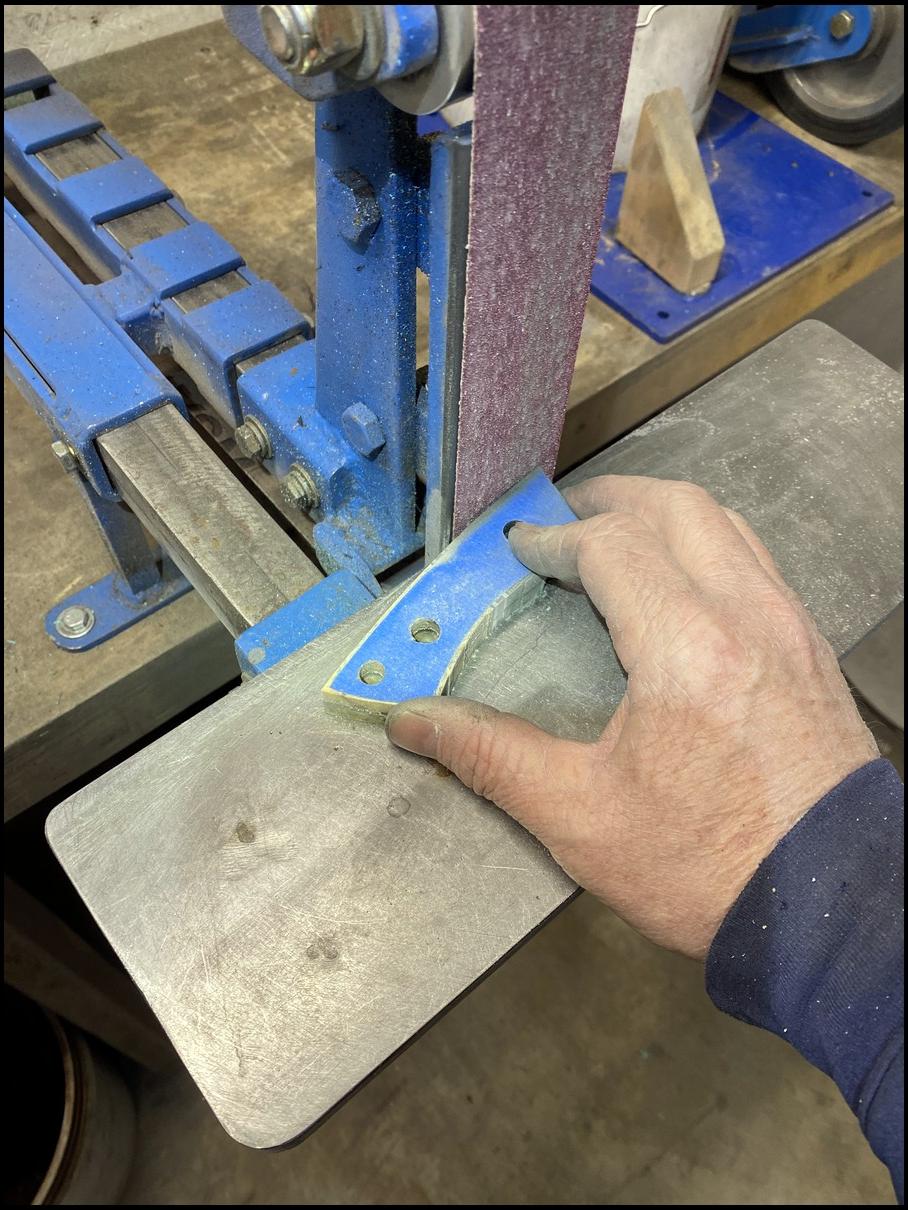
I shape my handles by hand after I square and flatten back up to the blade. I feel if I start with something uniform it ends up finishing up much better and easier to see fewer angles at once
Now to cut the hourglass shape. I use various sized grinding wheels… this is an 8”
Now to cut the hourglass shape. I use various sized grinding wheels… this is an 8”
Though I do them by eye I check for symmetry as I go with calipers just in case.
Though I do them by eye I check for symmetry as I go with calipers just in case.
Now they are roughed in I will clean them up and shape to match with a fine belt belt
Now they are roughed in I will clean them up and shape to match with a fine belt belt

Rounding all the edges off with a 4” wheel
Rounding all the edges off with a 4” wheel
The edges are all rounded and the shape is ready to be sanded by hand to finish.
I place the knife in a home made “knife” vise and sand away

I place the knife in a home made “knife” vise and sand away
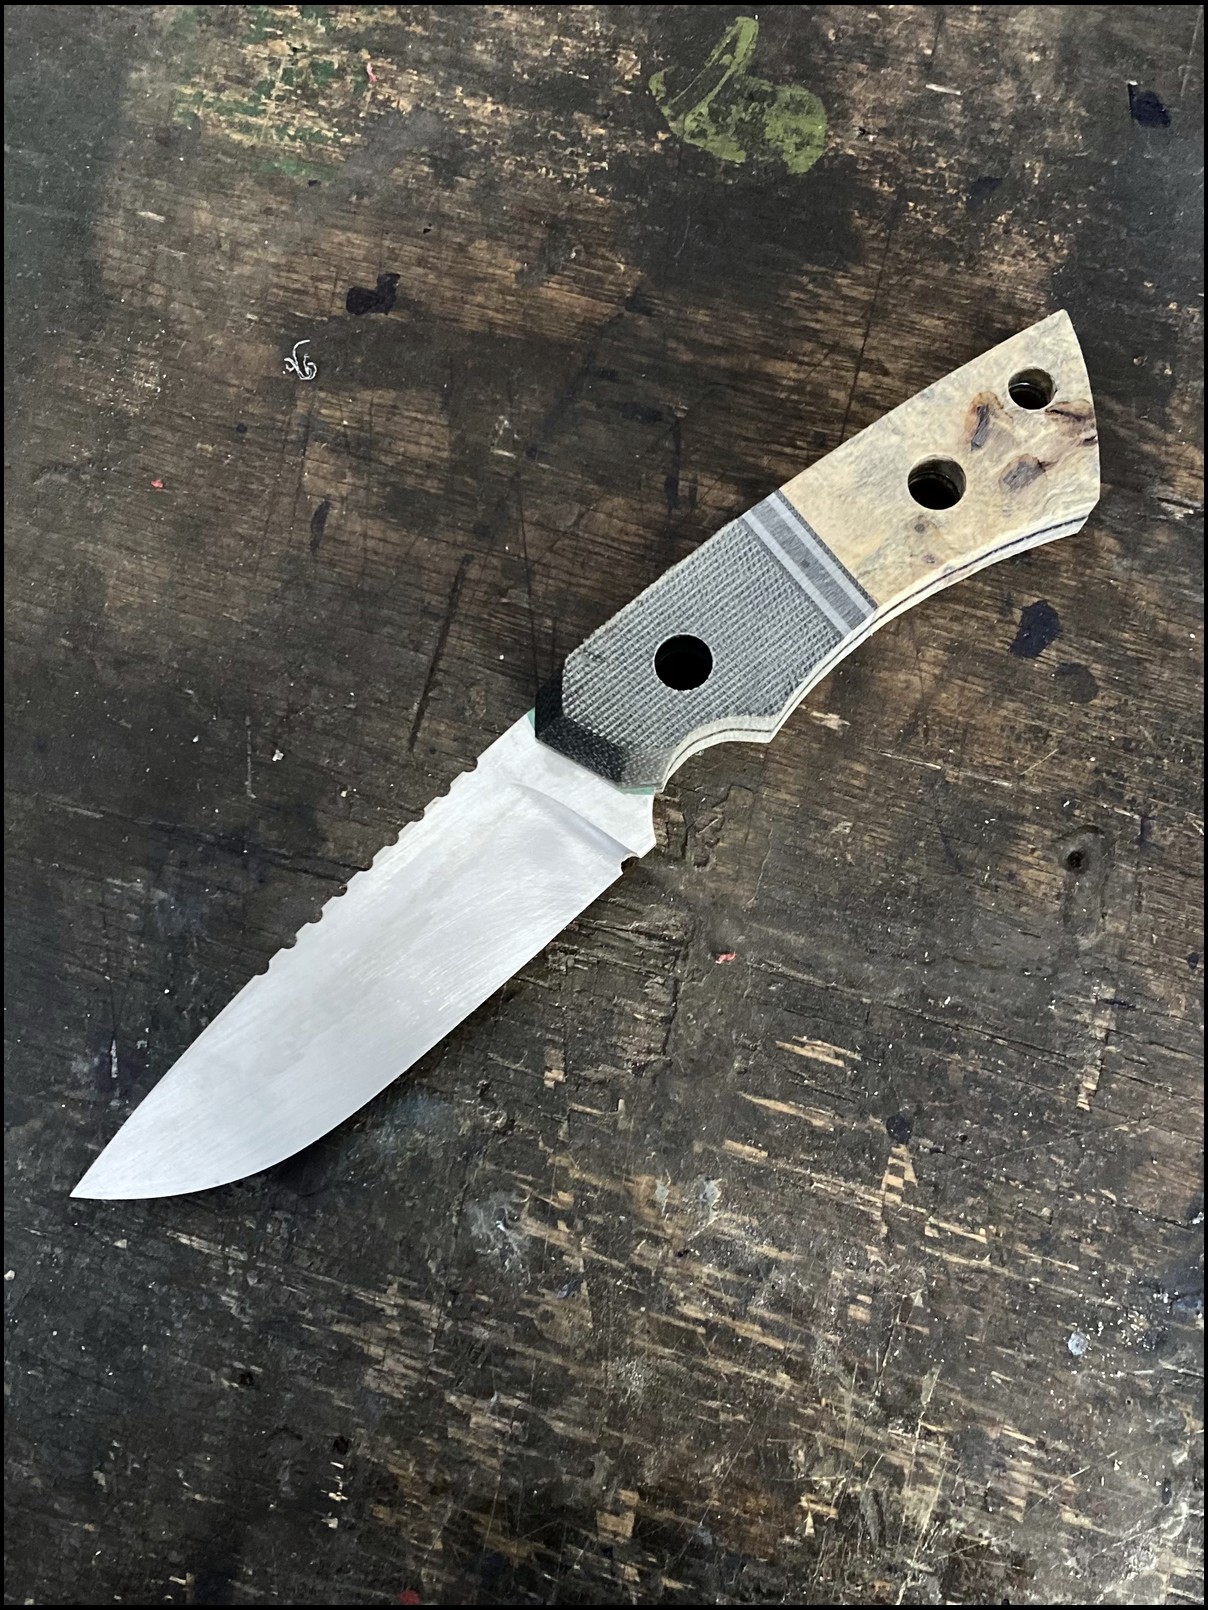
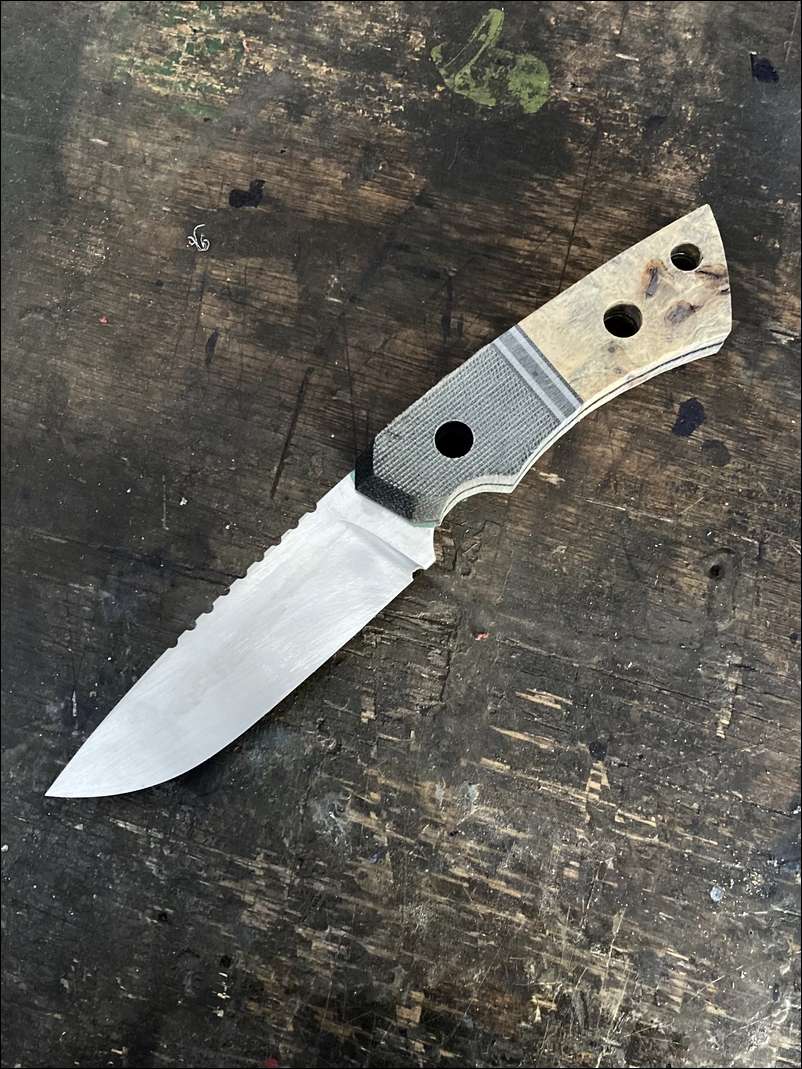
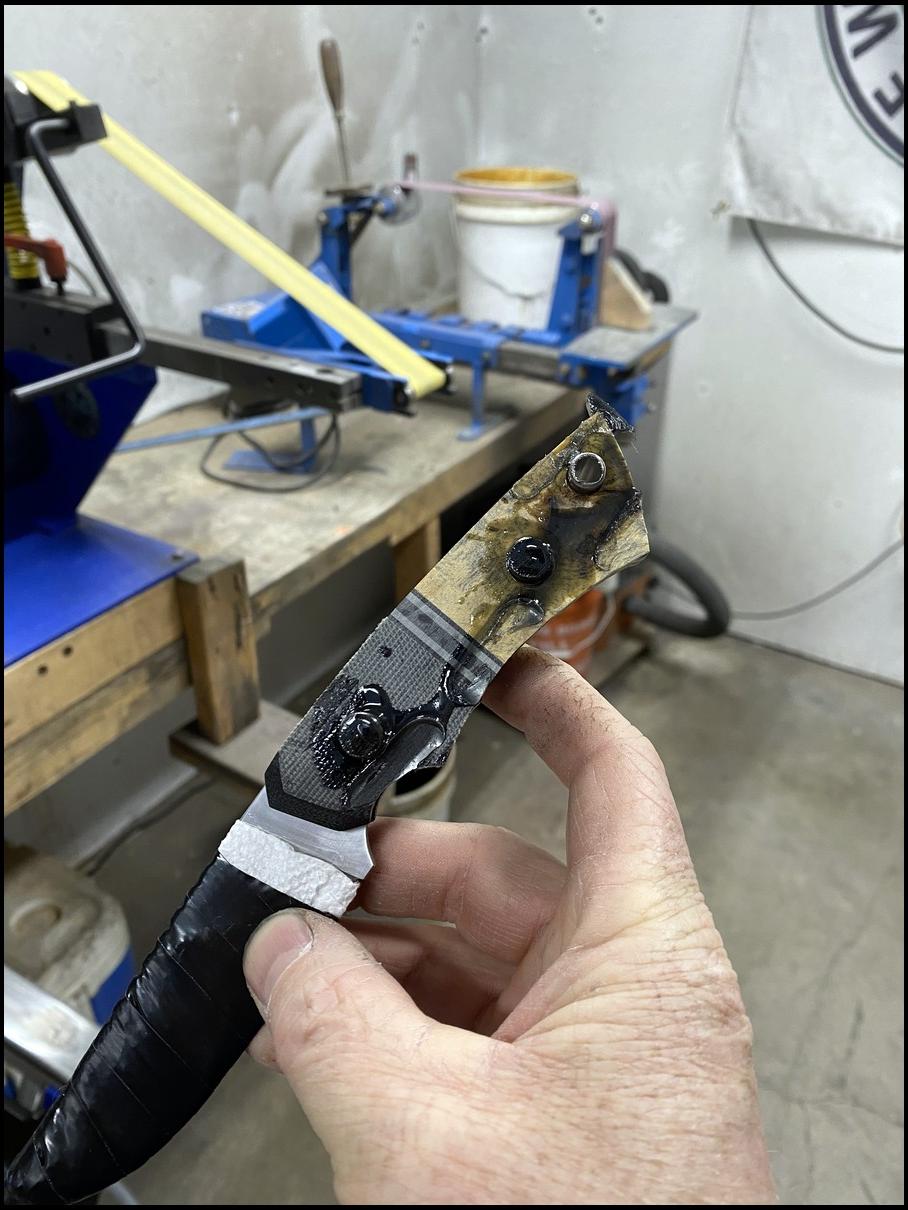
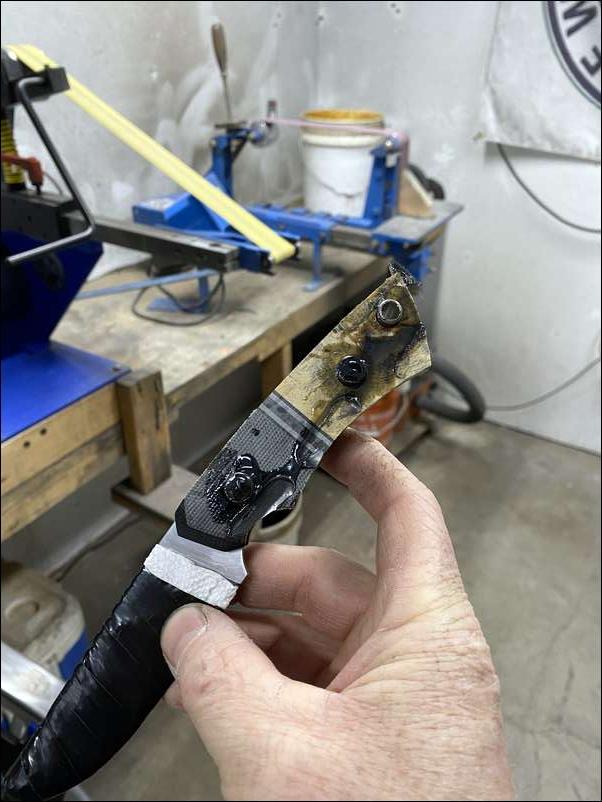
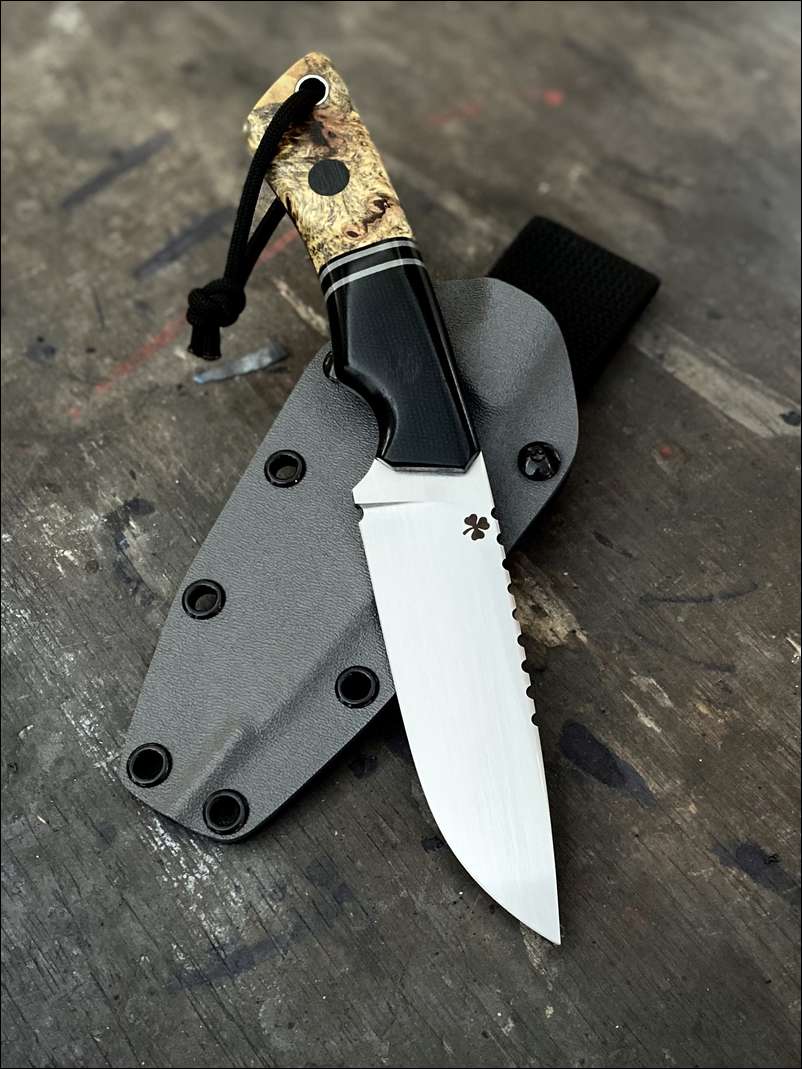
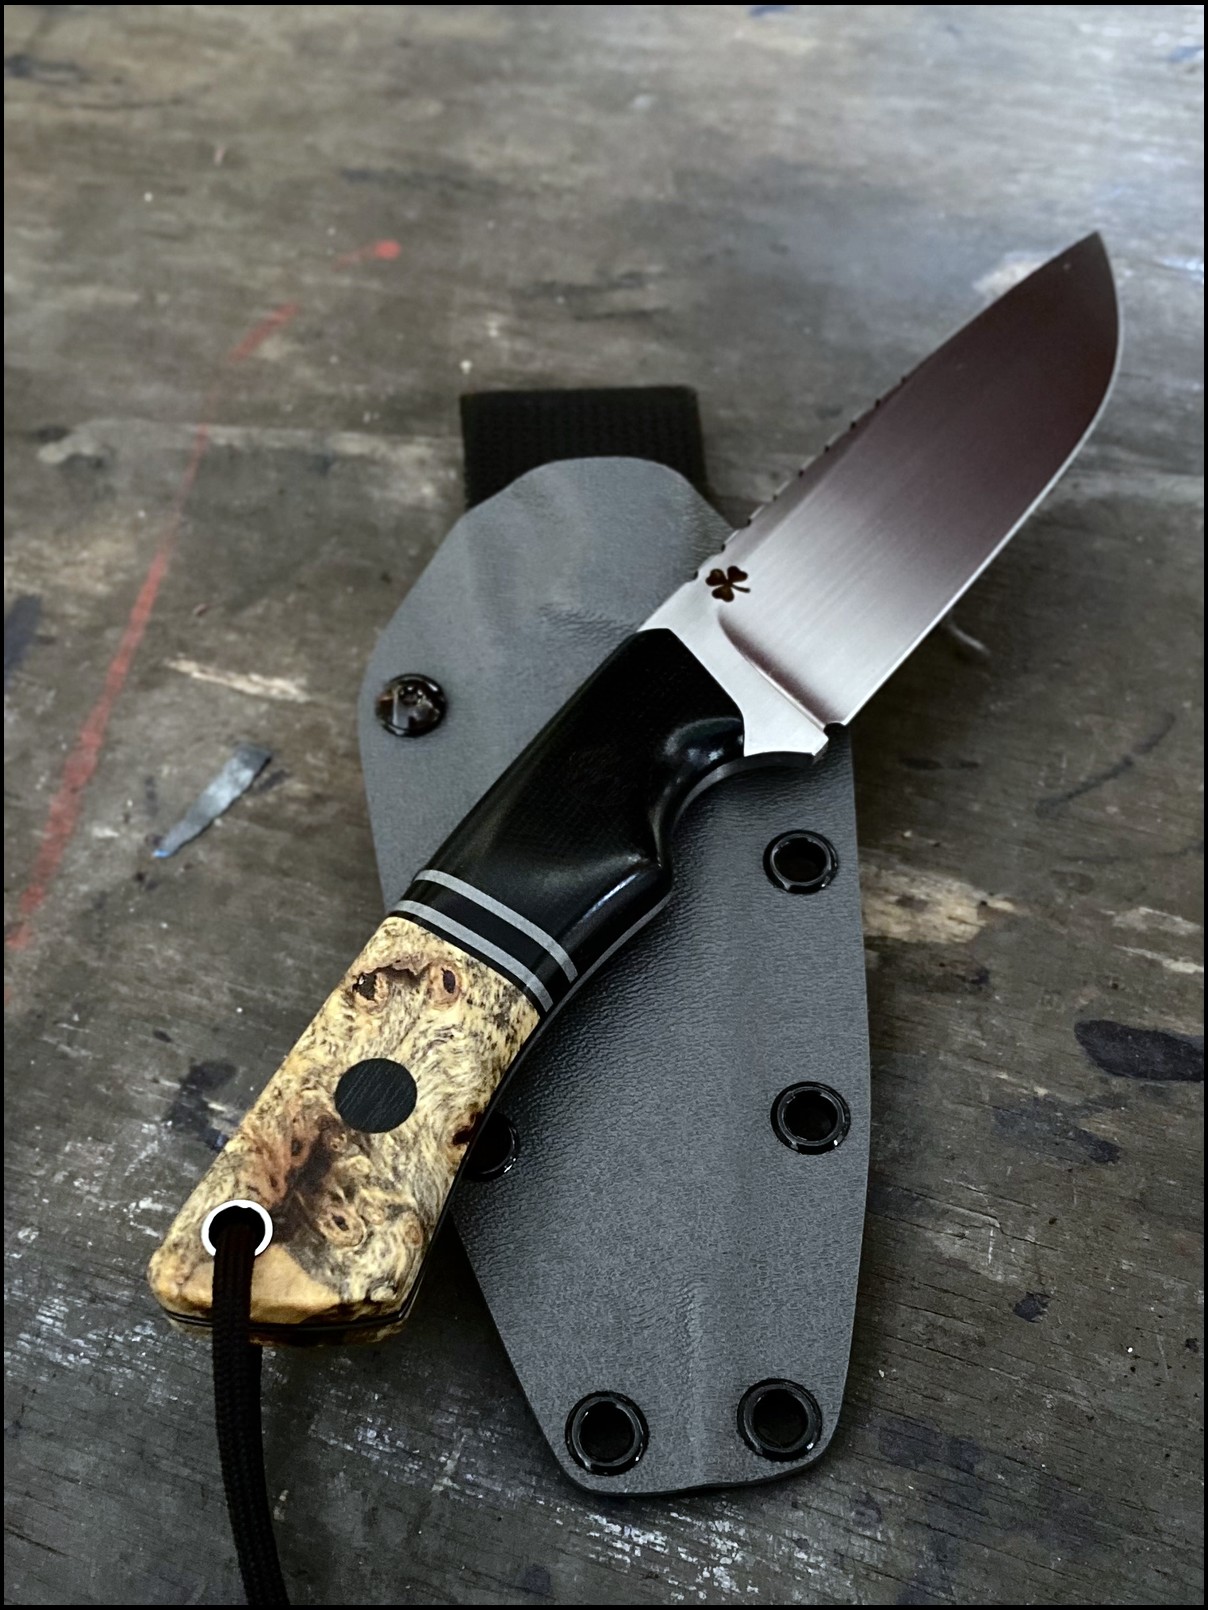
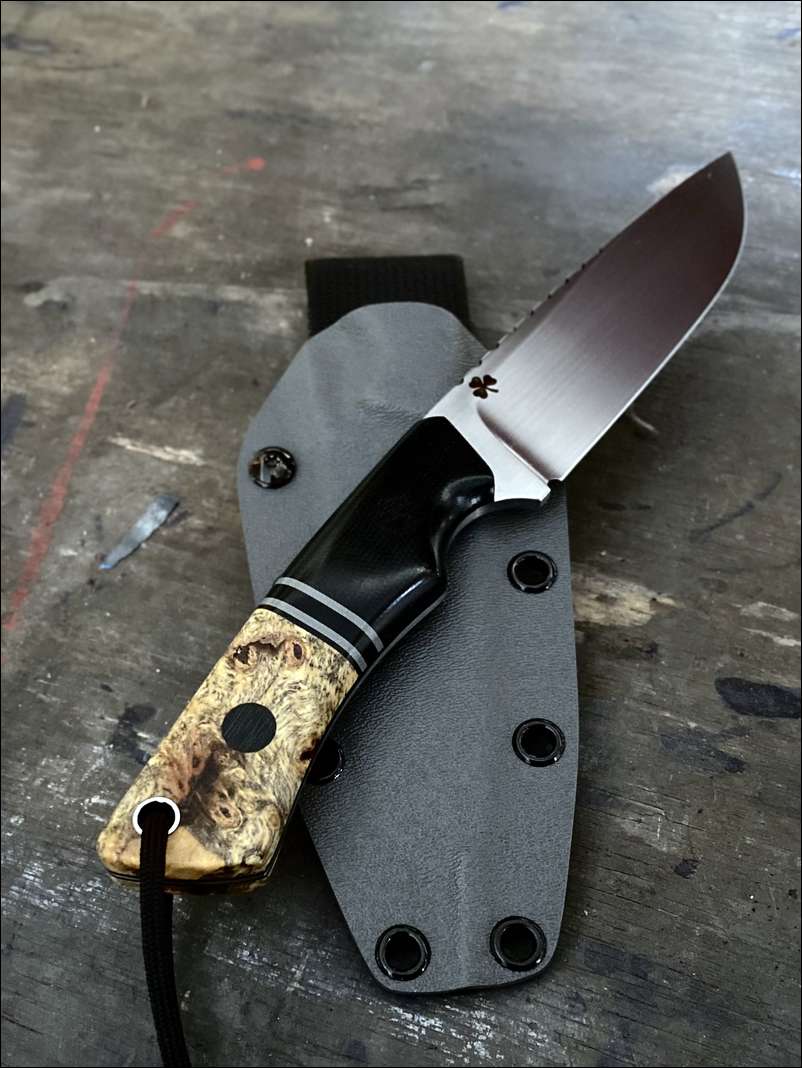
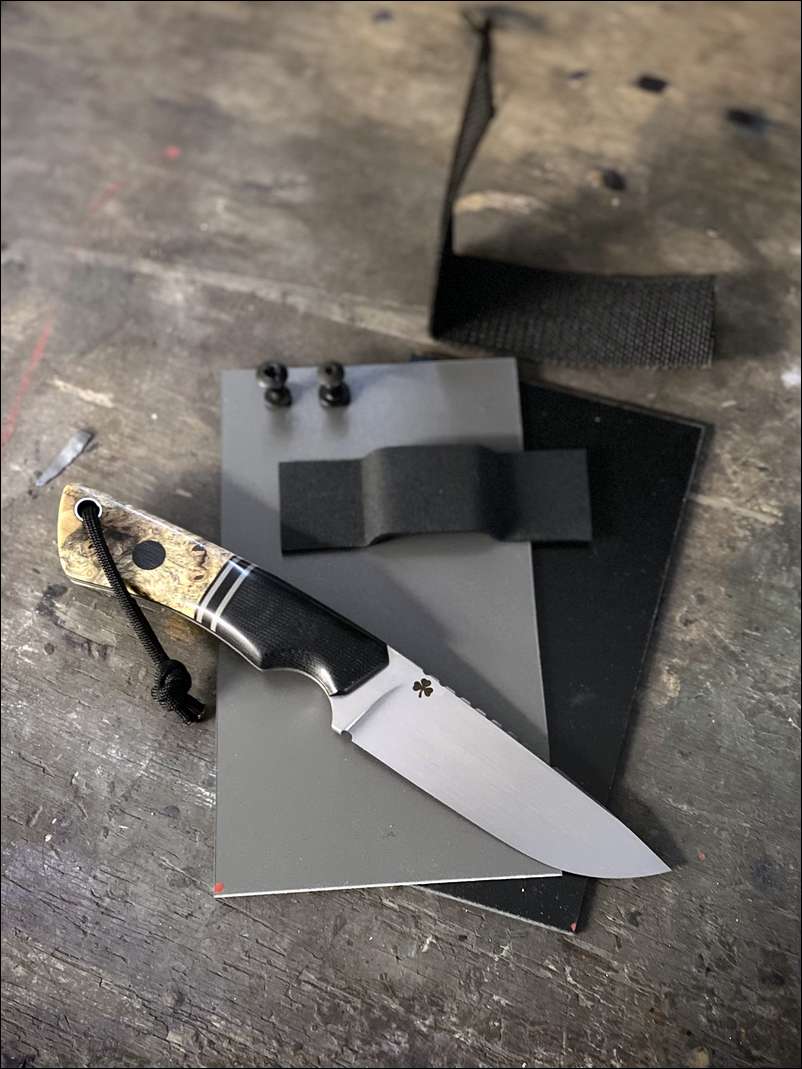
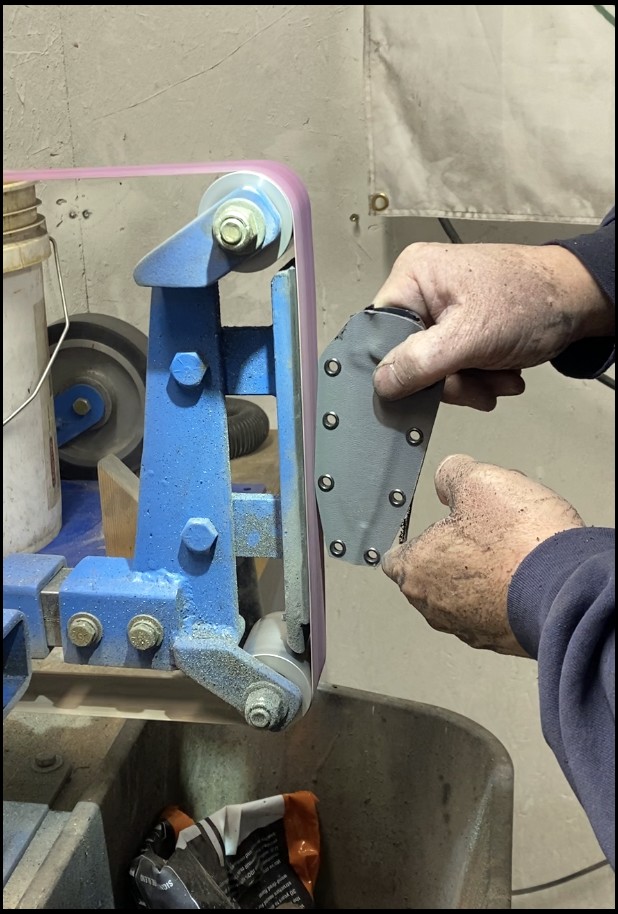
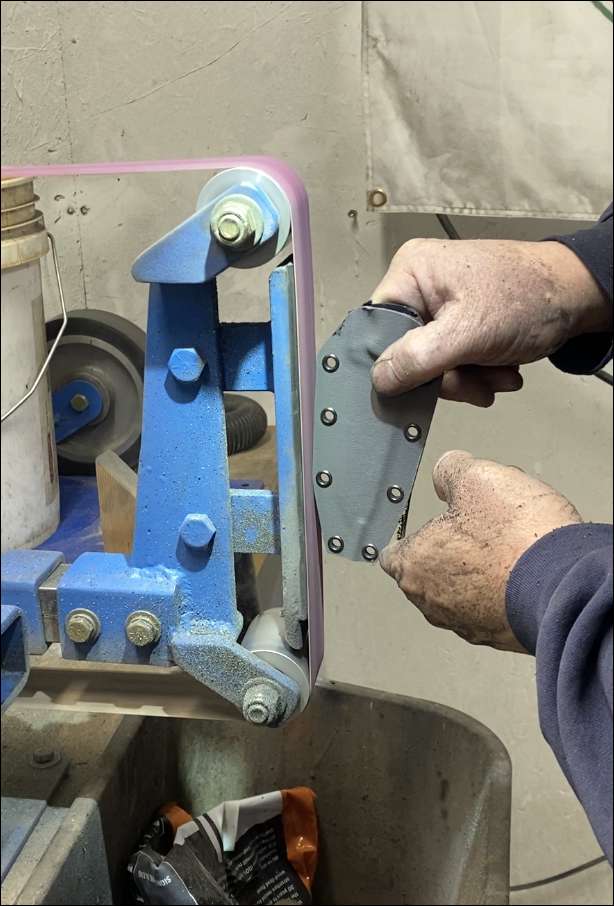
The blade is done and the handle is now shaped and sanded. Now final steps are the sheath and sharpen. I make kydex sheathes that come with the knife and if leather is requested I have a buddy in Ohio that is a master at the leather craft I recommend. The sheath making will be next
You still have knife number one? If so lets see where you started. Good looking knife!
I gave knife number one to a buddy of mine after I finished it but let me see if I can drag out a picture of it.
It’s amazing how much the grain in the burl “pops” with the fine sanding. Beautiful!!
Matt
Here is my very first knife I finished that actually worked. Is O1 tool steel I heat treated with a little forge and a can of canola oil
Thanks for sharing that. You have come a ways, still lot better than most of could do it we tried.
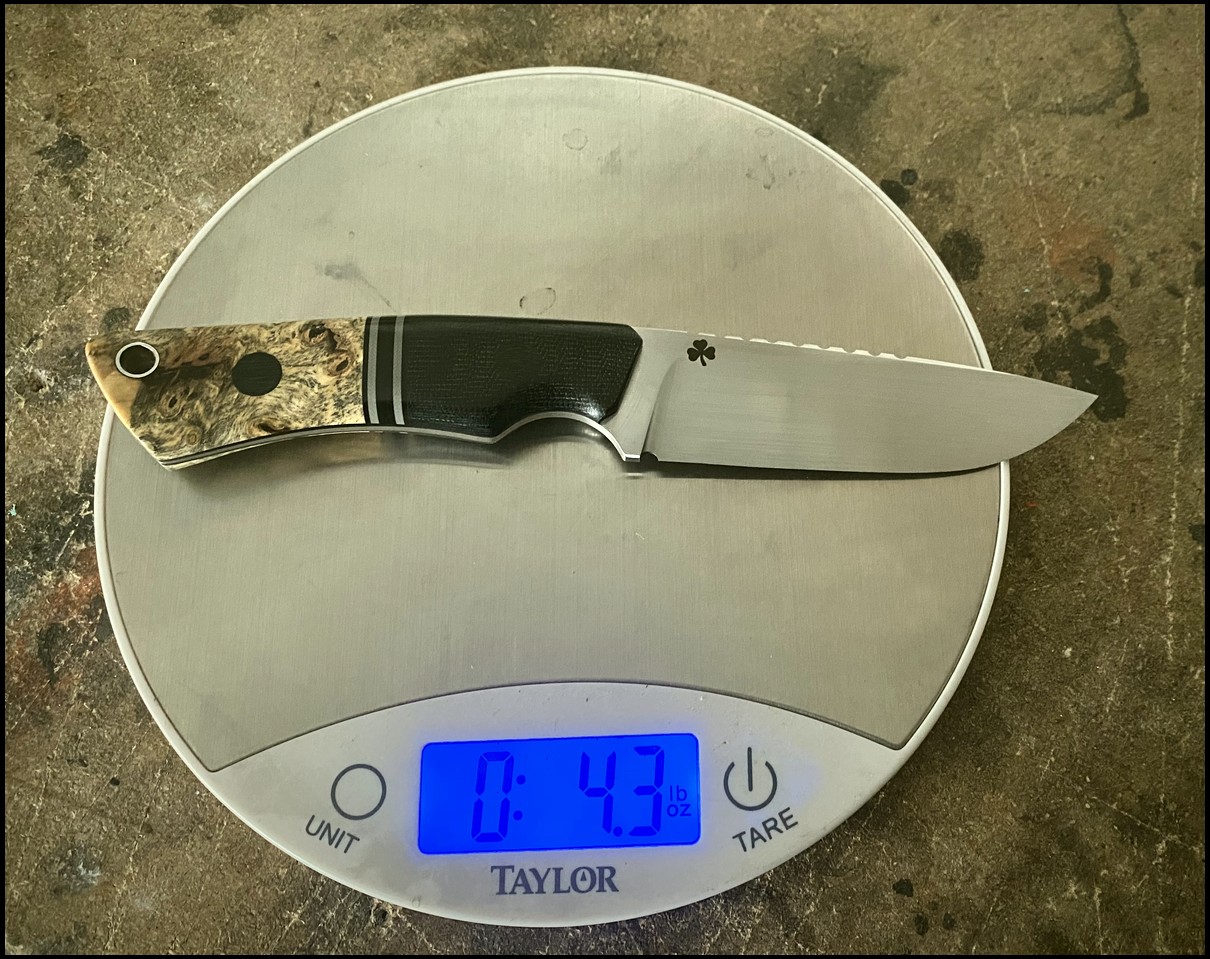
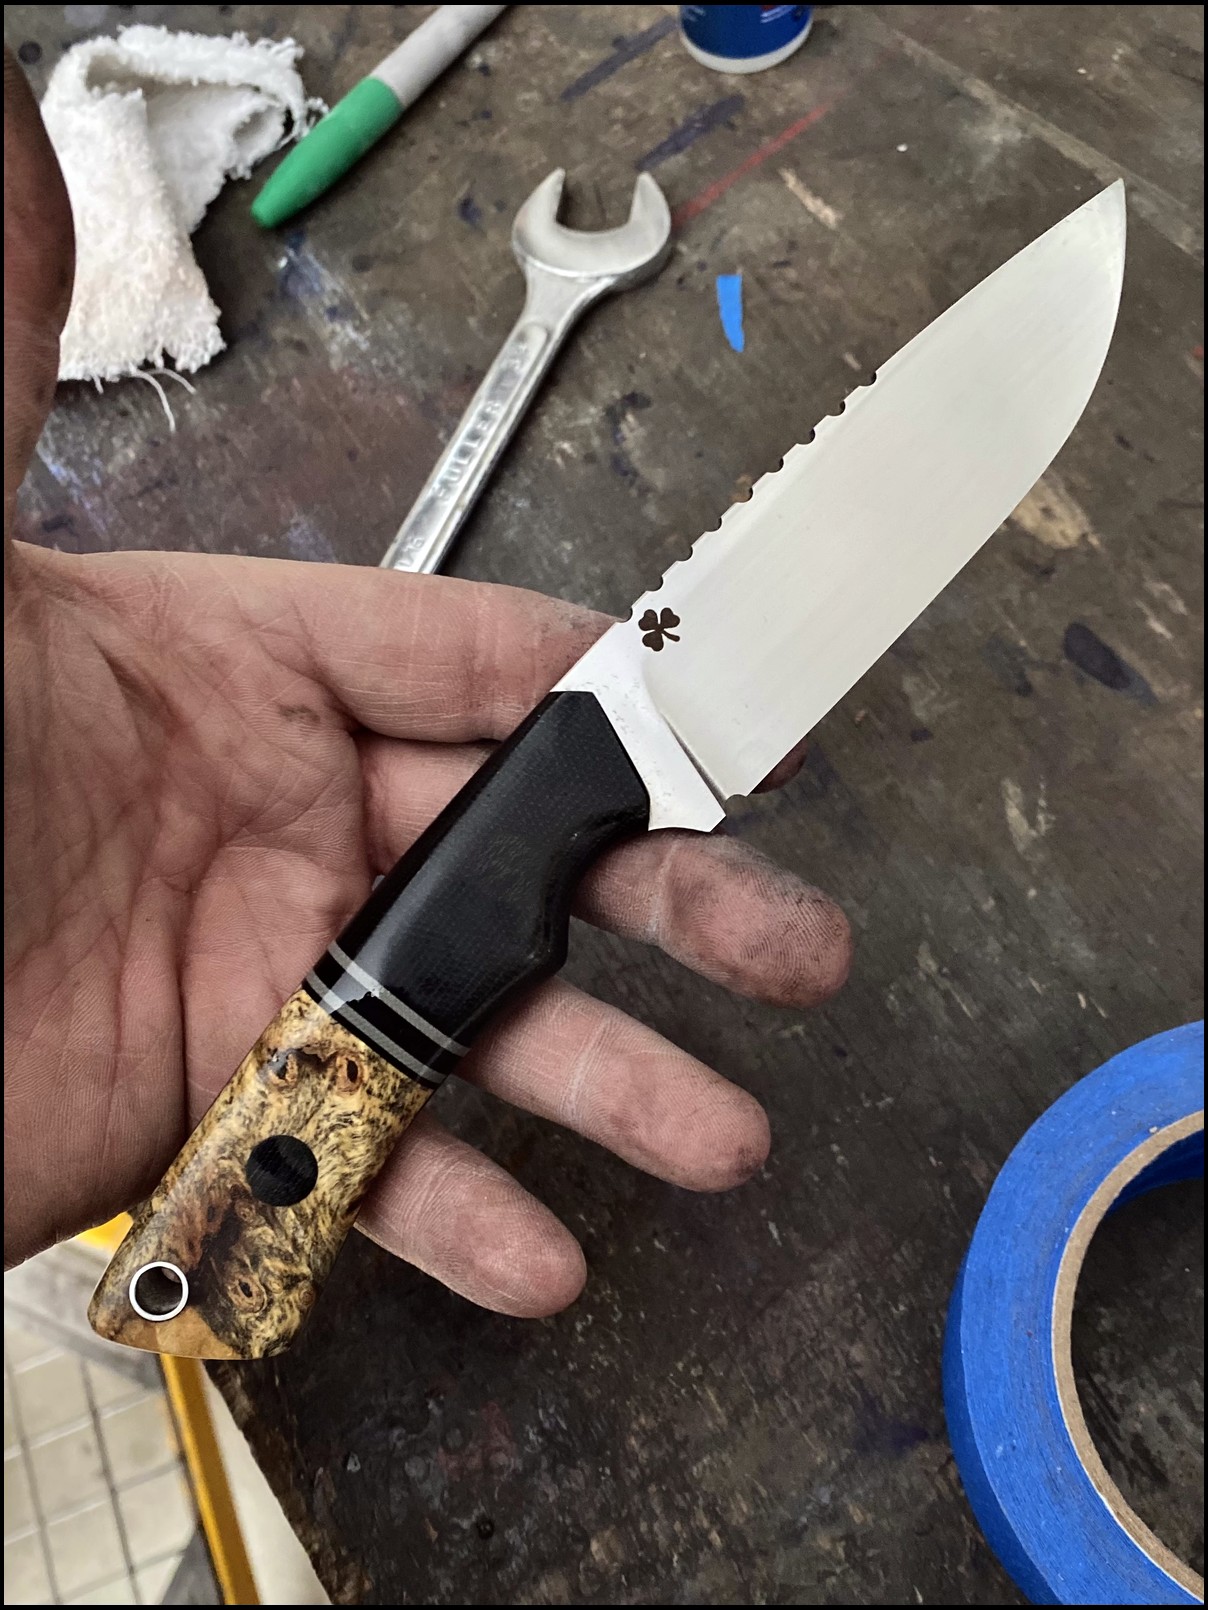
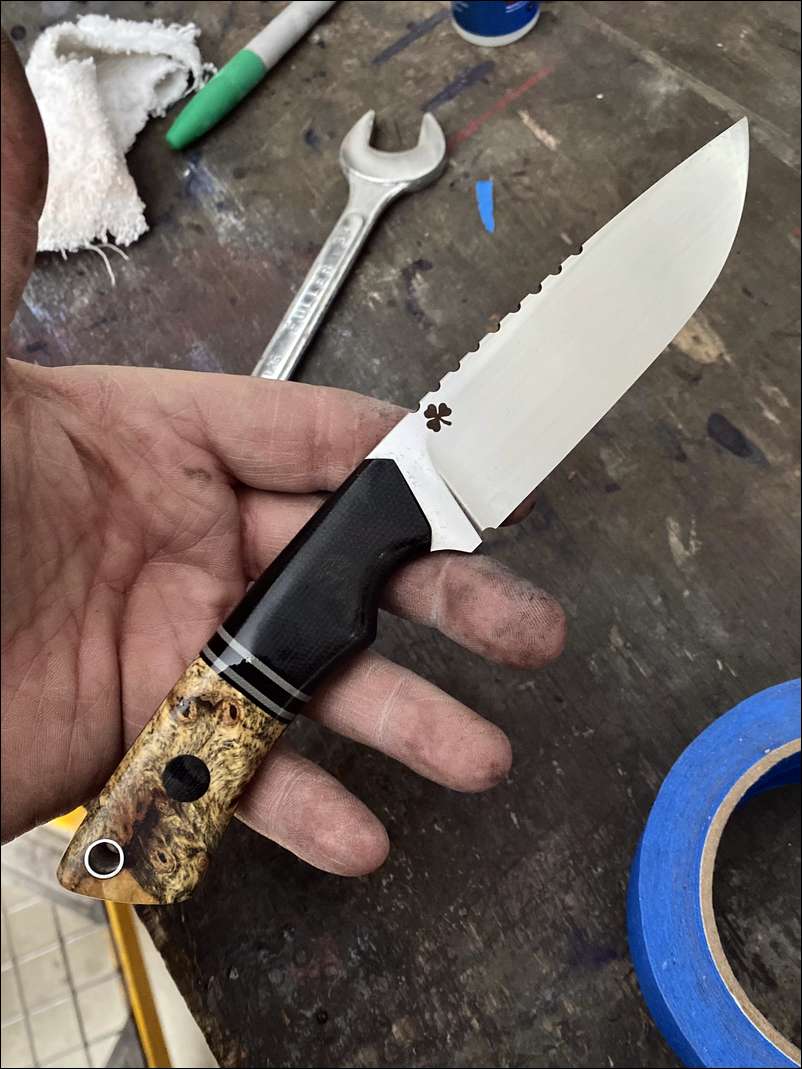
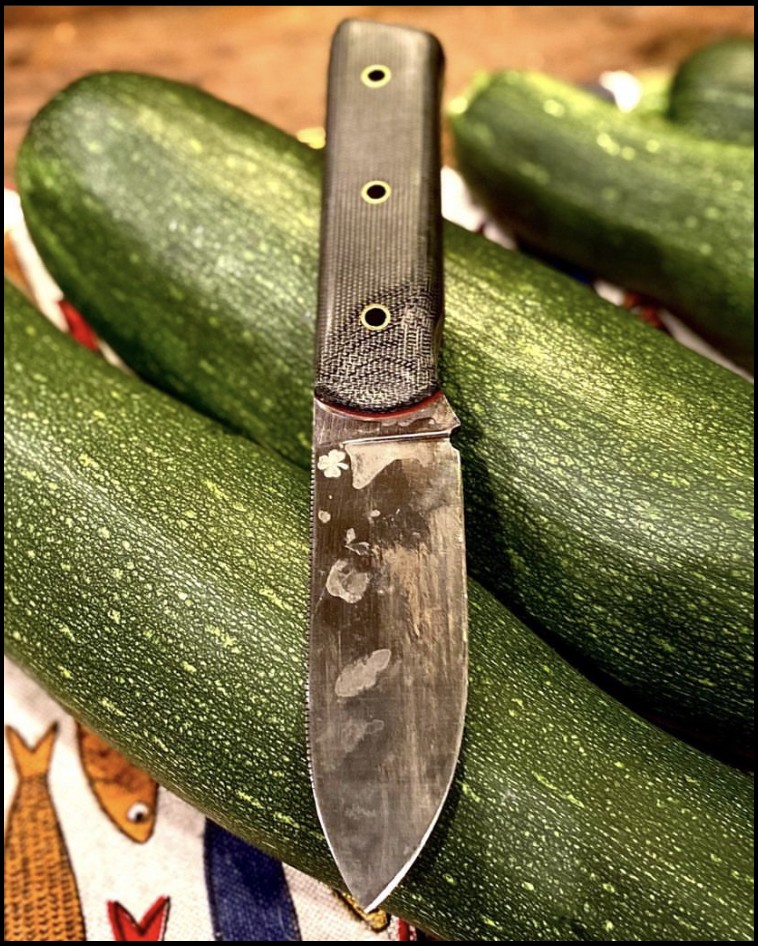
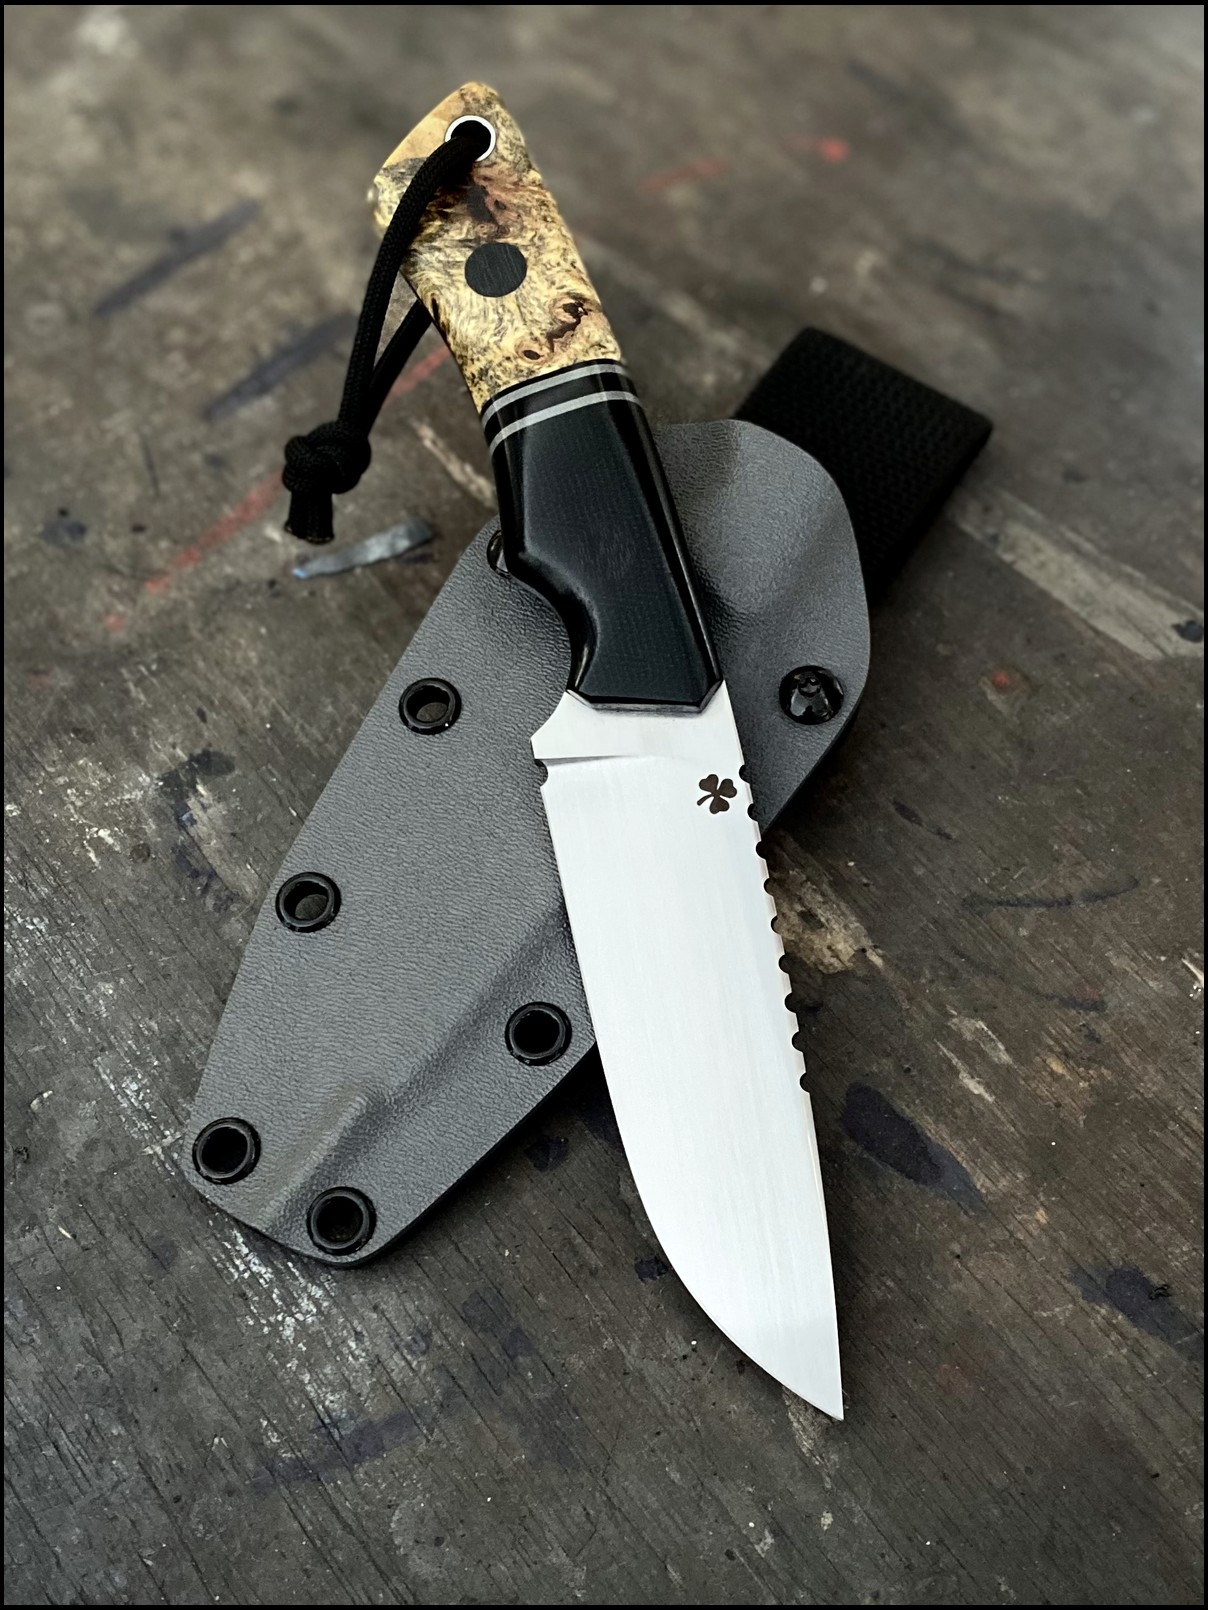
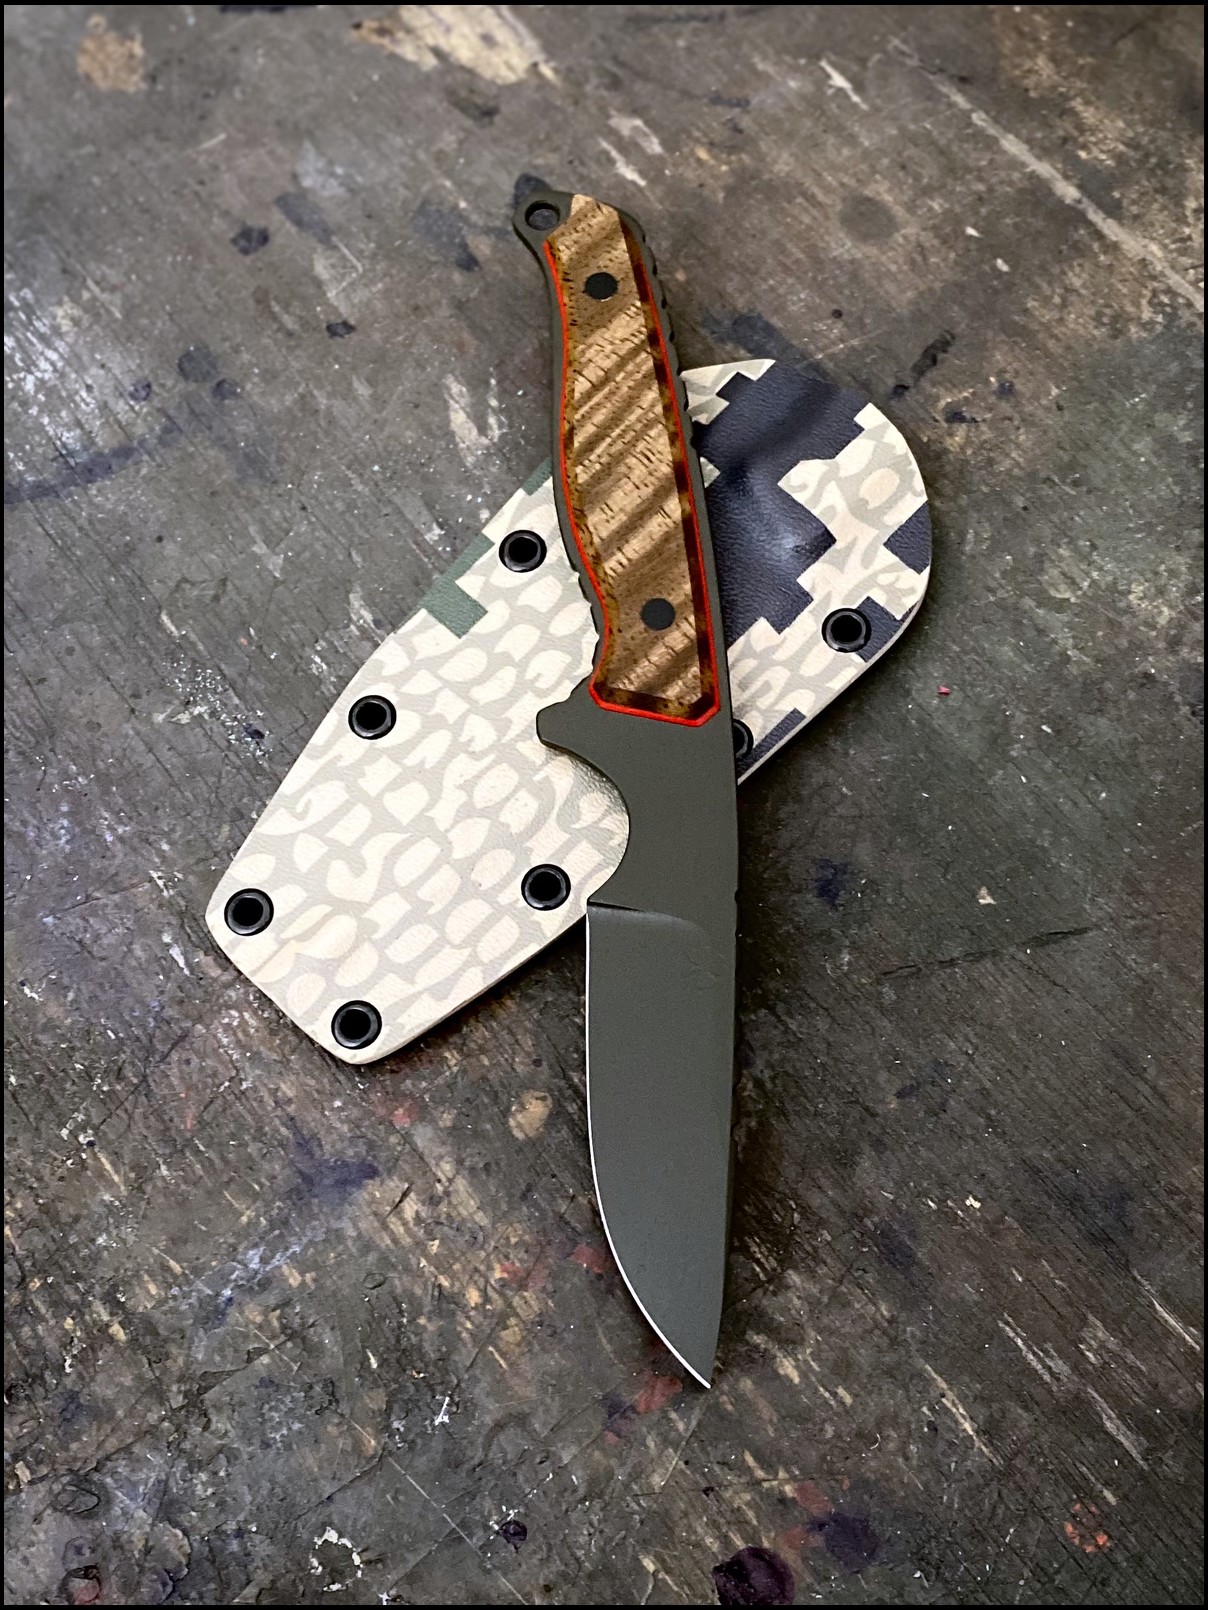
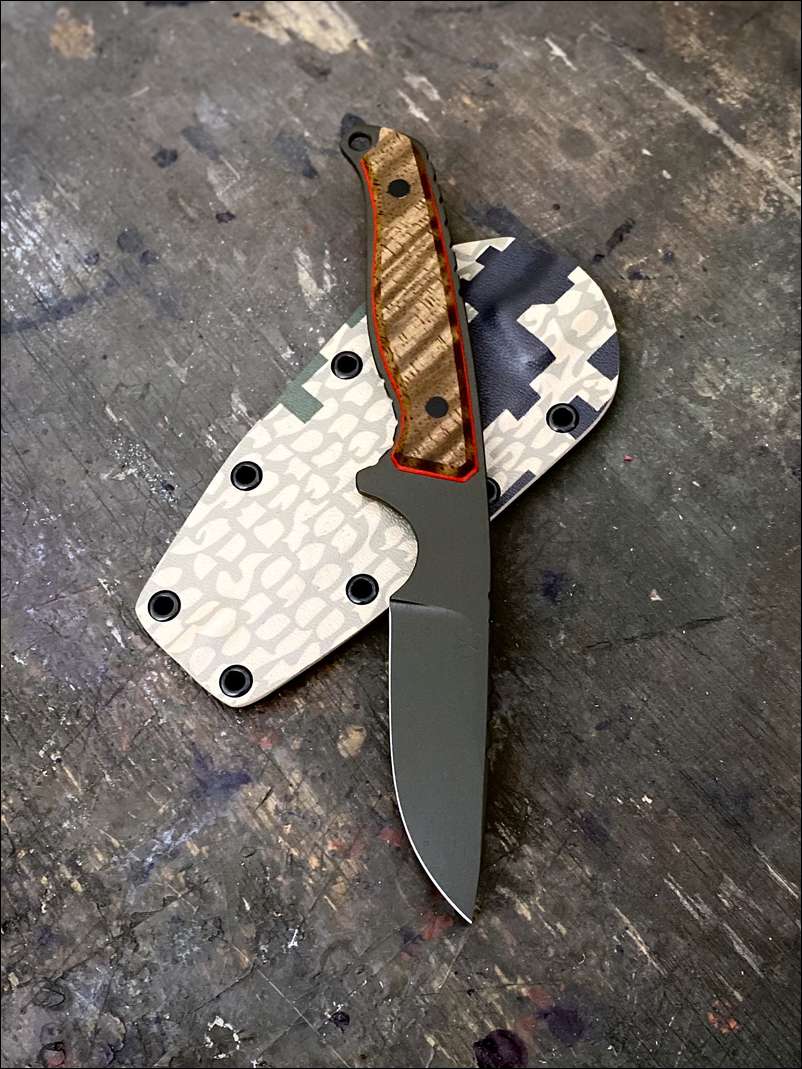
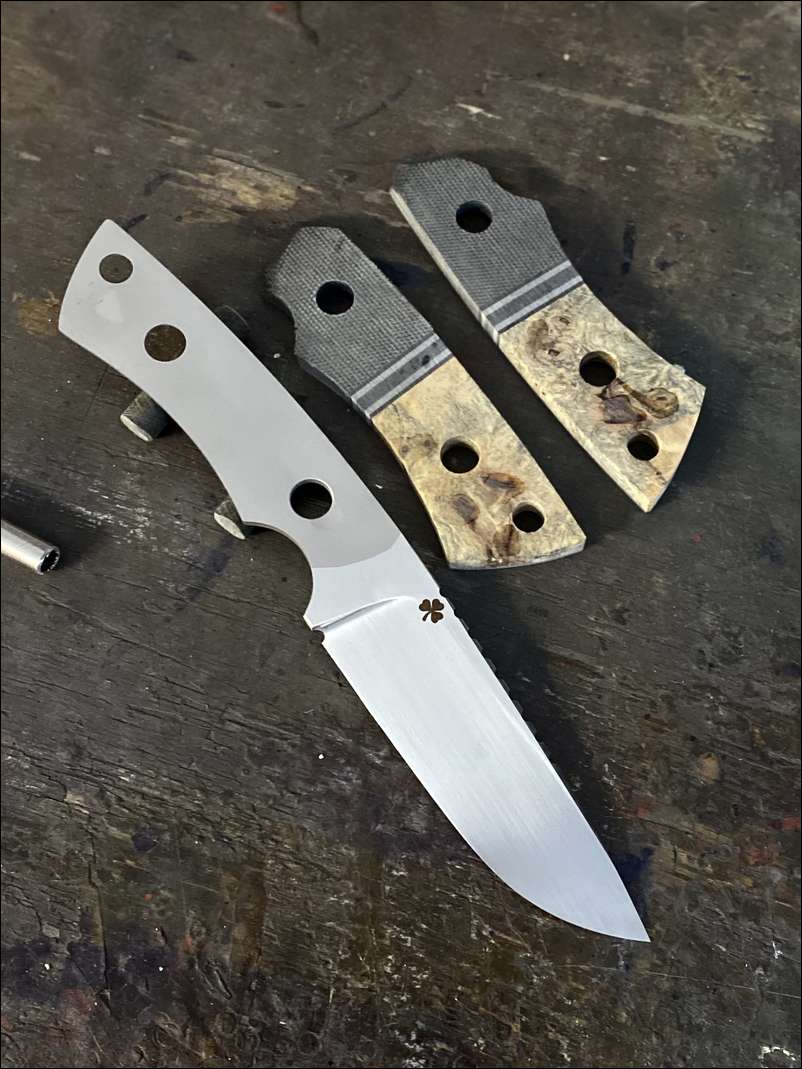
For you guys that pack in here is a 4” blade with a 8.5” overall with the capability to break down an entire elk and weighs in at 4.3oz
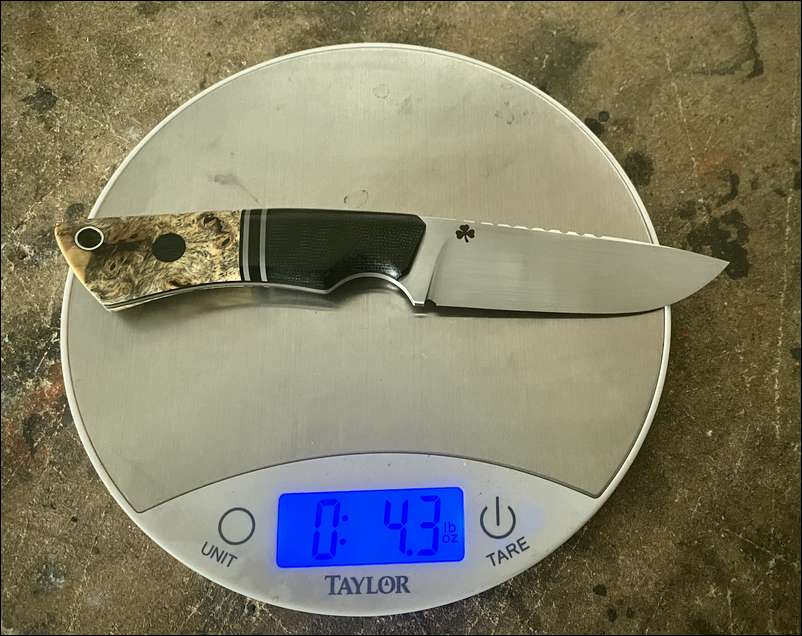
For you guys that pack in here is a 4” blade with a 8.5” overall with the capability to break down an entire elk and weighs in at 4.3oz
You sir, are a true craftsman. Beautiful knife. Thanks for the take along. knife
Thanks for all the kind words gents
I am truly amazed at your skill, that knife and the WEIGHT! 4.3 oz's!
Was this knife sold before you made it or did it sell it's self during this thread?
Simply amazing and just beautiful, truly a piece of working art !
Absolutely gorgeous... Thanks for sharing...
Did I read that wood is ebony?
Pics of the other knives you made during this thread? Please...
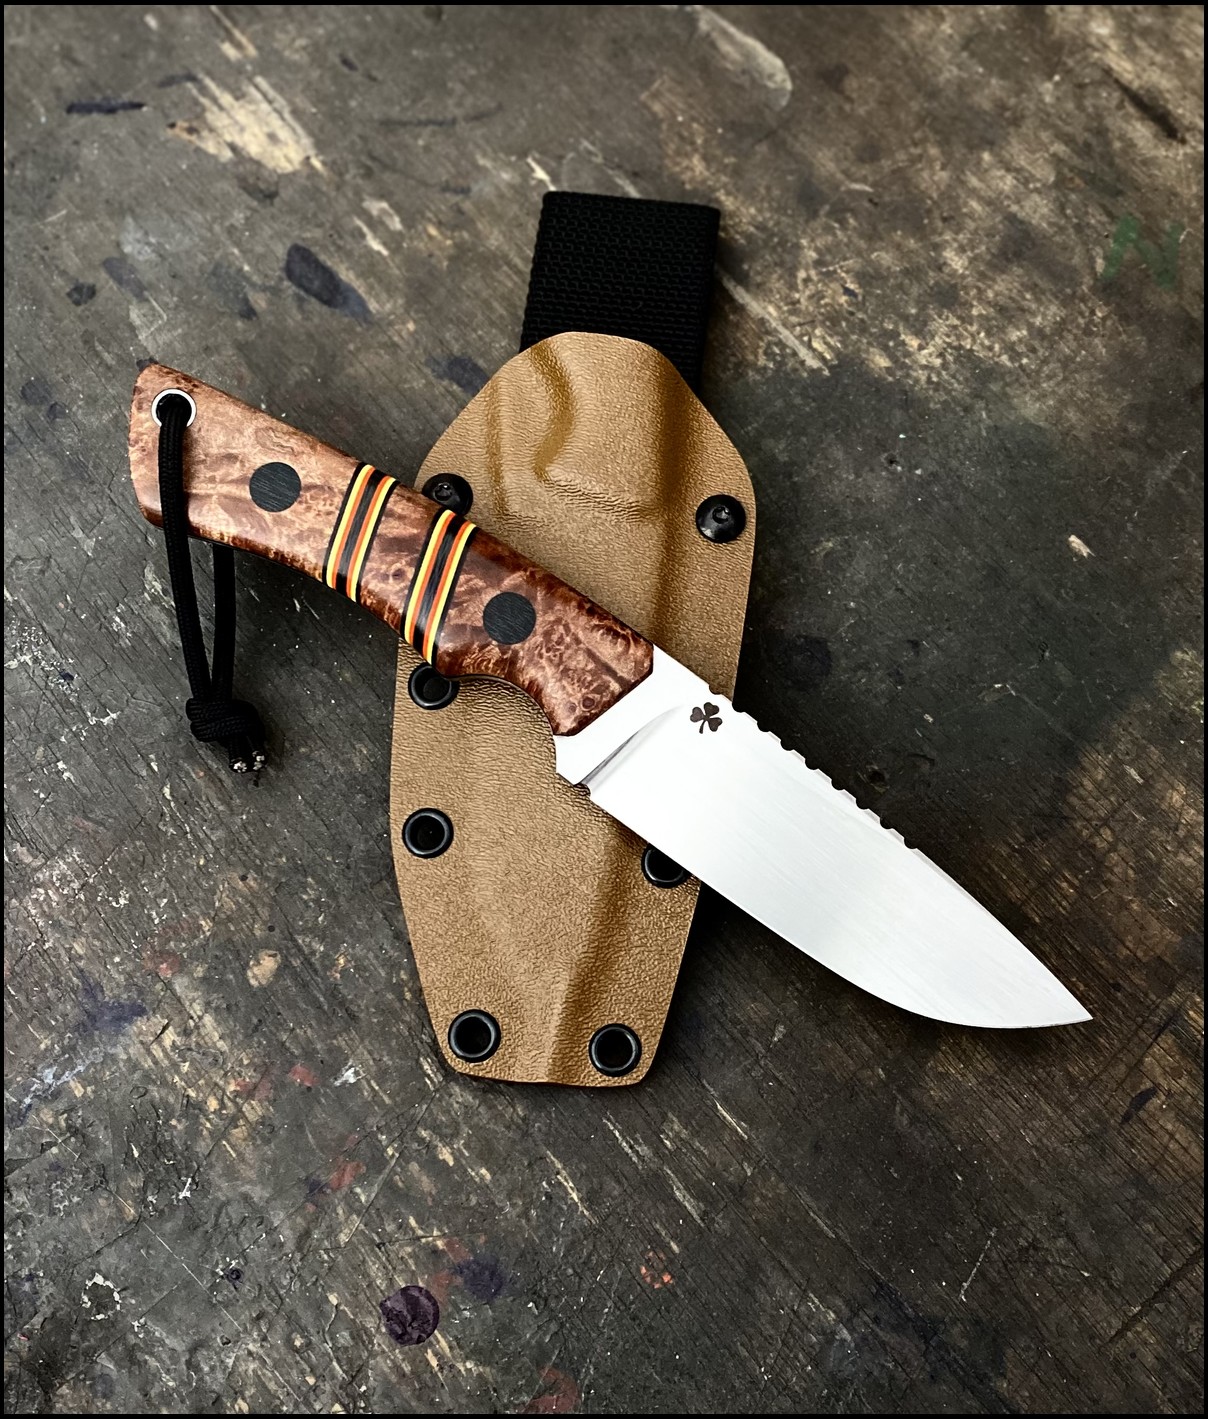
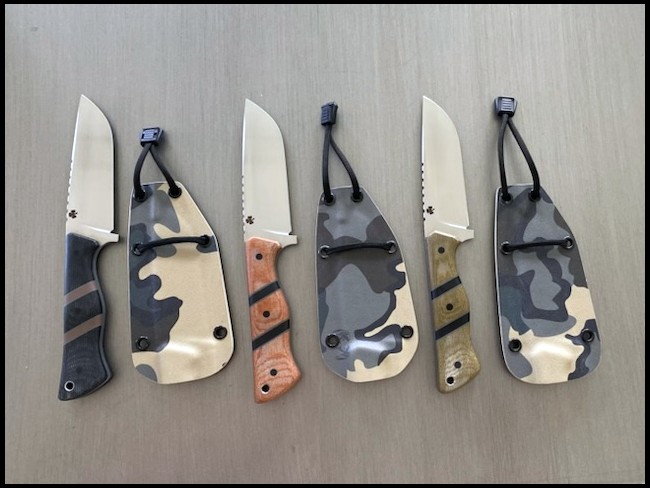
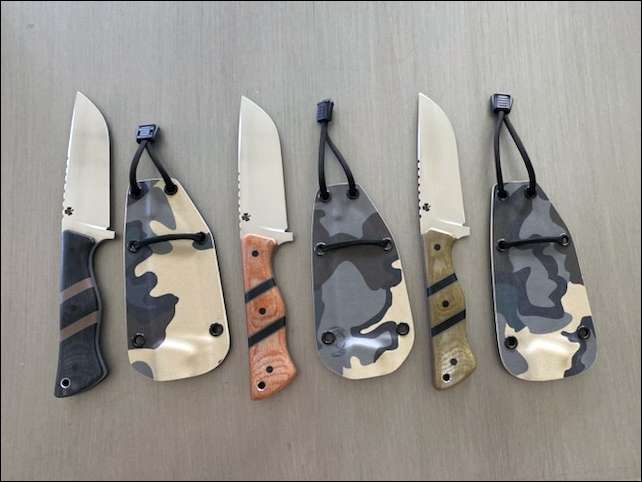
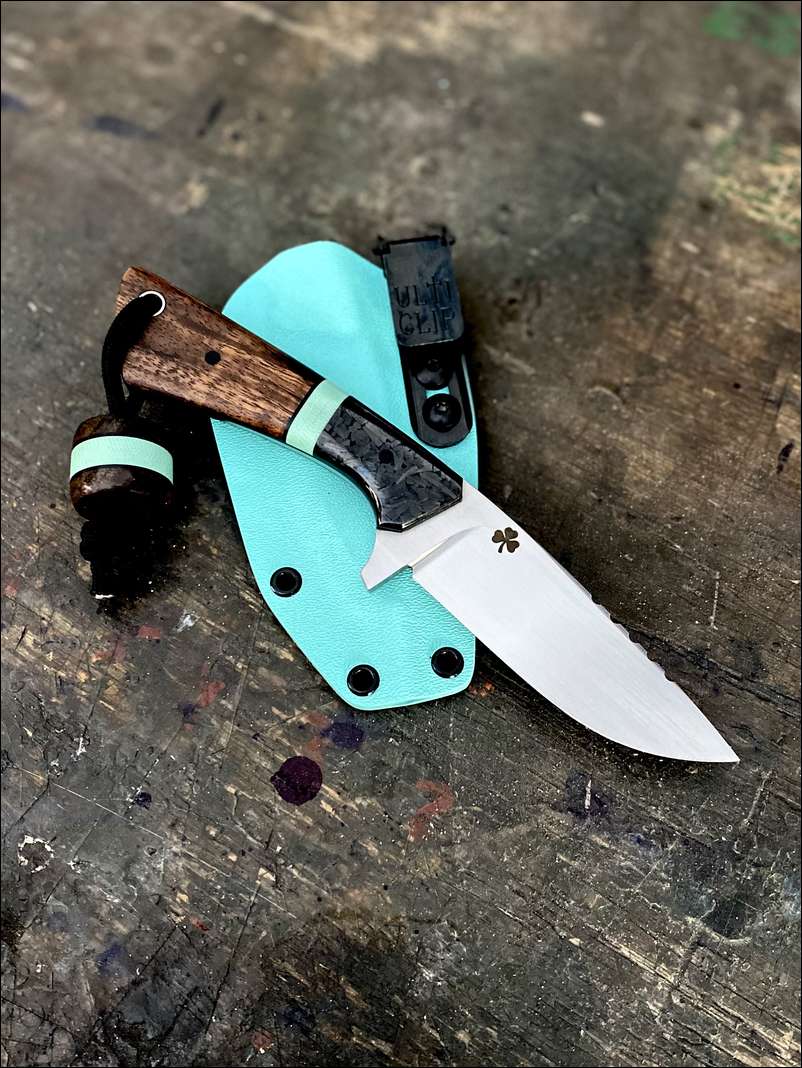
One of the other knives I made during this post.
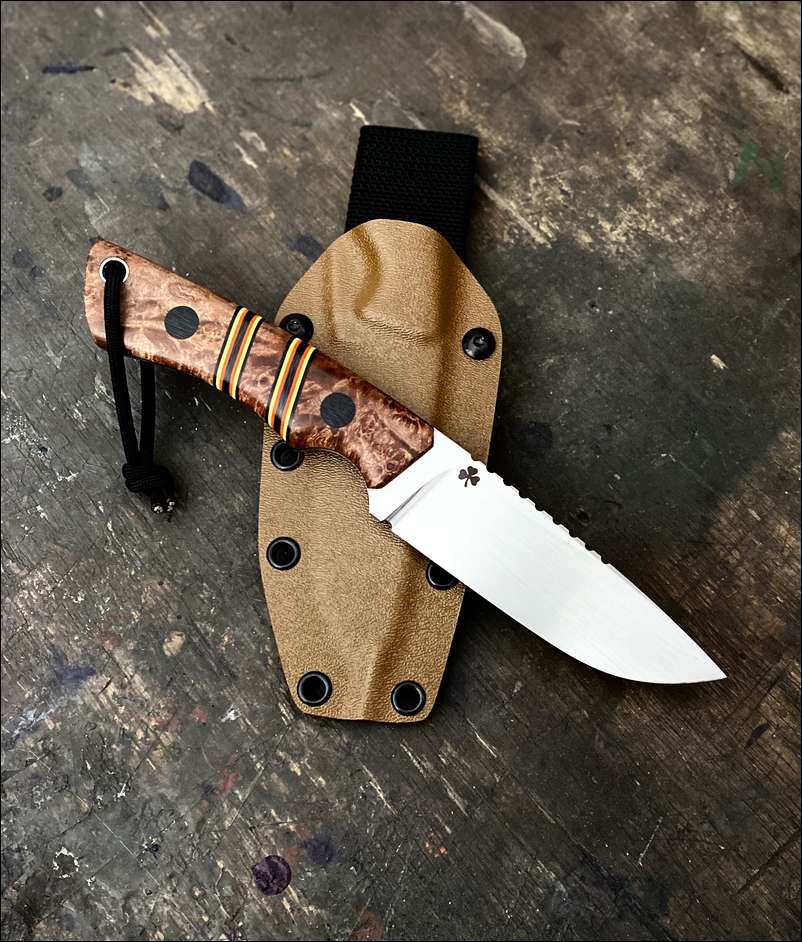
One of the other knives I made during this post.
Ambush, Thank you. That knife was claimed as I was making it on the thread. Zbone, the wood portion in the handle is stabilized buckeye Burl. Cat scratch… I don’t have pics of all the knives I made during this thread but I have a couple.
Wow, that's another beauty, I like the brown kevlar sheath too... Did you also form the sheath? Thanks again...
Zbone… yes sir I make the sheaths and belt loops. I will detail that process next.
Way cool sir, thank you...
Crazy good looking knives! Fun to see the amount of work and skill that goes into your build. Thanks for sharing! Kevin
So incredibly talented. Both knives are beautiful. Please share few more pics if you can find the pictures of others you have built.
Very nice! I would love to carry one of those as an EDC. Can you make the kydex sheath to carry vertical and horizontal?
I can make sheaths with vertical or horizontal carry.
Love the knife, but I think I would have left the colors off the handle , distracts from the beauty of the knife.
This has been awesome to follow! While sanding, the handle was very dull in color. Was the color there and the sanding dust just needed washed off and polished to bring the colors back to life?
Beautiful knife and your very talented. I've made one forged knife through a hands on class and know/appreciate the work involved, you make it look easy!
Thank you for a wonderful thread. Beautiful knives!
Fine craftsmanship is appreciated! I bet it cuts as good as it looks! Nice work.
Absolutely outstanding. Great thread/post and much appreciated.
Excellent craftsmanship. Beautiful knife... you sir, are an artist.
Thanks guys. Lbshooter, the knife I made along side the bowsite knife had colored stripes in the handle as they are company logo colors and this one was ordered as a gift to one of his employees… hence the bright colors. WV… the handle was “dull” looking during the process as needed to be sanded smooth by hand and buffed with a towel to bring out the luster. . Today I will post the process to make the sheath. Happy Monday.
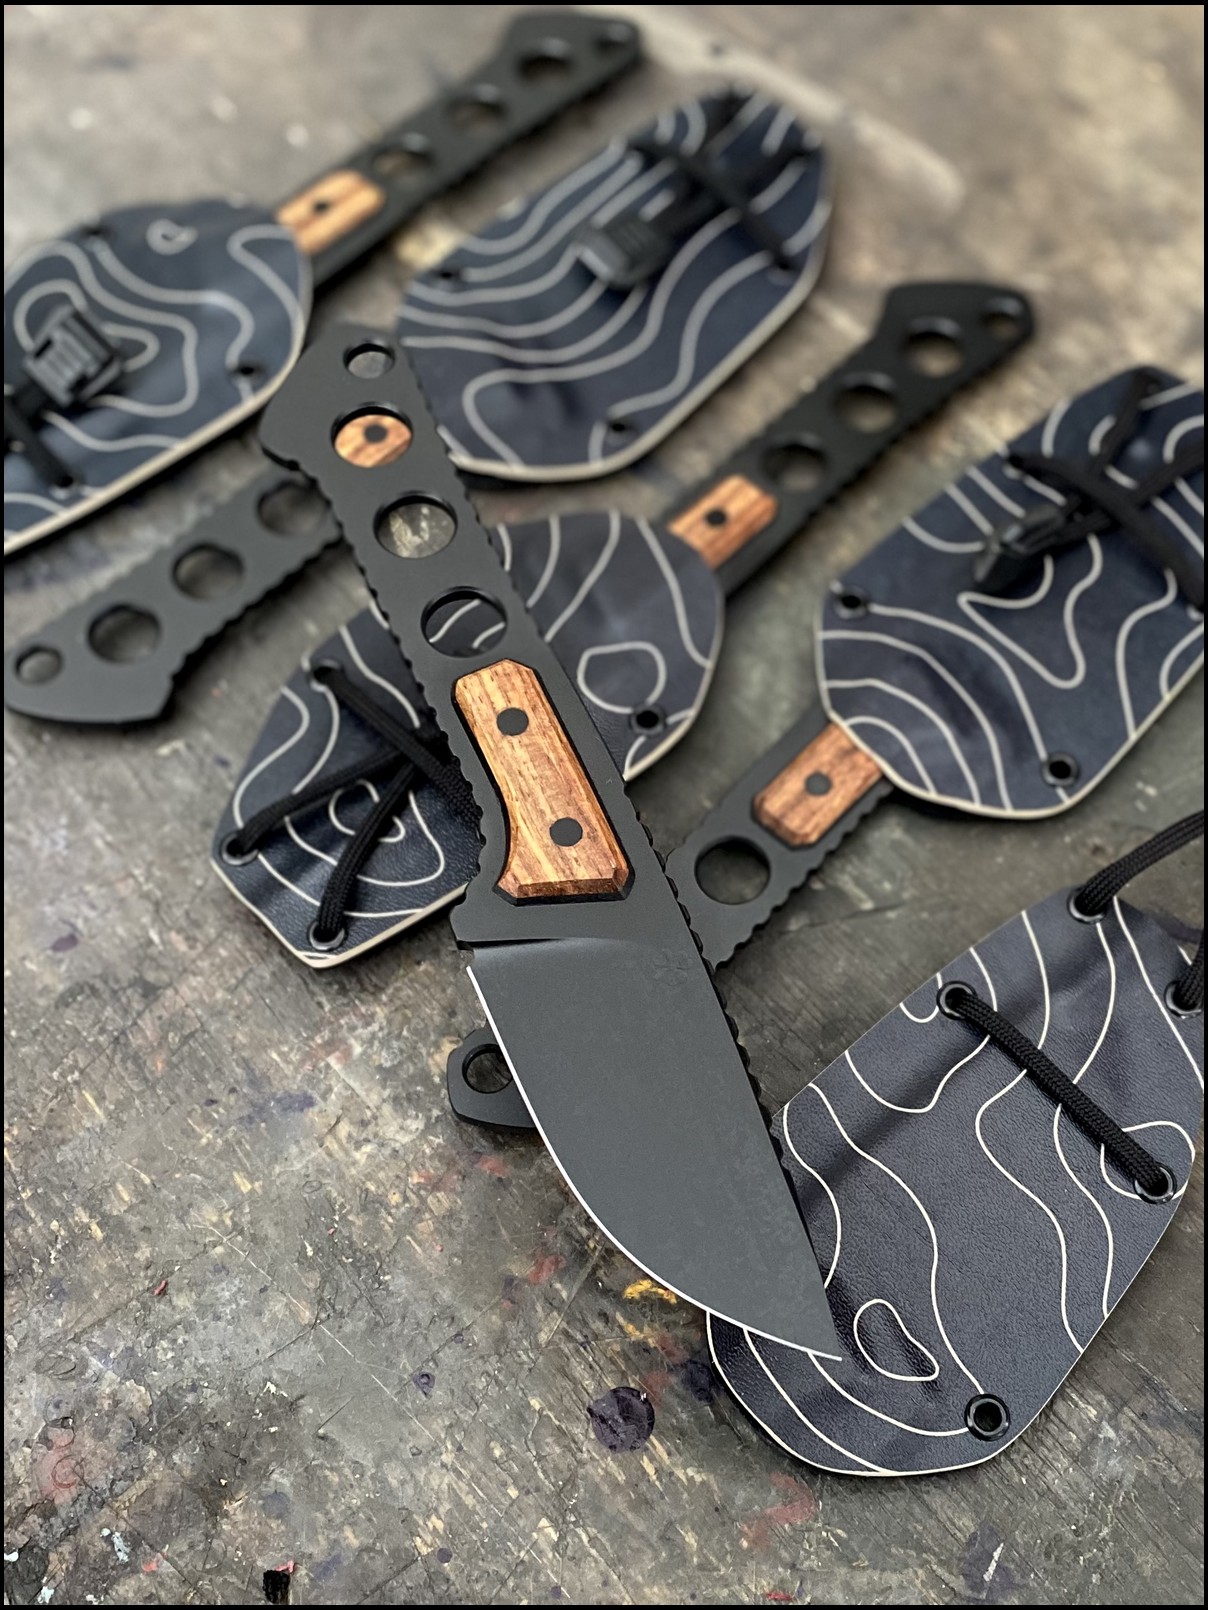
As the name implies, Niche Custom Blade Works, everything Rob makes is CUSTOM. Whether you want a monotone handle or a color scheme to match the fletching on your arrows, Rob can do it. Half the fun is just visiting with him about your ideas and then seeing what he comes up with.
Rob helped me design these three. I wanted them to essentially the same knife but each with a different handle color. All three also have thin blue line inserts between the scales and the tang. I gave one to my son and one to my son in law. Both are in law enforcement.
Amazing work! You definitely have a passion and have developed a great set of skills! Awesome thread! Thank you!
As a knife junky I had given thought years ago to make my own knives but am not very handy in general. What is your background for work? Have you always been a craftsman?
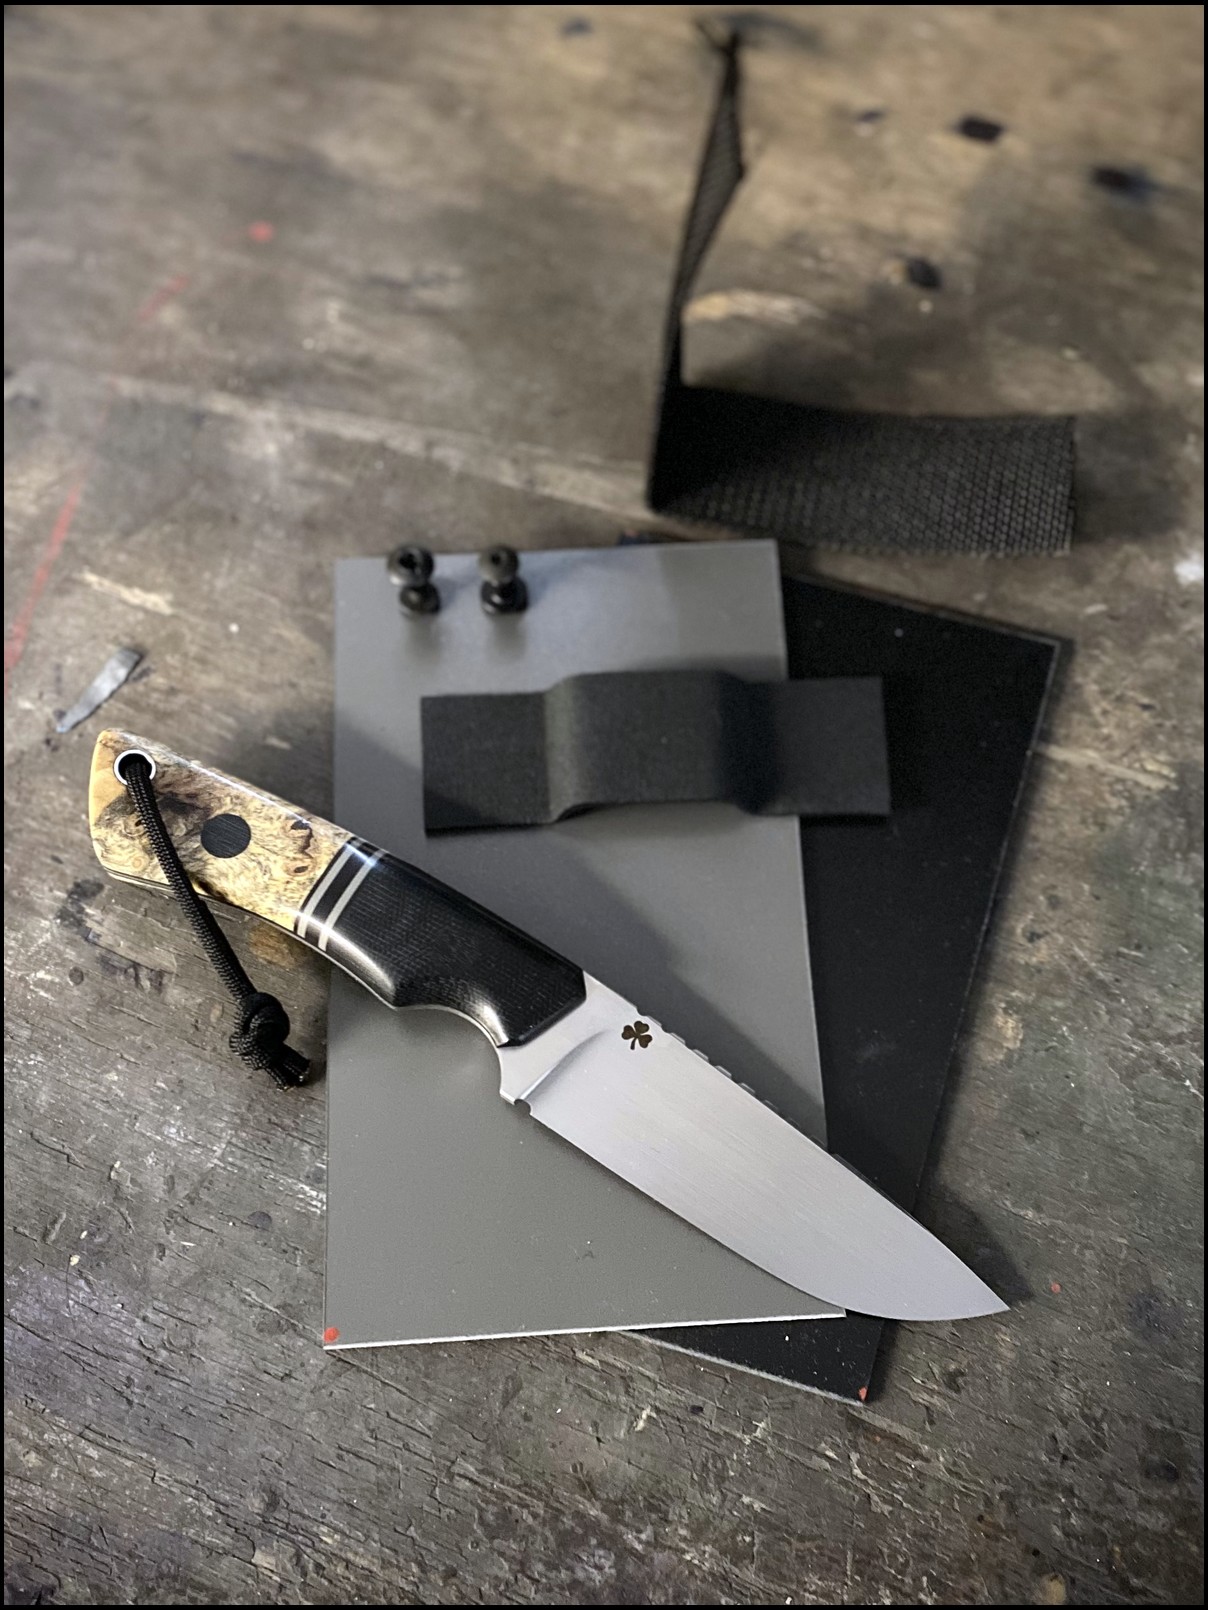
Ok… sheath time. Here are the materials.
Ok… sheath time. Here are the materials.
Tmac, thank you. I have always been “handy” and my grandfather and great grandfather were skilled wood workers. I myself could never get into the wood working as much but I really was drawn to metal fabrication when was a kid. I have always worked with my hands and such but never really took on a challenge like this before a few years ago as I wanted something better in my pack when I had work to do in the field.
Well there goes my dream lol….. You do beautiful work!
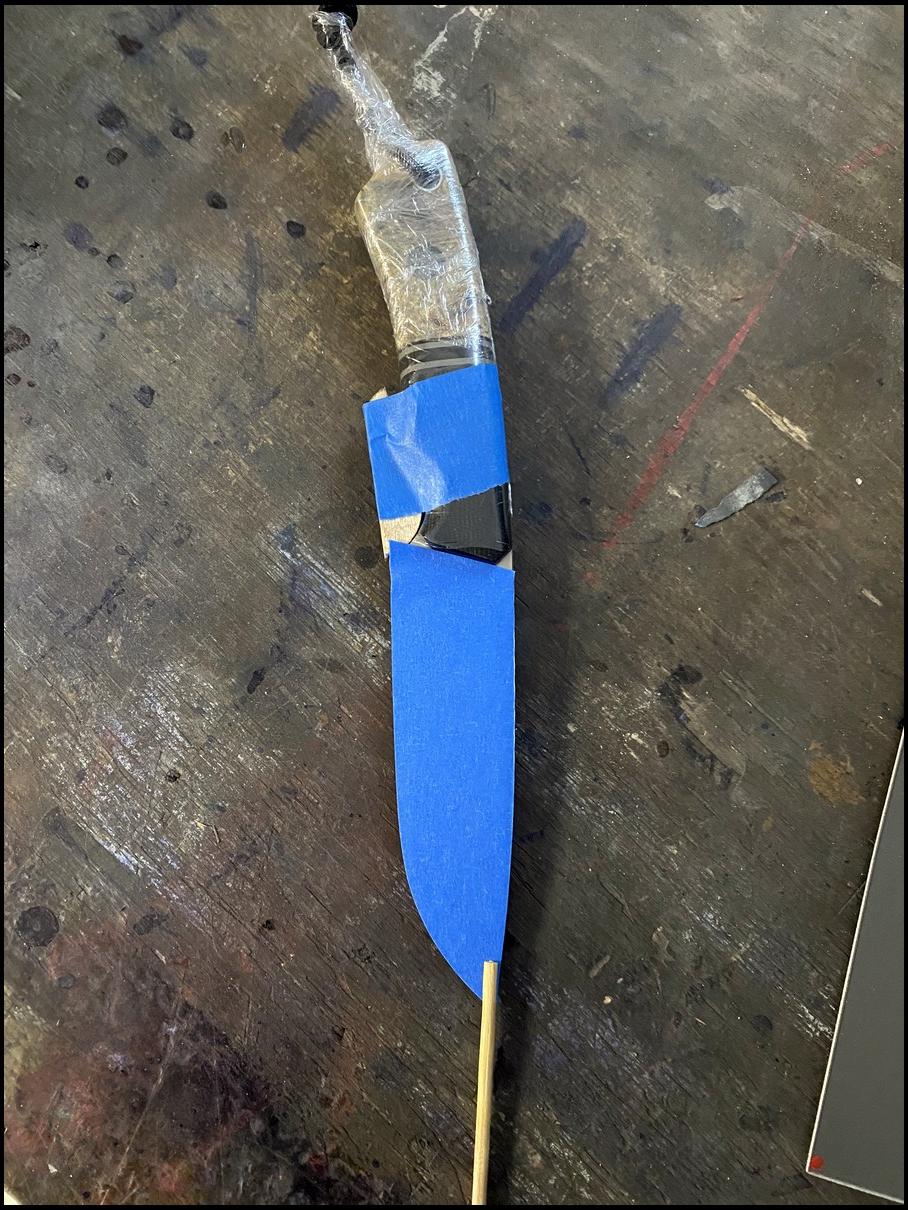
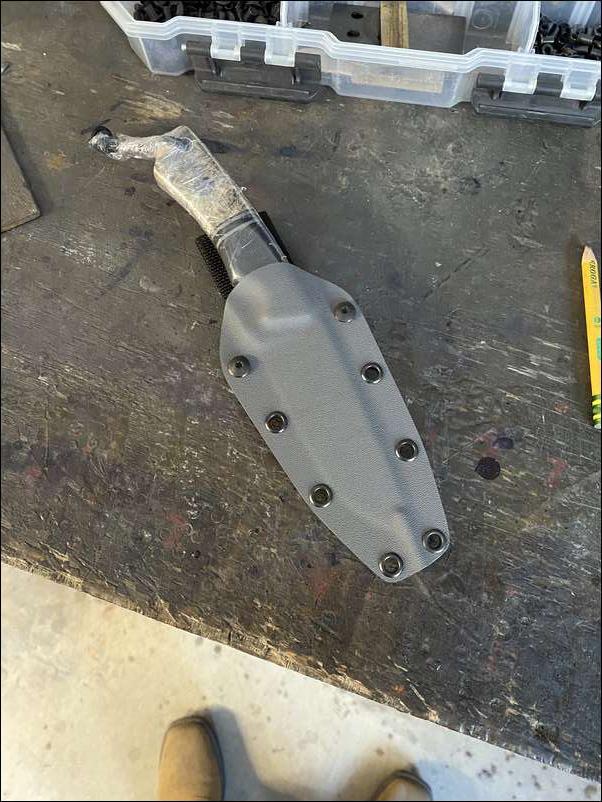
I tape up the knife to prep to mold the sheath

I tape up the knife to prep to mold the sheath
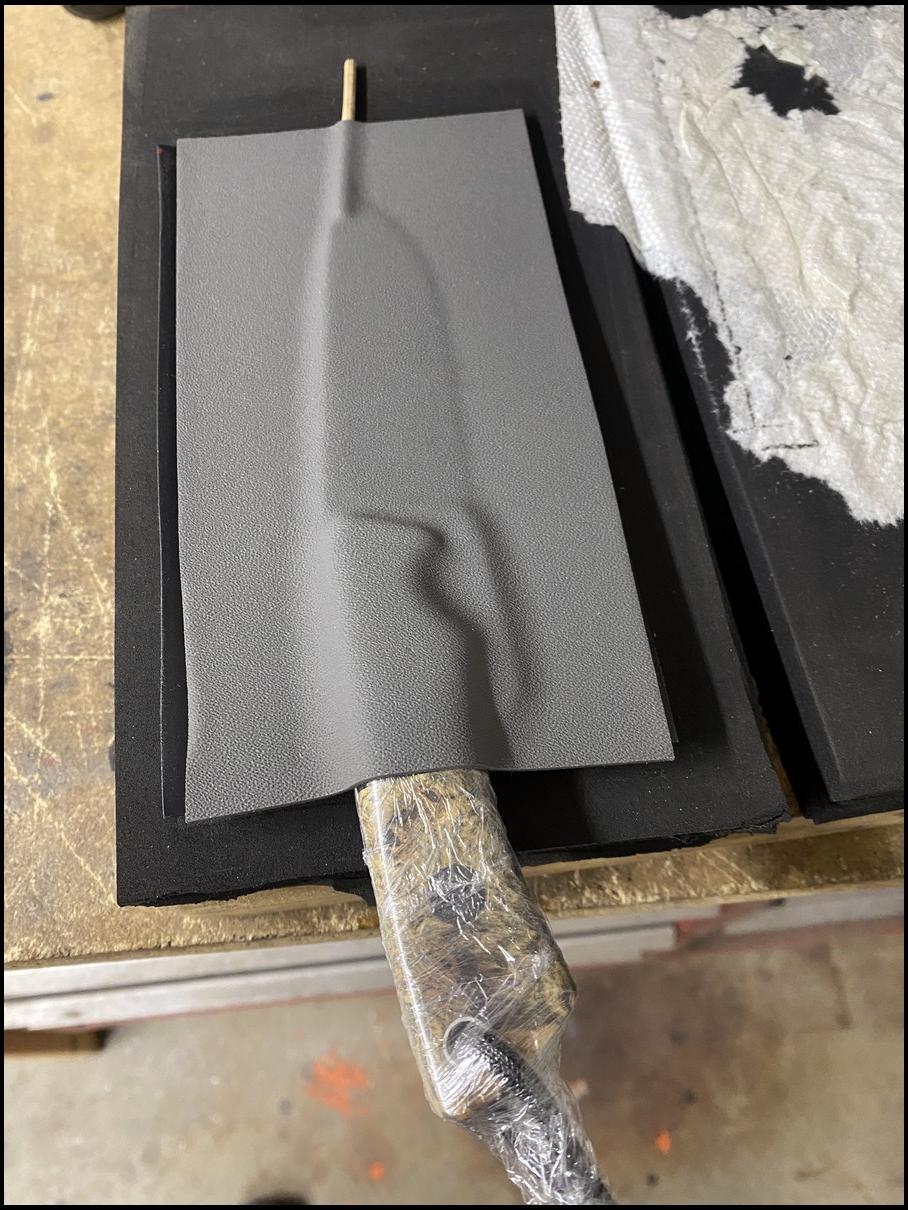
I heat the kydex and put in a press with the knife as a form
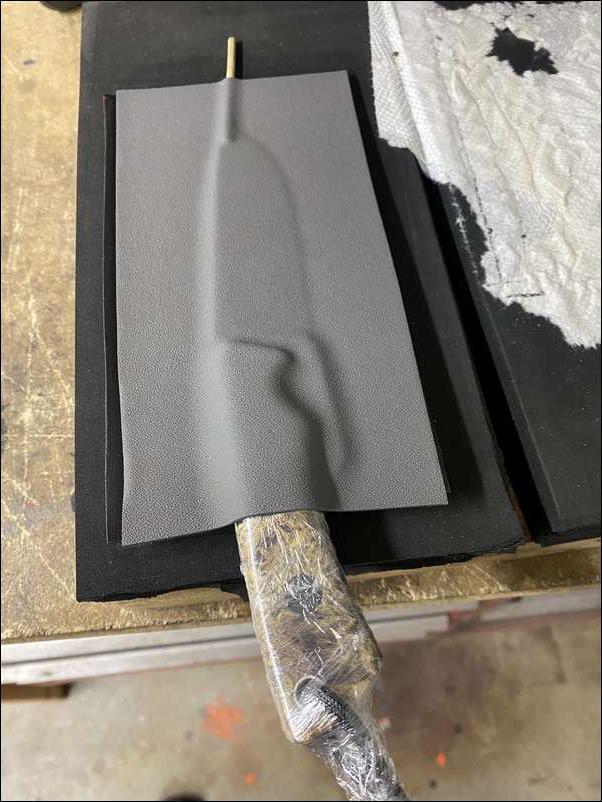
I heat the kydex and put in a press with the knife as a form
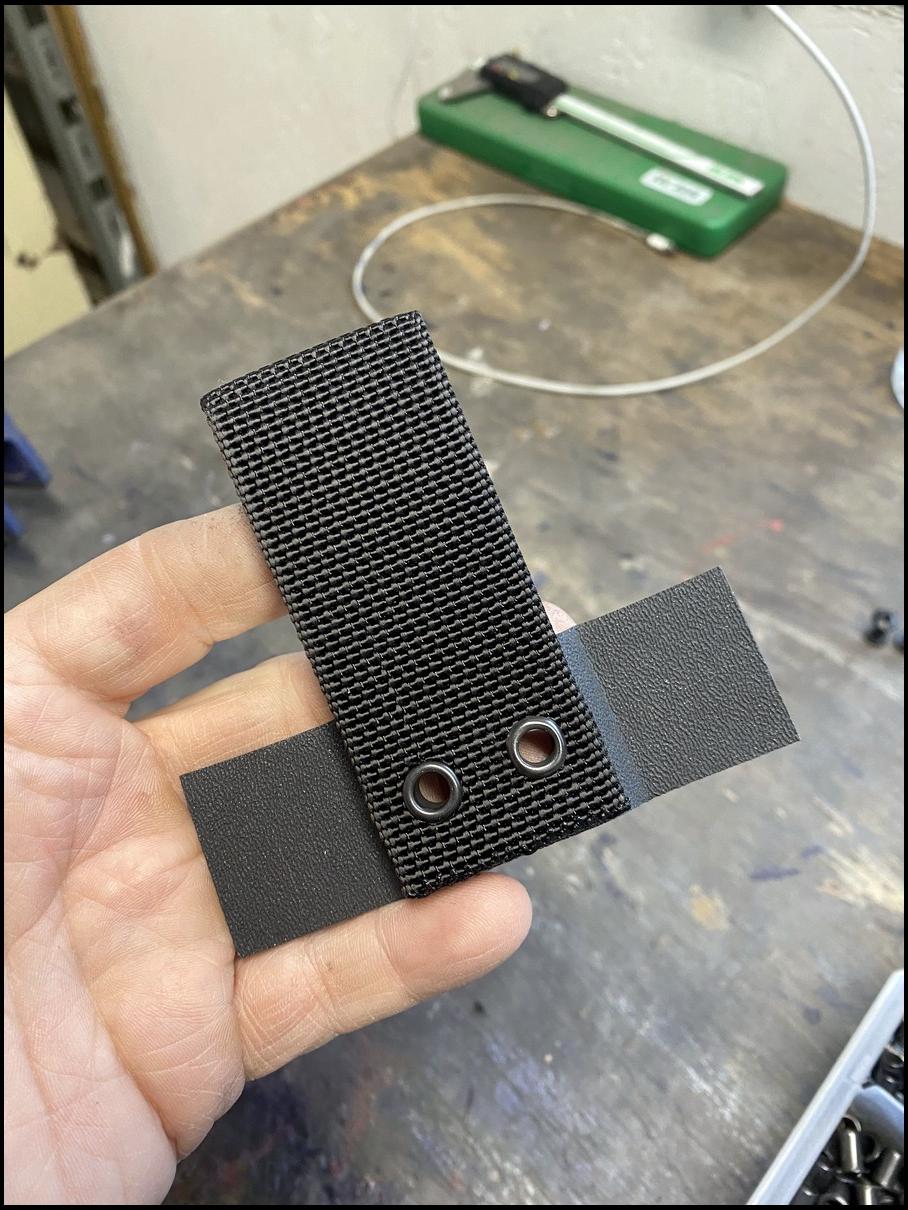
As that is cooling I make the belt loop
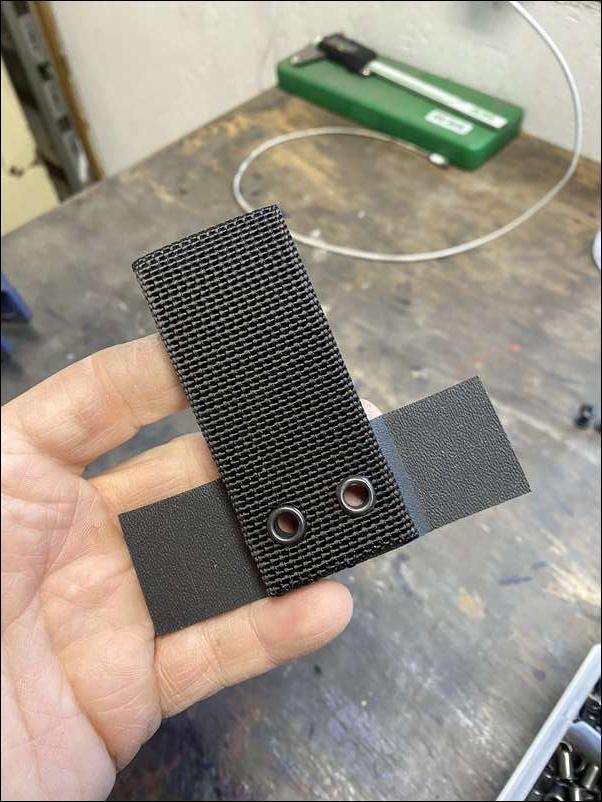
As that is cooling I make the belt loop
I then drill and install the rivets with a press
I then drill and install the rivets with a press
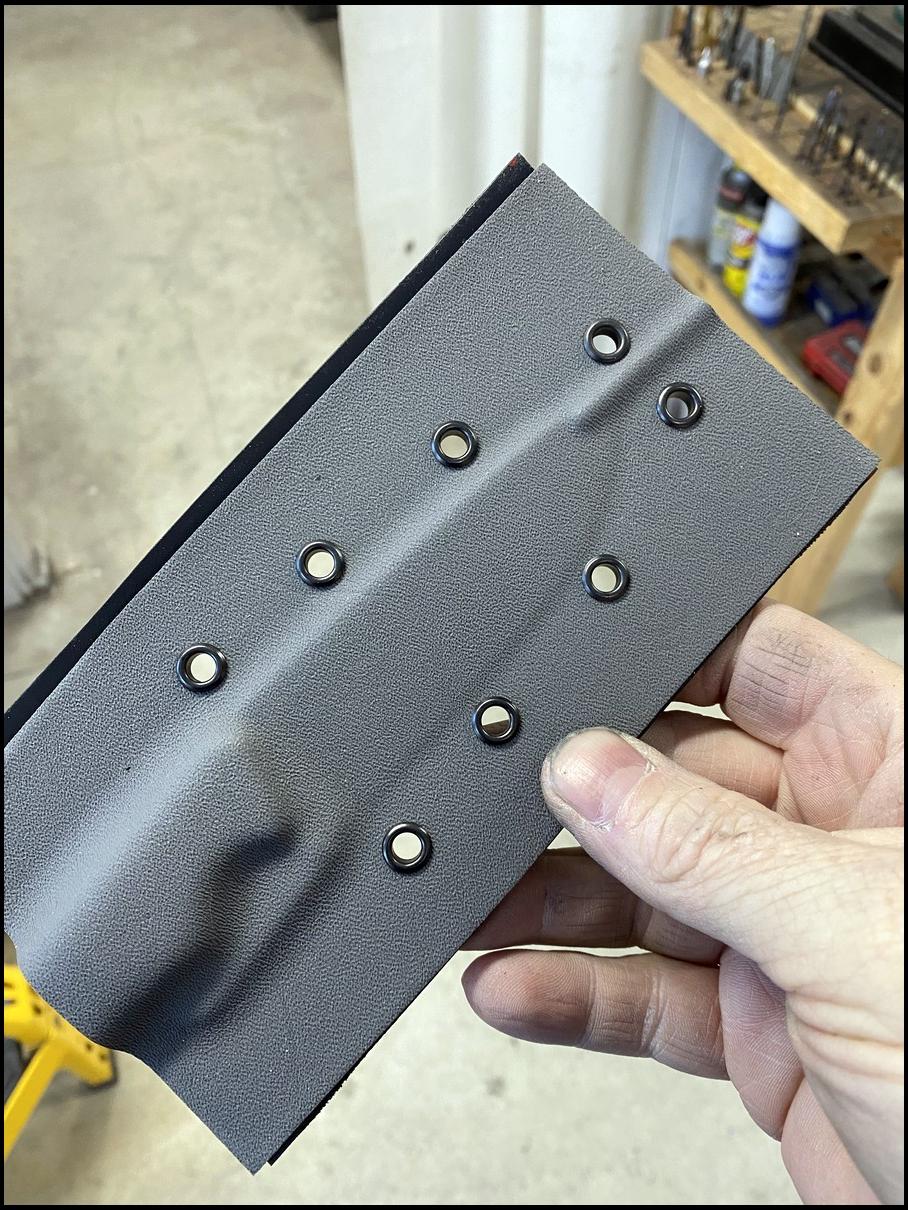
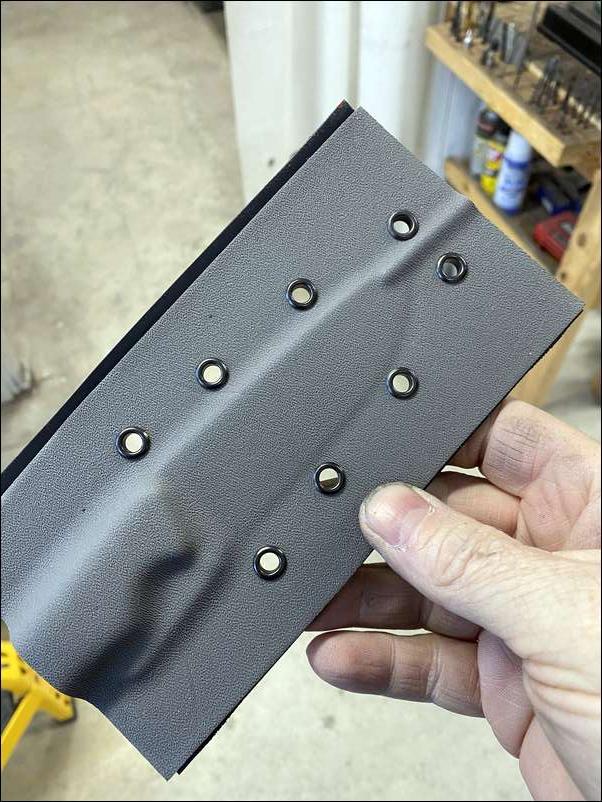
And shape on the grinder.
And shape on the grinder.
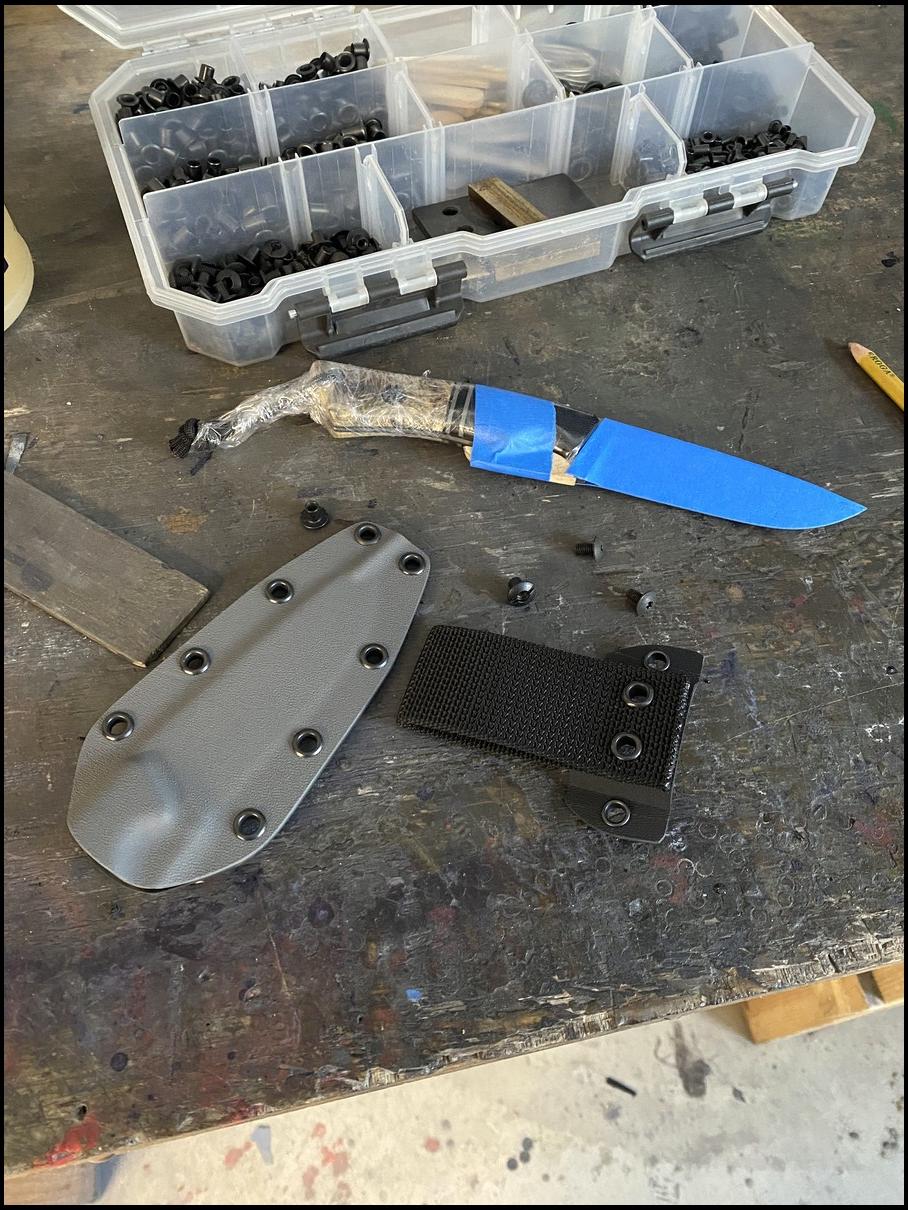
When is shaped and the edges are buffed it time to bolt on the belt loop at test fit
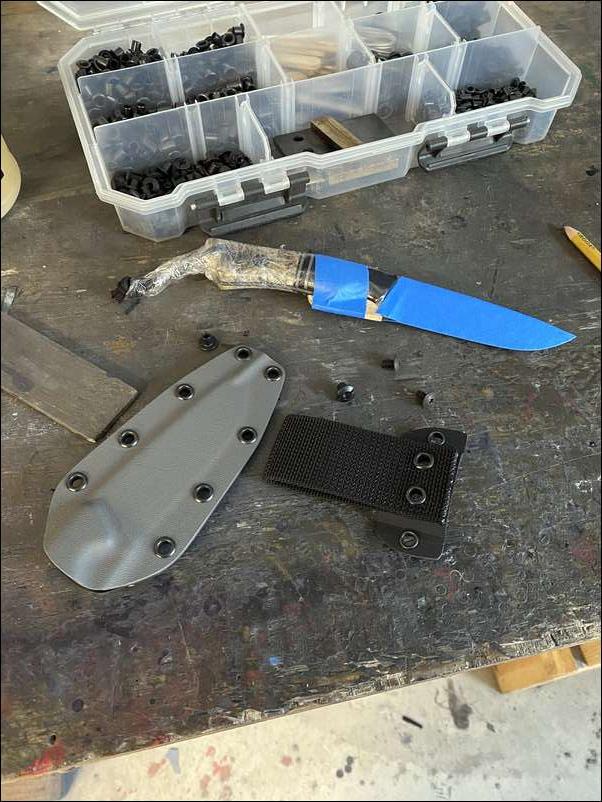
When is shaped and the edges are buffed it time to bolt on the belt loop at test fit
Bravo RJ. Beautiful knives. Thanks for sharing the process.

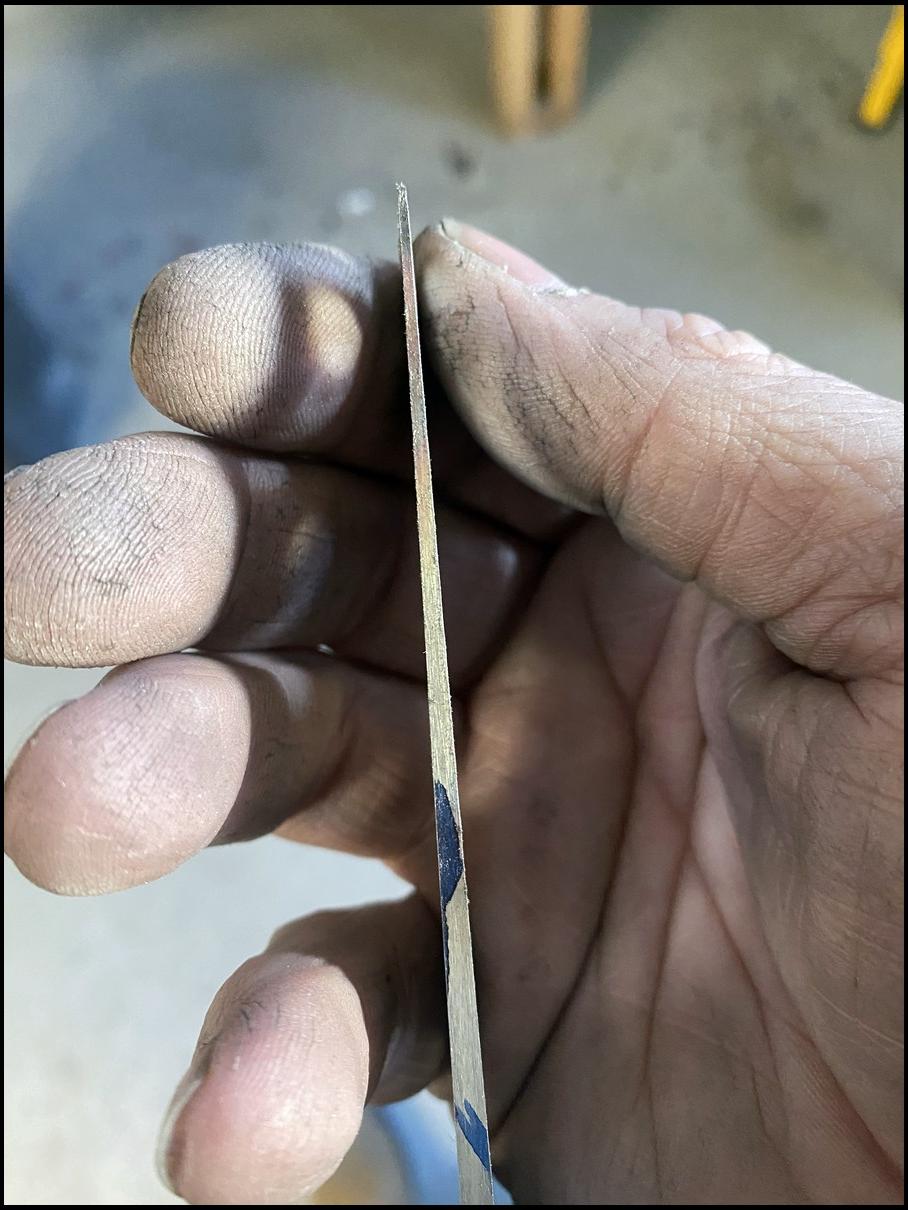
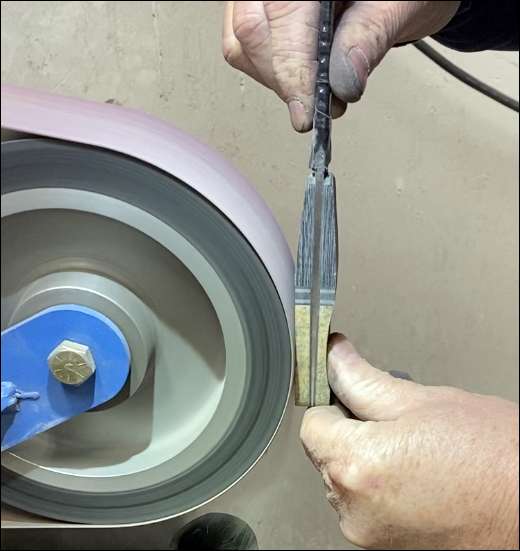
Now to sharpen. I start with coarse diamond stones and work my way to about an 800 grit in a gatco I have modified to do what I want.
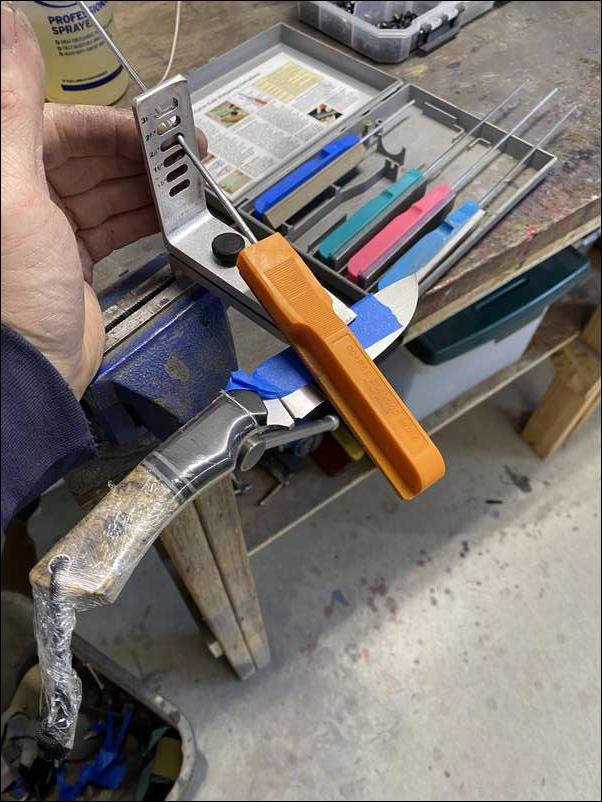
Now to sharpen. I start with coarse diamond stones and work my way to about an 800 grit in a gatco I have modified to do what I want.
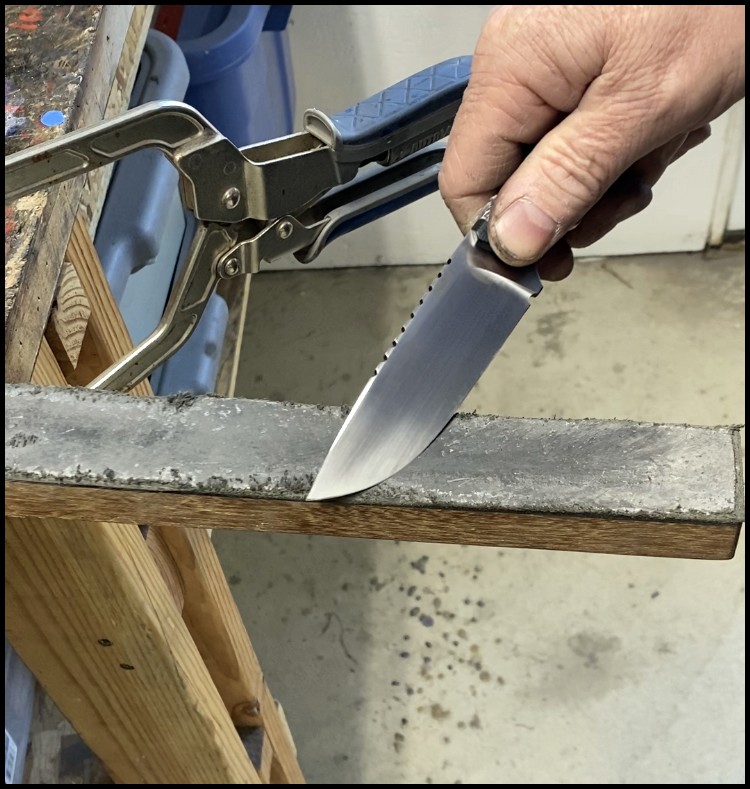
I then strop off the burr and make sure the edge is clean
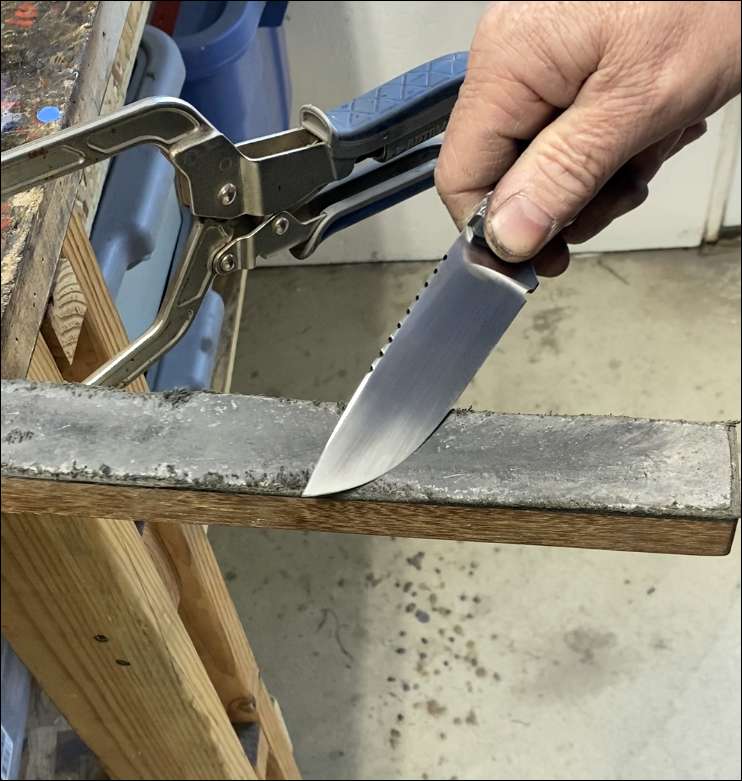
I then strop off the burr and make sure the edge is clean
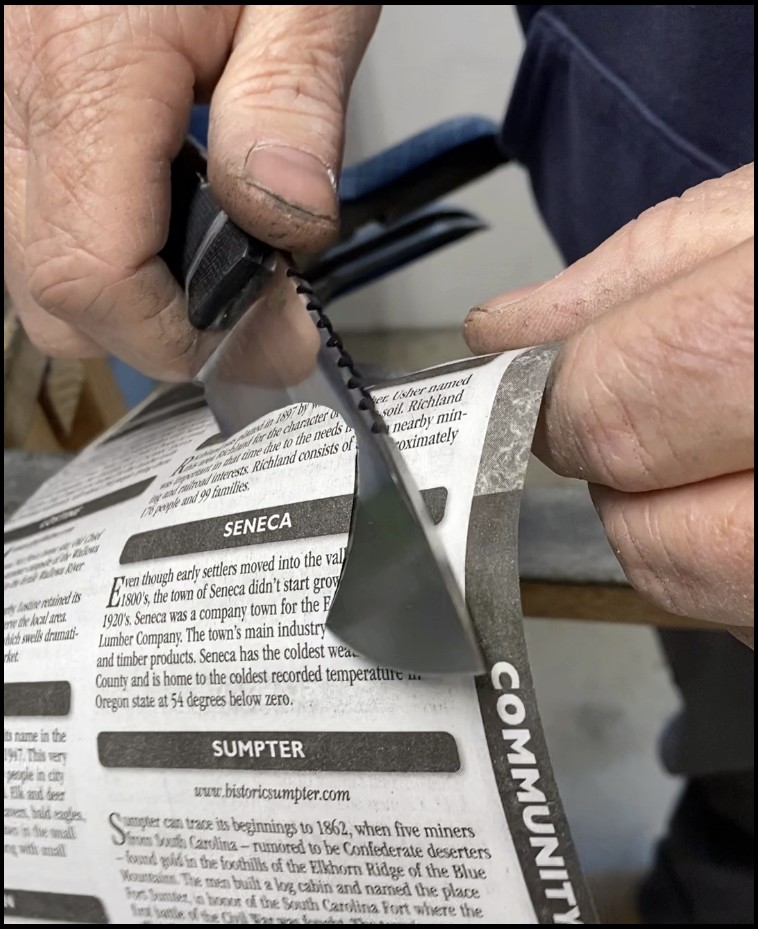
A check for me is to try to cut phone book paper from the side to make sure there is a keen edge that will grab a surface like phonebook paper. I also have a bald left arm for some reason. ;-)
A check for me is to try to cut phone book paper from the side to make sure there is a keen edge that will grab a surface like phonebook paper. I also have a bald left arm for some reason. ;-)
We now have a knife ready for a hunt. I thank all you guys for following along and a thank you to bowsite for giving me the platform to do share what I do.
VERY nice work Somebody is going to be very pleased with that
Robert, do you do a straight V-edge? And is that 22 degrees that I'm seeing on your jig?
Matt
Grey Ghost. Yes and I have bent the rods so is right at 20dps. And thank you RK
Thanks again for sharing your talent with us!
That knife is a thing of beauty and will no doubt be a great workhorse in the field. Thanks again for taking us through your process!
RJ, this was a great thread, I enjoyed it immensely ! You do great work and I appreciate you sharing it with us. I really like the scales on the “other” knife you were making at the same time.
BRAVO... beautiful work!!!!!!!!!!!!!!!!!!!!!!!!!!!!!!!
Thanks brothers. Appreciate it. Also let me know if you have any questions. I will keep up on the thread and answer any you may have. Thank you
Incredible craftsmanship! I am jealous of your skills. Thanks for documenting from start to finish.
Extremely fun following along on this thread, RJ! Always interesting to see how the sausage is made, so to speak. I have a question about how you get the fit right on the sheath. Do you have to put a specific amount of tape/etc. on the knife and handle so the fit is snug, but not too tight?
T-roy eyes there is I apply three layers of tape to the blade on each side for clearance but not on the handle. I have a wooden spacer on the handle for the finger choil.
how do people get these knives?
That’s both, a beautiful piece of art and a very useful tool.
Time for a second thread! What will you be building us next?
I'm not sure if you're into trading, but I've got a left nu . . . . . aah never mind : (
WOW! Very cool!! You have amazing talent!!
Since Rob is too modest to post, I will.
He made these for me while doing the knife build for Bowsite.
The first one is made to match one he already made for me.
The second is for my wifes birthday. She said she needed a new “apple slicer” for her purse, so now she will have one.
Anyone wanting or “not needing” another item such as this just needs to get creative on how to describe said item;)
Thanks Matt. I appreciate that.
All of the knives on this thread and your Instagram page are amazing. Thanks for sharing the process and your craftsmanship. I see one of Matt's has a darker blade. Is it a different steel or heat treated differently? Care to share the pros and cons of both those materials?
Fast flight, Matt’s has a darker look as that one is Cerakoted in mil green. Wild1, that knife is Elmax hardened to 62.2 hrc. Most my knives are done in that steel and in 20cv as well
Just amazing!
Thank you for taking us through the process!
Rob, well that was indeed a special treat watching the process and the talent that goes into making a useful and beautiful knife. Nicely done. My best, Paul
Thanks guys. Was fun to put together.
RJ, ???????? incredible work
Q, where do you purchase your drill bits?
Beendare, thank you. On the bits When I lived in a metro area I would purchase them from a local supply house. Now I have moved rural I have been forced to order in and mostly go though McMaster as they are mostly letter sized bits. For example if my pins are .250 I don’t drill a .250” hole for the pin as I need a few thousands for epoxy and fit up if that makes any sense. Anymore I don’t buy too many as I purchased a tool to sharpen the smaller ones and have been very happy with sharpening them as I need.
Beautiful knives RJ. I was wondering where you buy the steel from? I have access to most of the standard tool steels O1, A2, D2, S7, CMPM4, but I haven't seen the steels you use from the suppliers I work with.
Helgermite, I buy much of my steel from New Jersey Steel. The Elmax steel is difficult to come by and normally needs to be purchased in sheet quantity direct from Bohler.
Great thread. These are amazing knives. I absolutely love all of mine.
I thought at first this was my friend RJ Martin the famous knife maker.
BTW I really enjoyed the post. Great job!!
A plug for another knife maker at the end of RJHunt’s knife build thread??
Just me, or was that a douche move??
WhattheFOC x 2!
Classless move Steve.
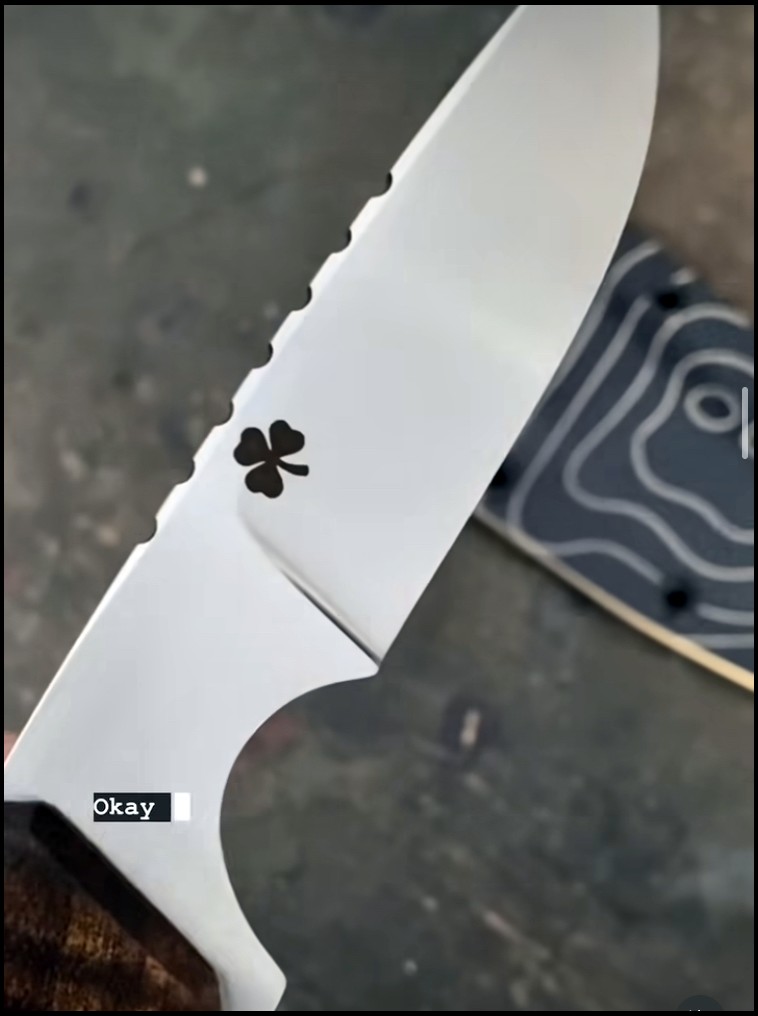
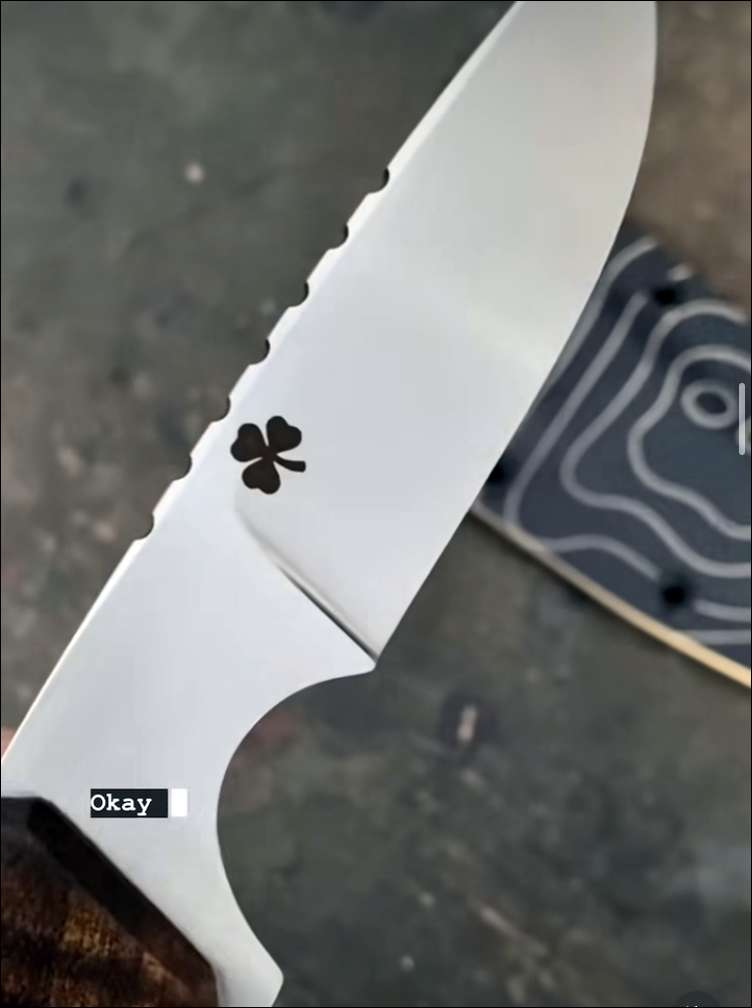
Scoot, I put my shamrock on the right side of the knife and the serial number on the left. My thought is most are right handed and my mark gets seen when being used as is most often facing out. Just my 0.02
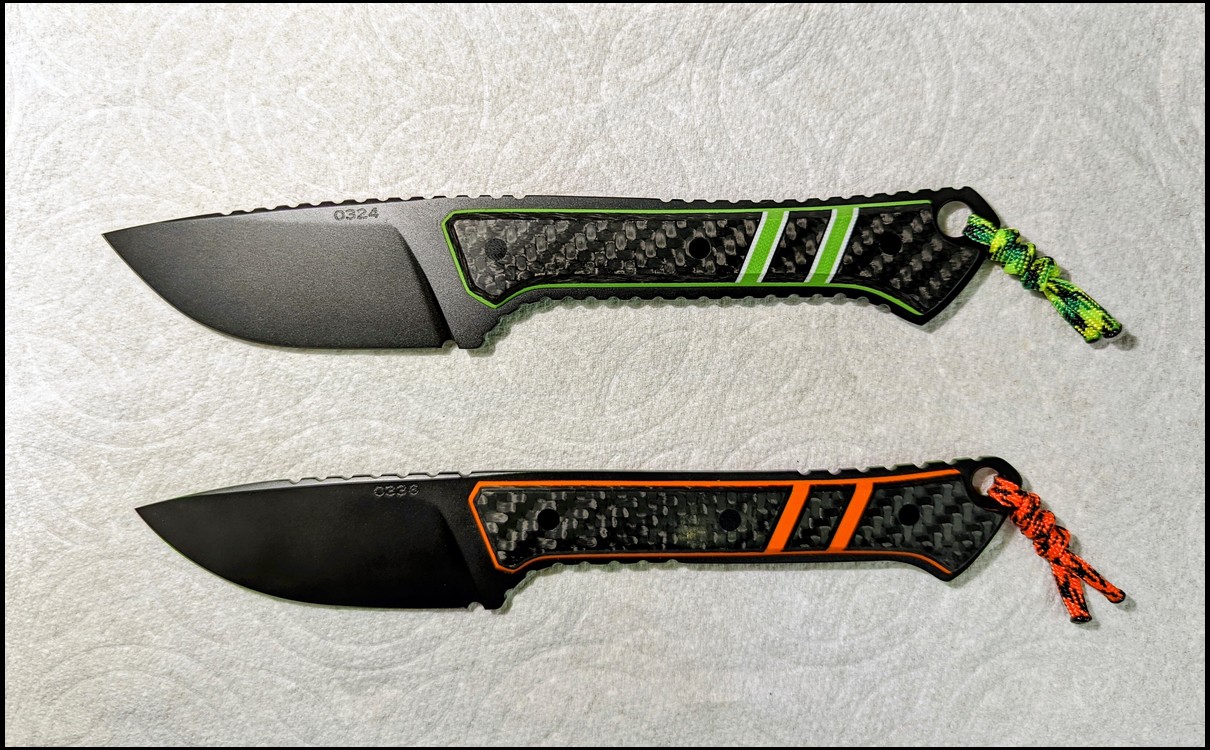
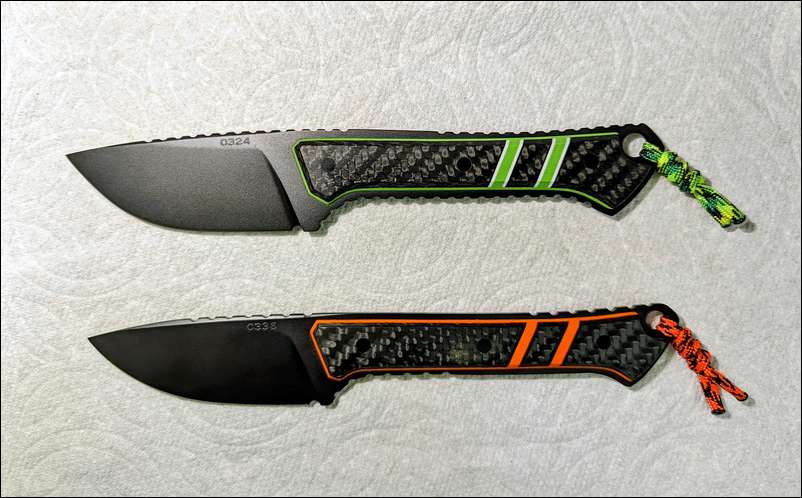
I need to hear some specifics about Pinwheels set.! Talk about 2 sexy knives!!
Matt
GG. Those are my two most popular knives. Both are 3” blades with a 5” handle for control. The bottom one is called my alpine and is approx 2.9oz and the top one is called my back country knife and is just a tad heavier. Both are in CPM20cv and work well on game
I know my limitations, so no urges to become a crafter of knives, but really enjoyed following along to see how "stuff" is done. Thank you for taking the time to entertain and inform us. My skill level hopefully ends with a sharp knife!
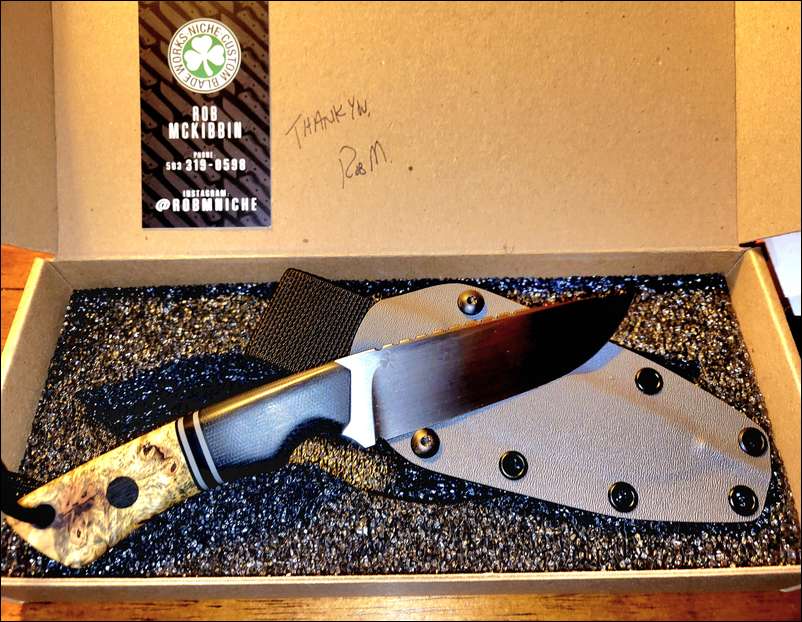
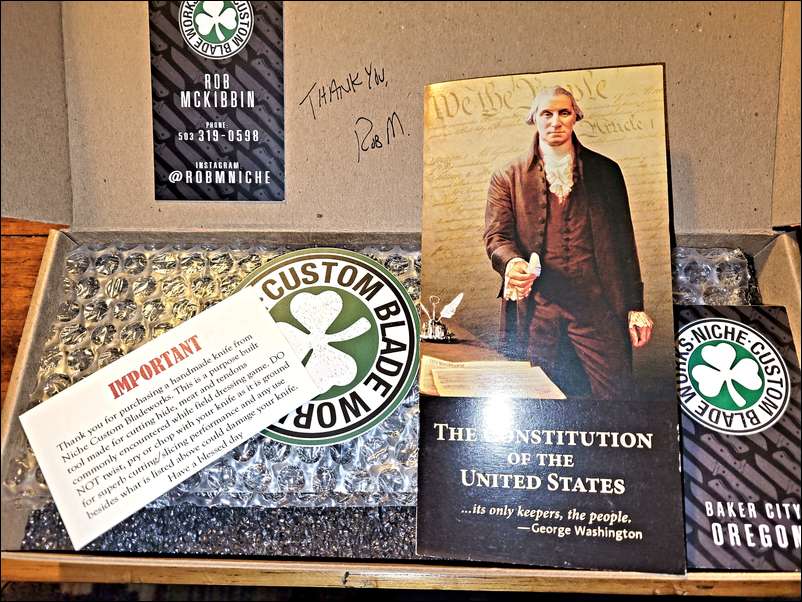
Its a real piece of work, thanks Rob! Who else sends a copy of the US Constitution with their product?
Thanks Kyle. Glad you are happy with it.
Grey Ghost: Here is another version on the knives above. This I call my back country.
How do I get one of your knives? Great work!